Note: 1Password SaaS Manager was previously named Trelica. Some commands and integrations still use or refer to Trelica. Follow directions as written to avoid errors.
Overview
The Authorization Code Flow is a more complex scheme to implement than Client Credentials but is better suited to letting a web application connect to 1Password SaaS Manager, whilst letting end-users control what access that application is given to SaaS Manager data.
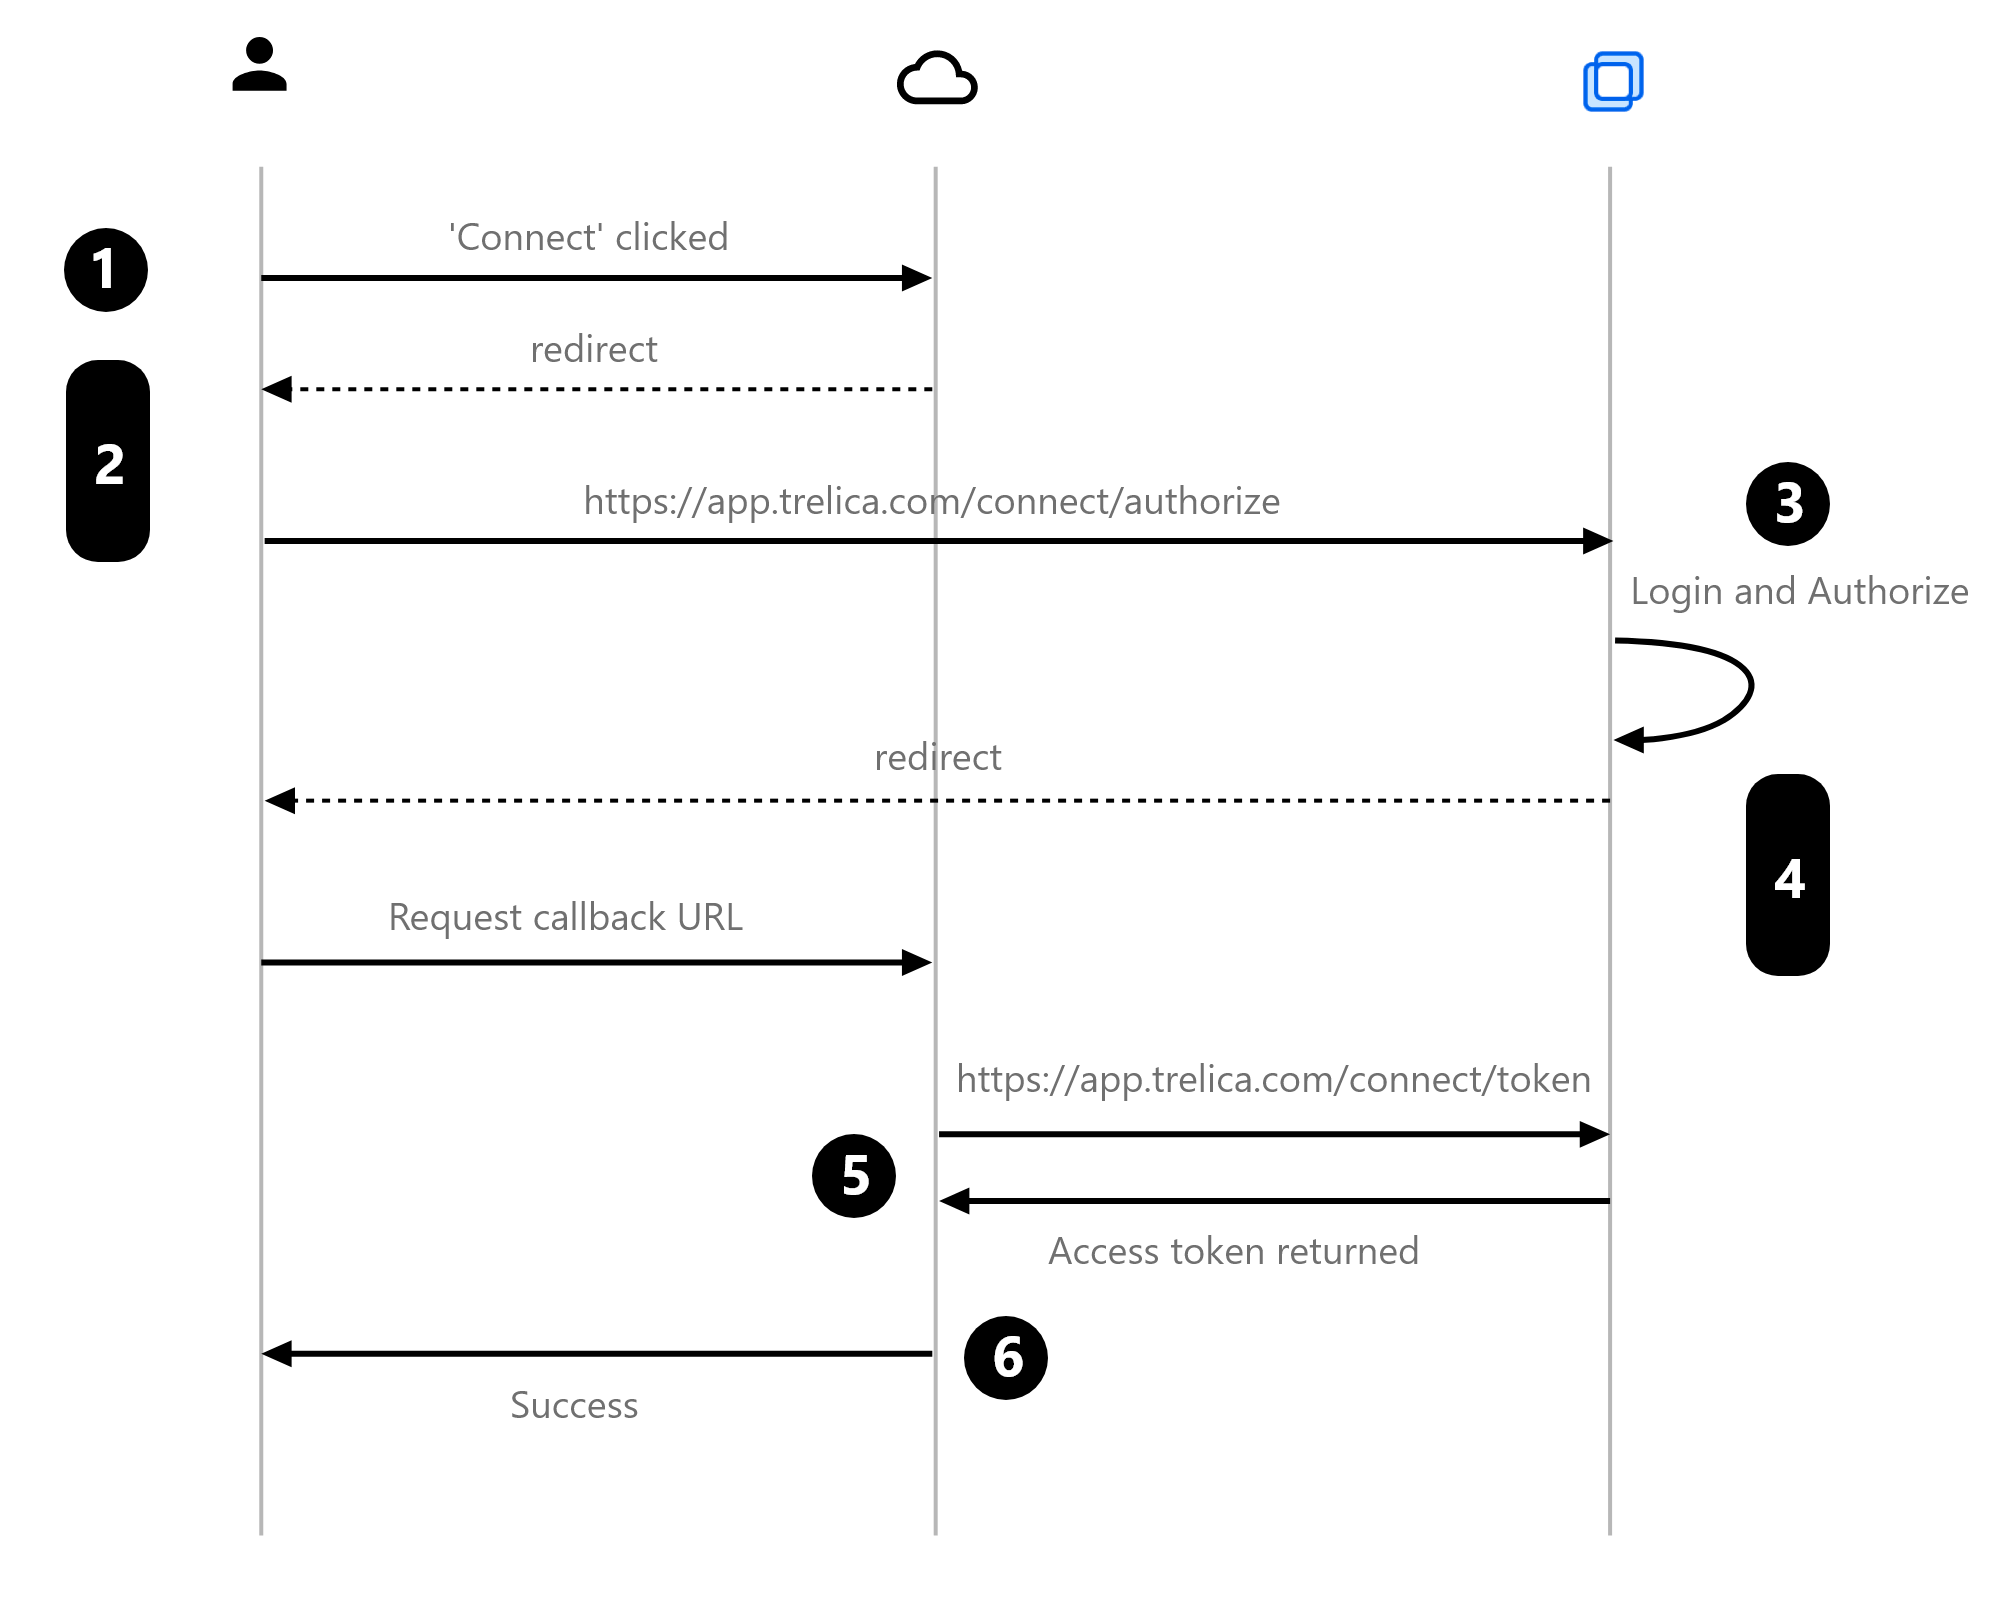
The basic steps are as follows:
- Select Connect to SaaS Manager in your web application.
- Your web application redirects your browser to the SaaS Manager
/connect/authorizeURL. - Log in to SaaS Manager. An access request pop-up will display for the application requesting access to SaaS Manager, and the sort of SaaS Manager data your application wants access to.
- SaaS Manager will redirect the browser back to a page in your web application, and append an authorization code (if access was granted).
- Your web application will swap this authorization code for a SaaS Manager access token.
- Your web application will then communicate that the connection was successful.
 Step 3 may be transparent if you're already logged in to SaaS Manager in the current browser session, and if they have already granted access to your application.
Authentication
Two SaaS Manager end-points are needed to support OAuth2 Authorization Code Flow. These are described below.
If you are implementing OAuth2, we strongly recommend using an existing library. The library you choose will depend on your application.
To help you get started experimenting with the Authorization Code Flow, we've included an example below using Postman.
Request authorization to access SaaS Manager resources
Shows the SaaS Manager authorization page, asking for the user to consent to SaaS Manager sharing information with your web application.
| Body | ||
prompt |
string |
|
state |
string | An opaque value used by your web application to maintain state between the request and callback. This value is included by SaaS Manager when redirecting the browser back to your web application. This parameter also prevents cross-site request forgery. |
redirect_uri *
|
string | The URL to redirect to. This must match a URL defined in the SaaS Manager app. |
client_id *
|
string | The SaaS Manager app Client ID |
scope * |
string | The OAuth scopes for the data you want to access. The string is case-sensitive. Multiple scopes must be separated by a space character. |
response_type |
string | code |
Responses
-
HTTP 302
Redirects the browser to the callback URL you specified, passing the OAuth authorization code and the state (if passed in your request).
Location: https://client.example.com/your-callback-url?code=<CODE>&state=<STATE>
Access Token Request
Exchanges the code received from the authorization request for an access token.
| Header | ||
Authorization *
|
string | As per the HTTP Basic Authentication Scheme, i.e. Client ID and Client Secret concatenated with a colon, Base64 encoded, and prepended with the string "Basic ". |
| Body | ||
refresh_token |
string | The previously issued refresh token. Required if the grant_type is refresh_token
|
client_id |
string | The SaaS Manager app Client ID. Required if the grant_type is authorization_code
|
redirect_uri |
string | Required if the redirect_uri parameter was included in the authorization request. The value must be identical. Required if the grant_type is authorization_code
|
code |
string | The authorization code received from SaaS Manager. Required if the grant_type is authorization_code
|
grant_type *
|
string |
authorization_code or refresh_token
|
Responses
-
HTTP 200
JSON containing the access token.
{
    "access_token": "<TOKEN>",
    "expires_in": 3600,
    "token_type": "Bearer",
    "scope": "Users.Read offline_access",
    "refresh_token": "<REFRESH TOKEN>"
}
When requesting an Access Token, you must pass the Client ID and Client Secret in the Authorization header using the standard HTTP Basic Authentication Scheme.
Access tokens expire by default after 60 minutes. If you want to keep accessing data (e.g. from a background task in your application) then you should also request the offline_access scope. This will issue a refresh token which you can then use to get a new access token.
Refresh tokens
SaaS Manager issues refresh tokens with a 15 day sliding window. That means that if you don't use the token within 15 days it will expire forever. If you do use it within 15 days though, the token will be expired immediately and you will be issued with a new token, again valid for 15 days.
Refresh tokens are granted by posting to the /connect/token endpoint with:
| Key | Value |
|---|---|
| grant_type | refresh_token |
| refresh_token | The refresh token issued when you obtained the access token (using the offline_access scope) |
Don't forget that all requests to /connect/token need the Client id and Client Secret passed in the Authorization header using Basic Authentication.
Example
For this example we are going to use the popular Postman application as it handles opening the web browser and granting access.
Create an API App in SaaS Manager
Create a new API app in SaaS Manager and give it a name. Choose Authorization code, make sure the Read users scope is checked, and enter the following Redirect URL:https://oauth.pstmn.io/v1/callback
Copy the Client ID and Client Secret to a text editor like notepad as you'll need them shortly, then Save the new API app.
Create a new request in Postman
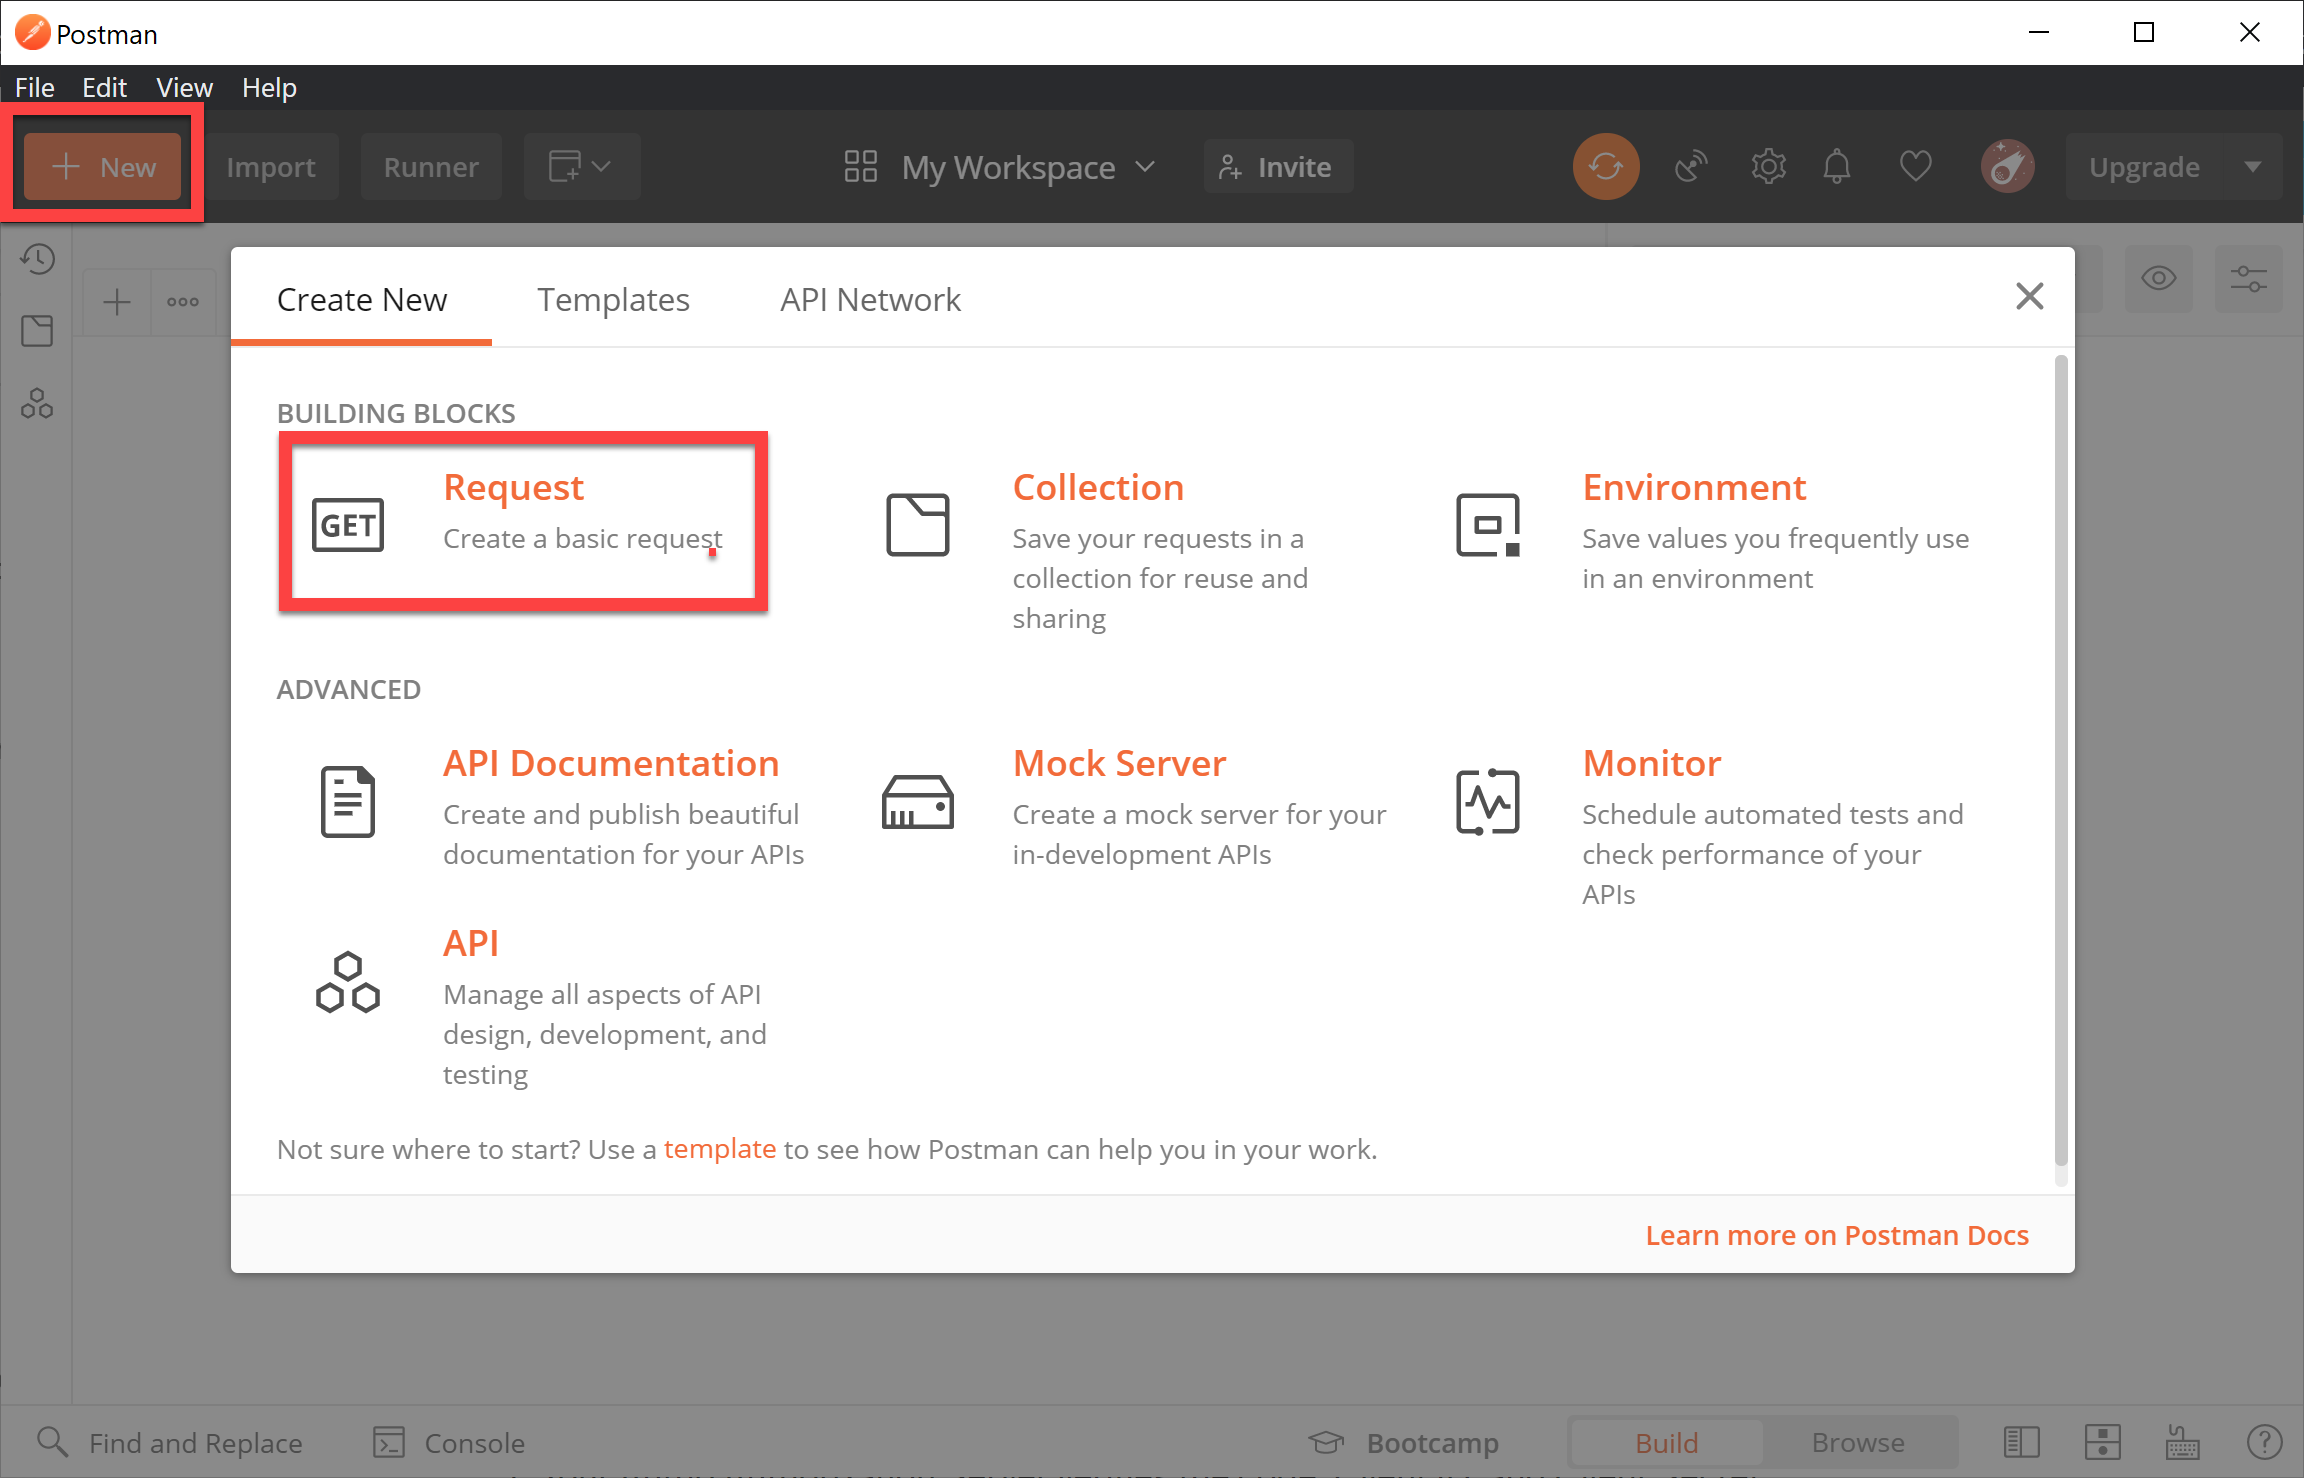
Load Postman, click New and then choose Request:
Create a new request called Get users (or whatever name you want).
Configure Postman variables
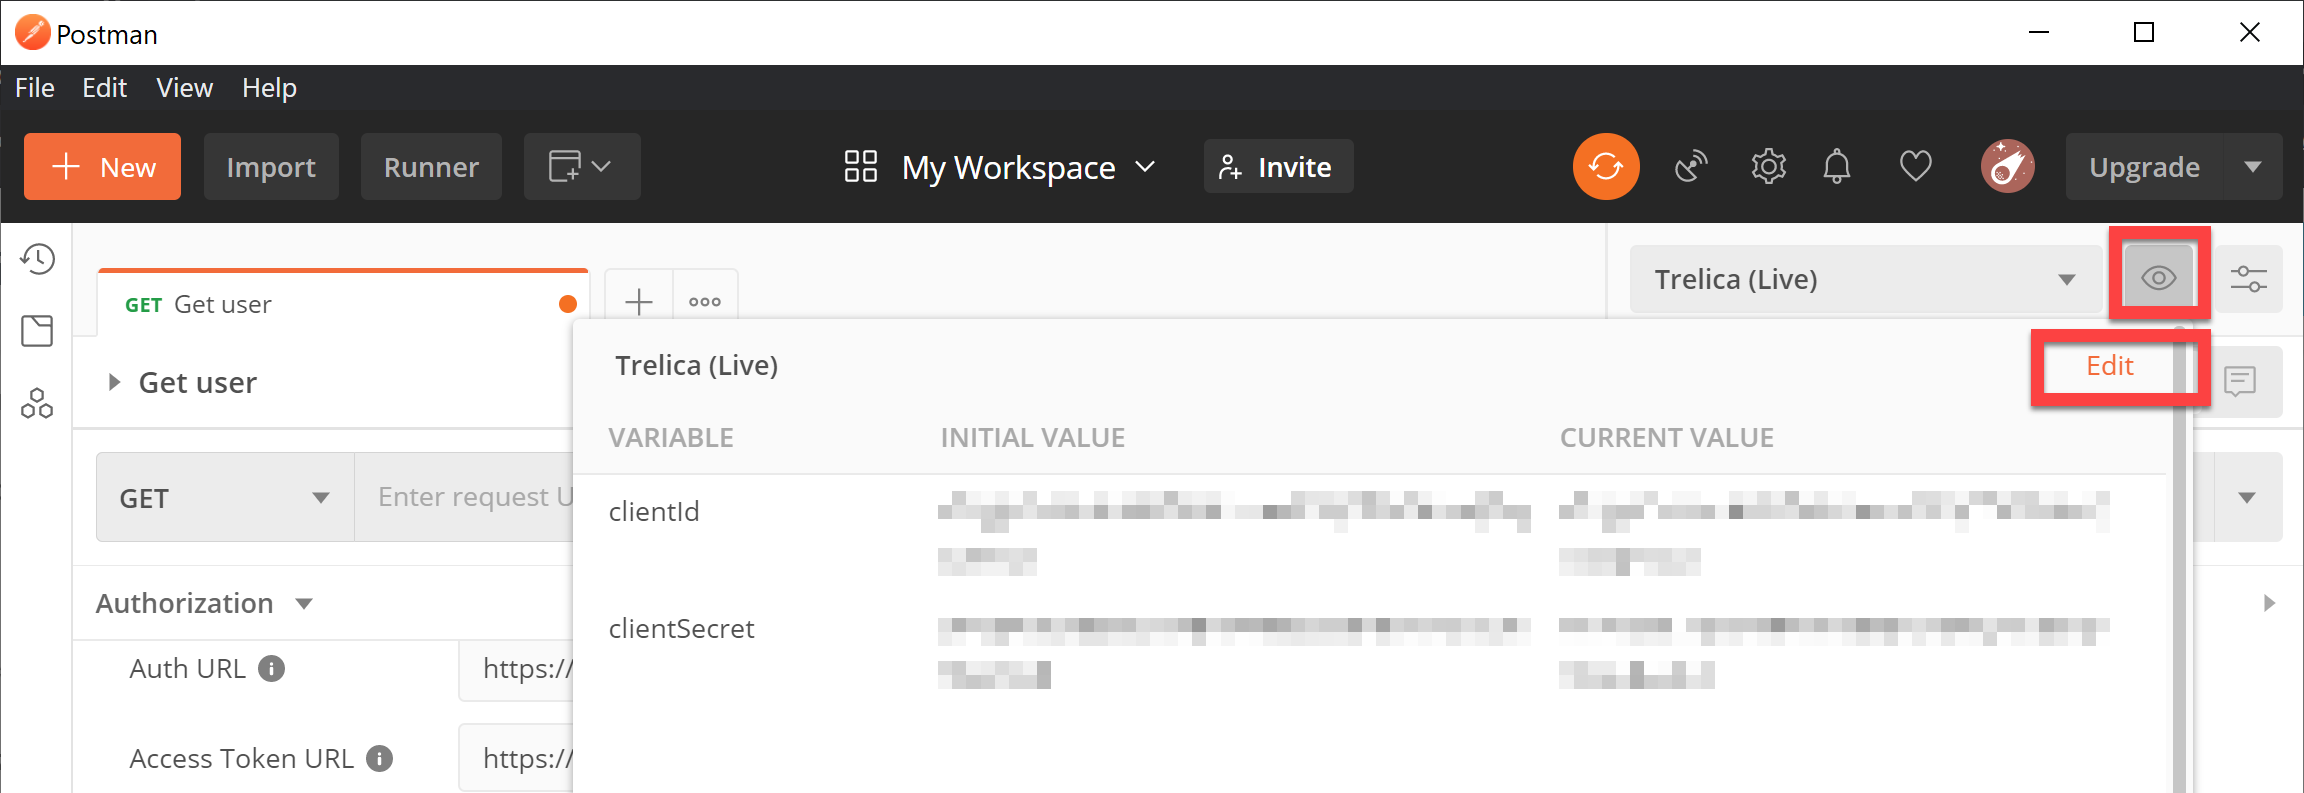
The next thing we'll do is configure two variables. It's best practice in Postman to store credentials and other sensitive data in variables. Near the top you will see the Environment dropdown, and a preview 'eye' icon. Click this, create a new environment if necessary (or use global variables if you prefer), and then choose Edit to define two variables for clientId and clientSecret.
Paste in the corresponding ID and secret values for the API app that you copied from SaaS Manager earlier.
Close the Manage environments dialog, and go back to your new request.
Configure OAuth2 authentication
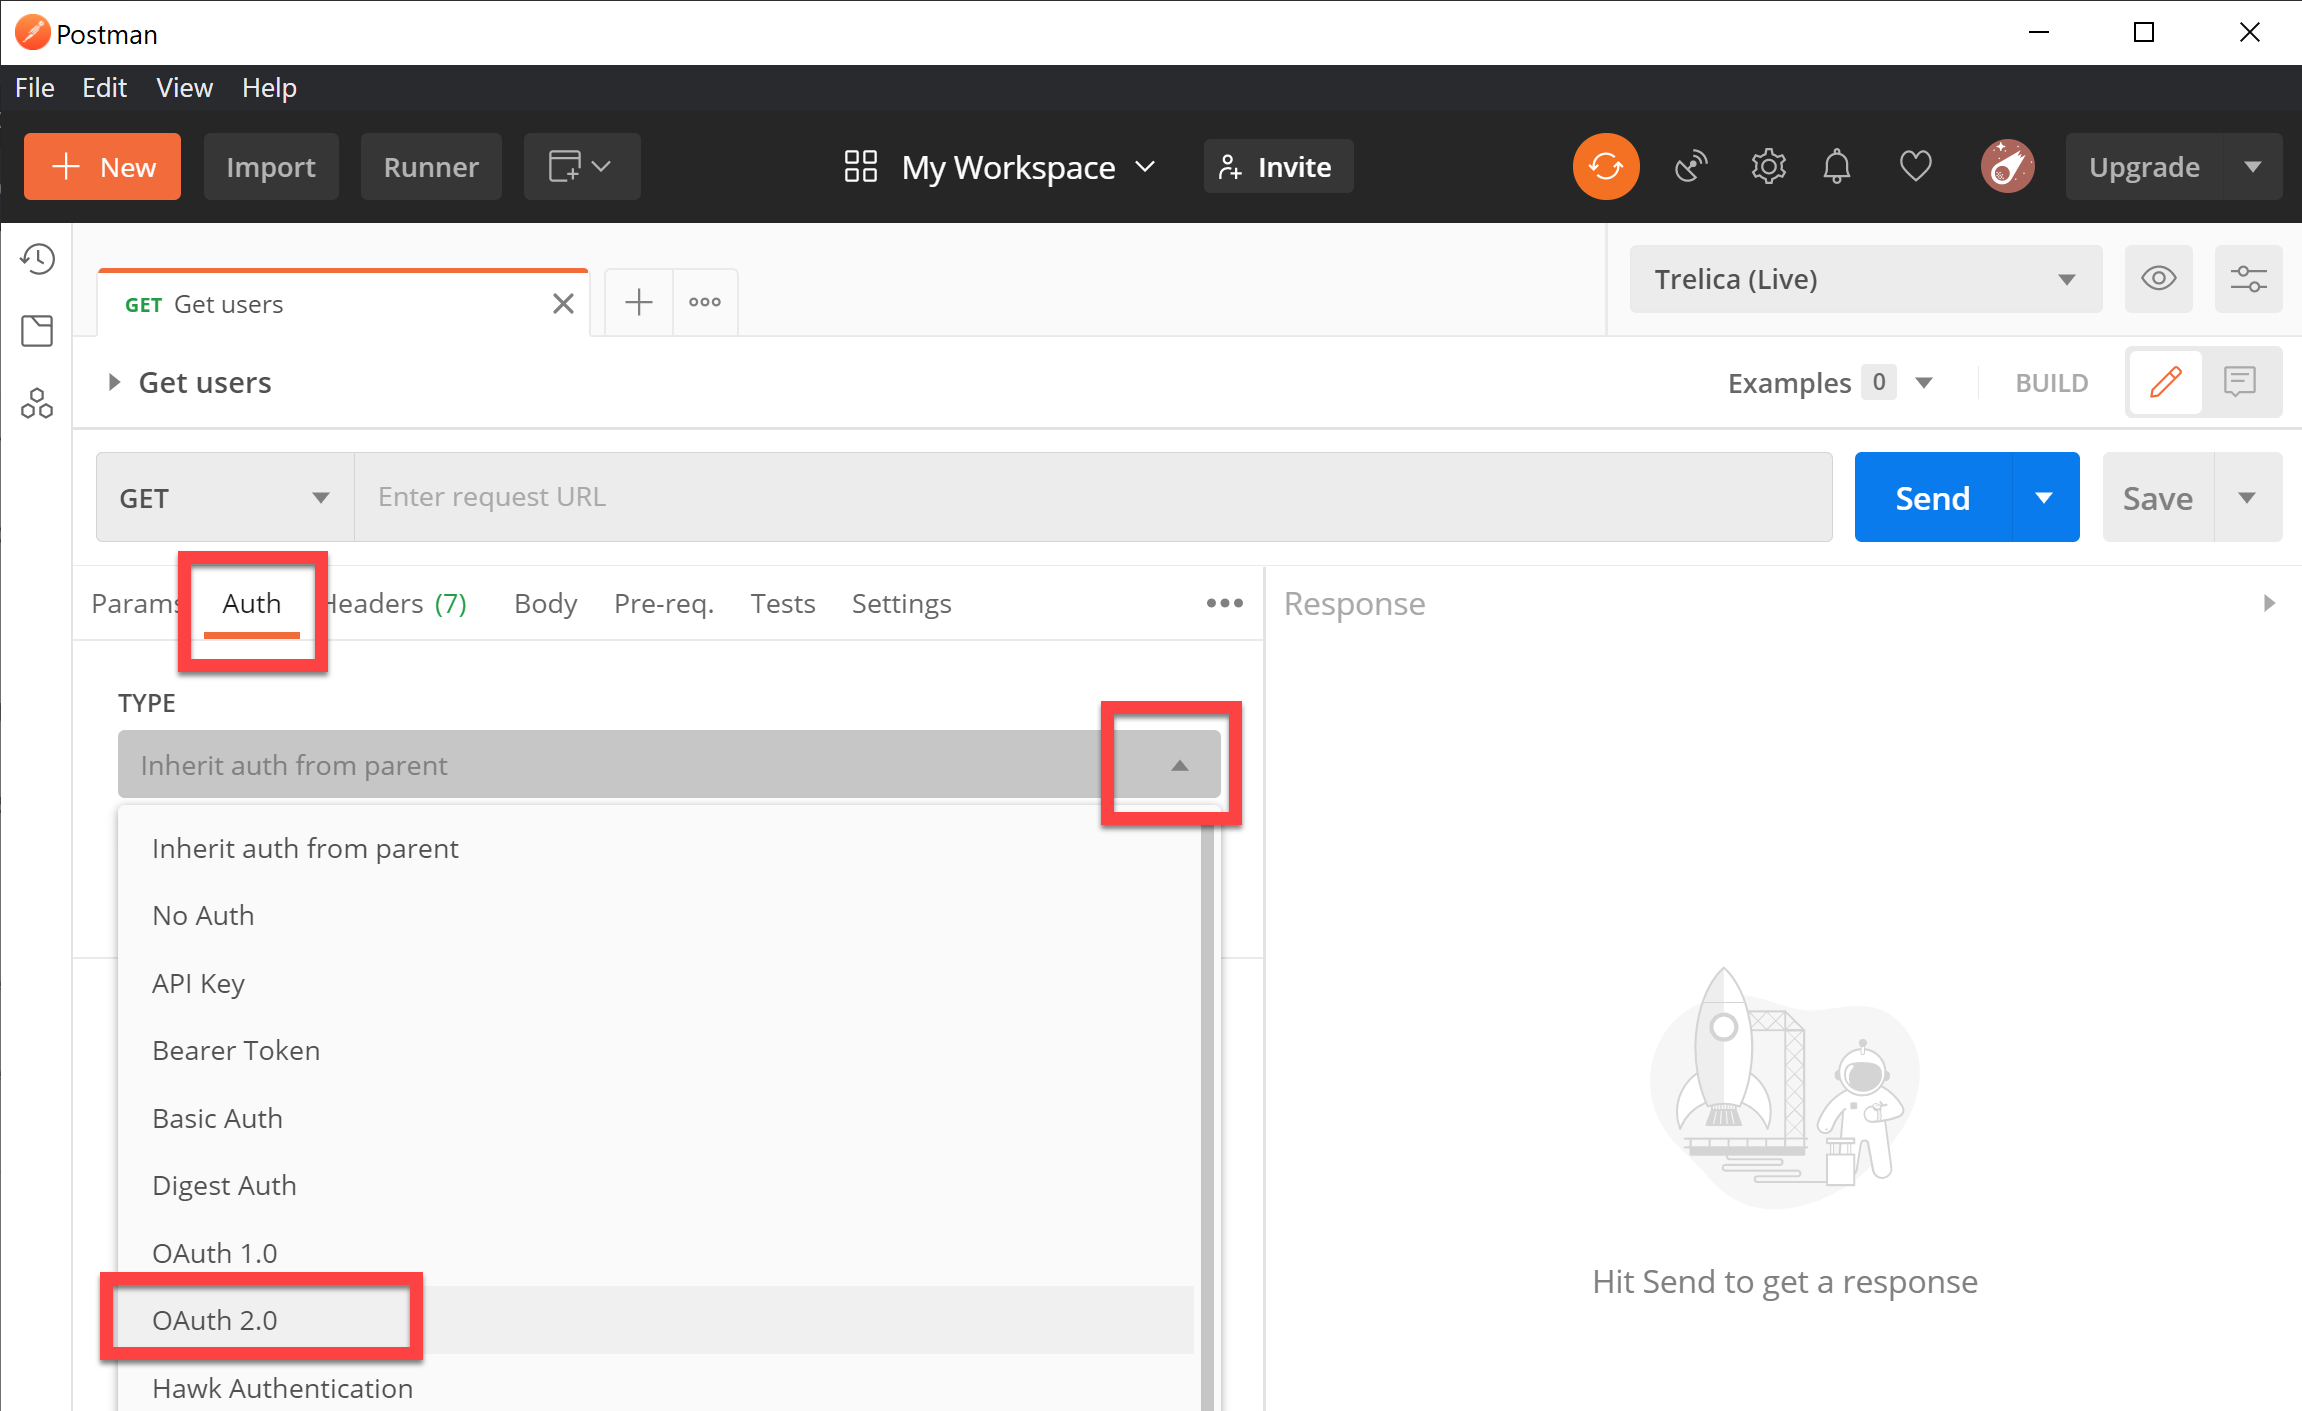
Select the Auth tab, and pick OAuth 2.0 from the Type dropdown:
Fill in the Configure New Token section as follows:
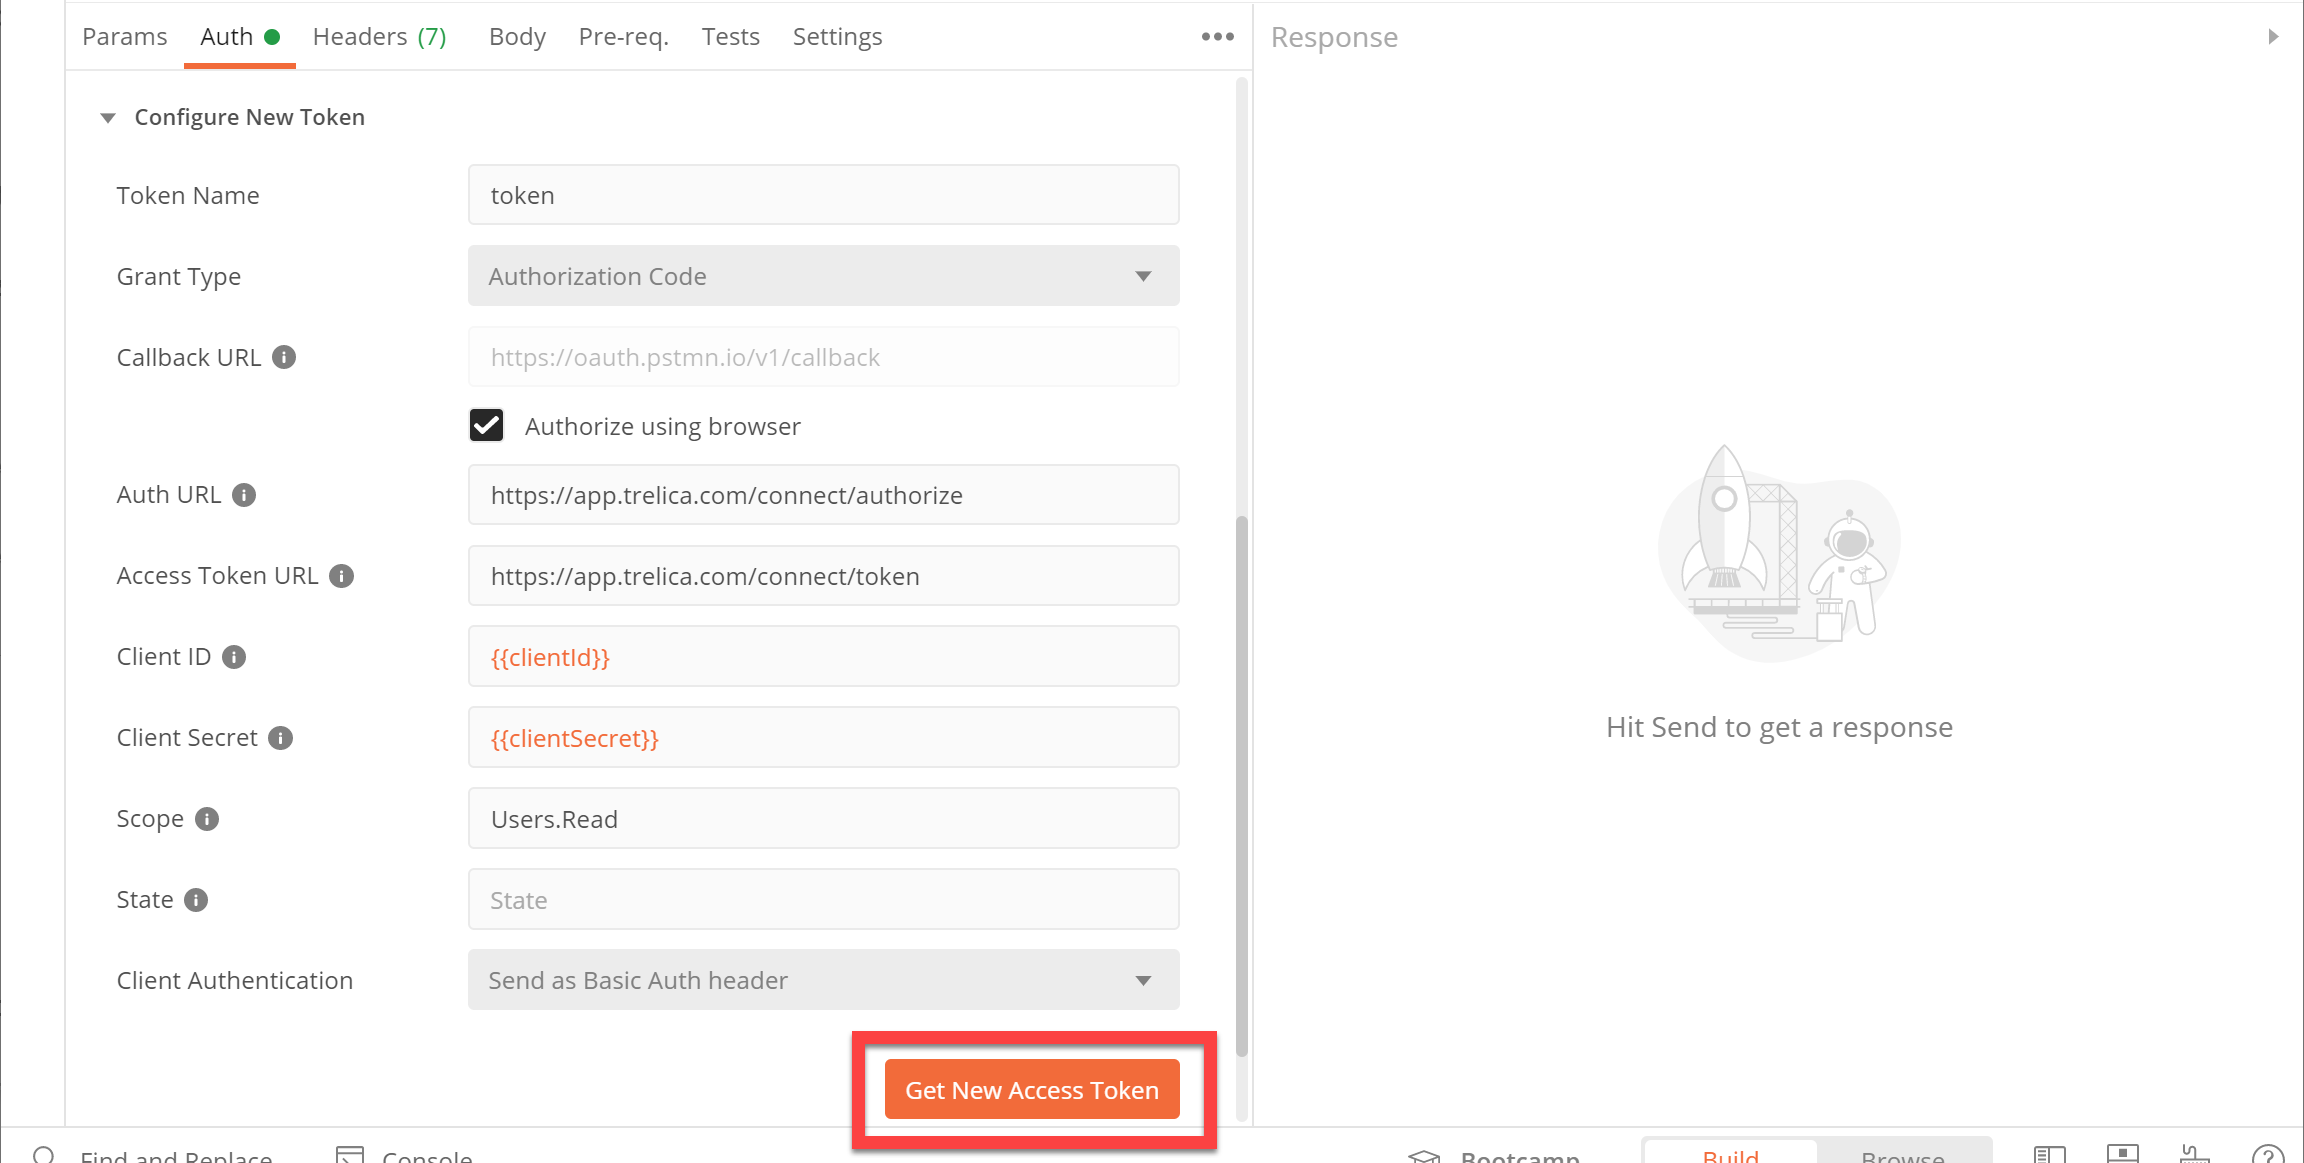
| Field | Value |
|---|---|
| Token Name | token |
| Grant Type | Authorization Code |
| Authorize using browser | (checked) |
| Auth URL | https://app.trelica.com/connect/authorize or https://eu.trelica.com/connect/authorize |
| Access Token URL |
https://app.trelica.com/connect/token or https://eu.trelica.com/connect/token |
| Client ID | {{clientId}} |
| Client Secret | {{clientSecret}} |
| Scope | Users.Read |
| State | (can be left empty) |
| Client Authentication | Send as Basic Auth header |
Note how Postman uses double braces to insert variables into fields.
Request an access token
When you're done, click Get New Access Token.
Postman will show a Get New Access Token dialog, and open up a web-browser. This will show you a SaaS Manager screen, asking you to authorize your App to access your SaaS Manager account. You may be asked to login first.
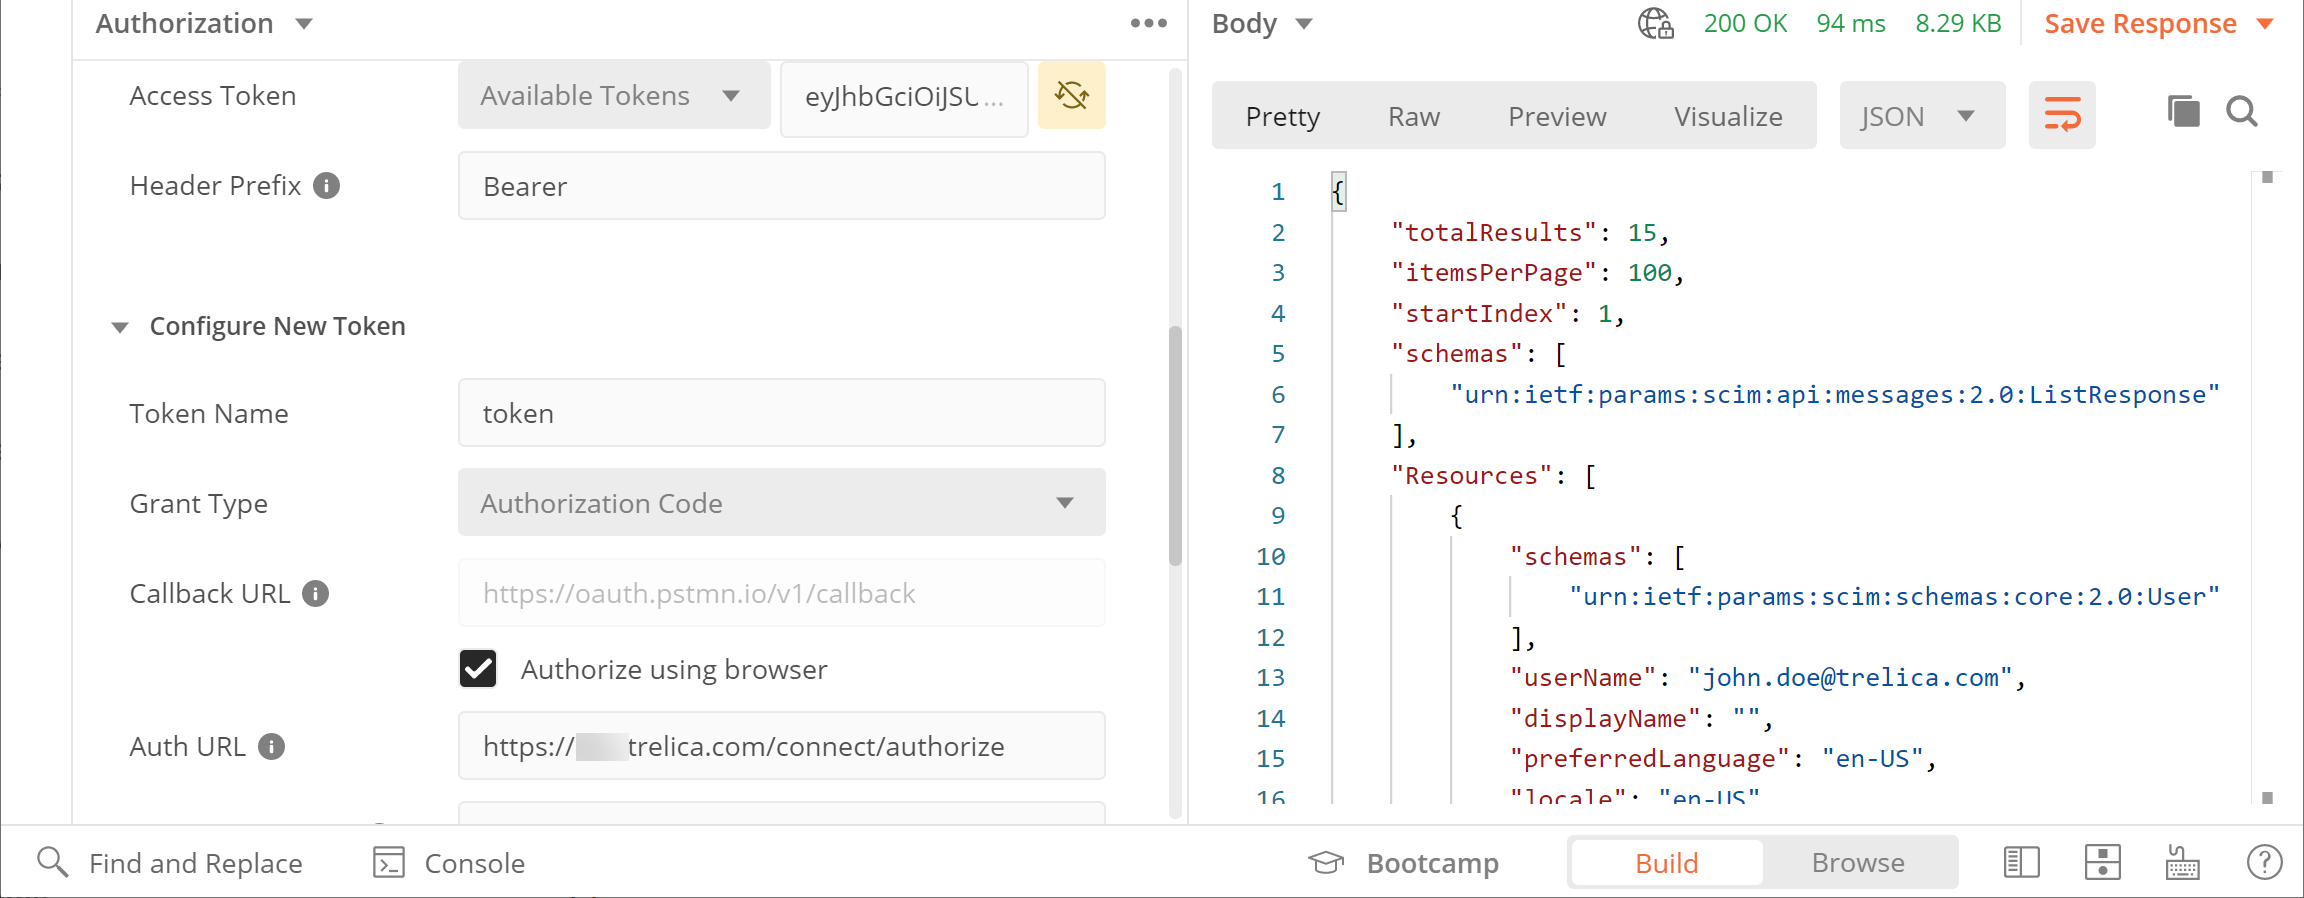
Click Authorize and you can go back to Postman, which will have captured the token issued by SaaS Manager:

Click Use Token.
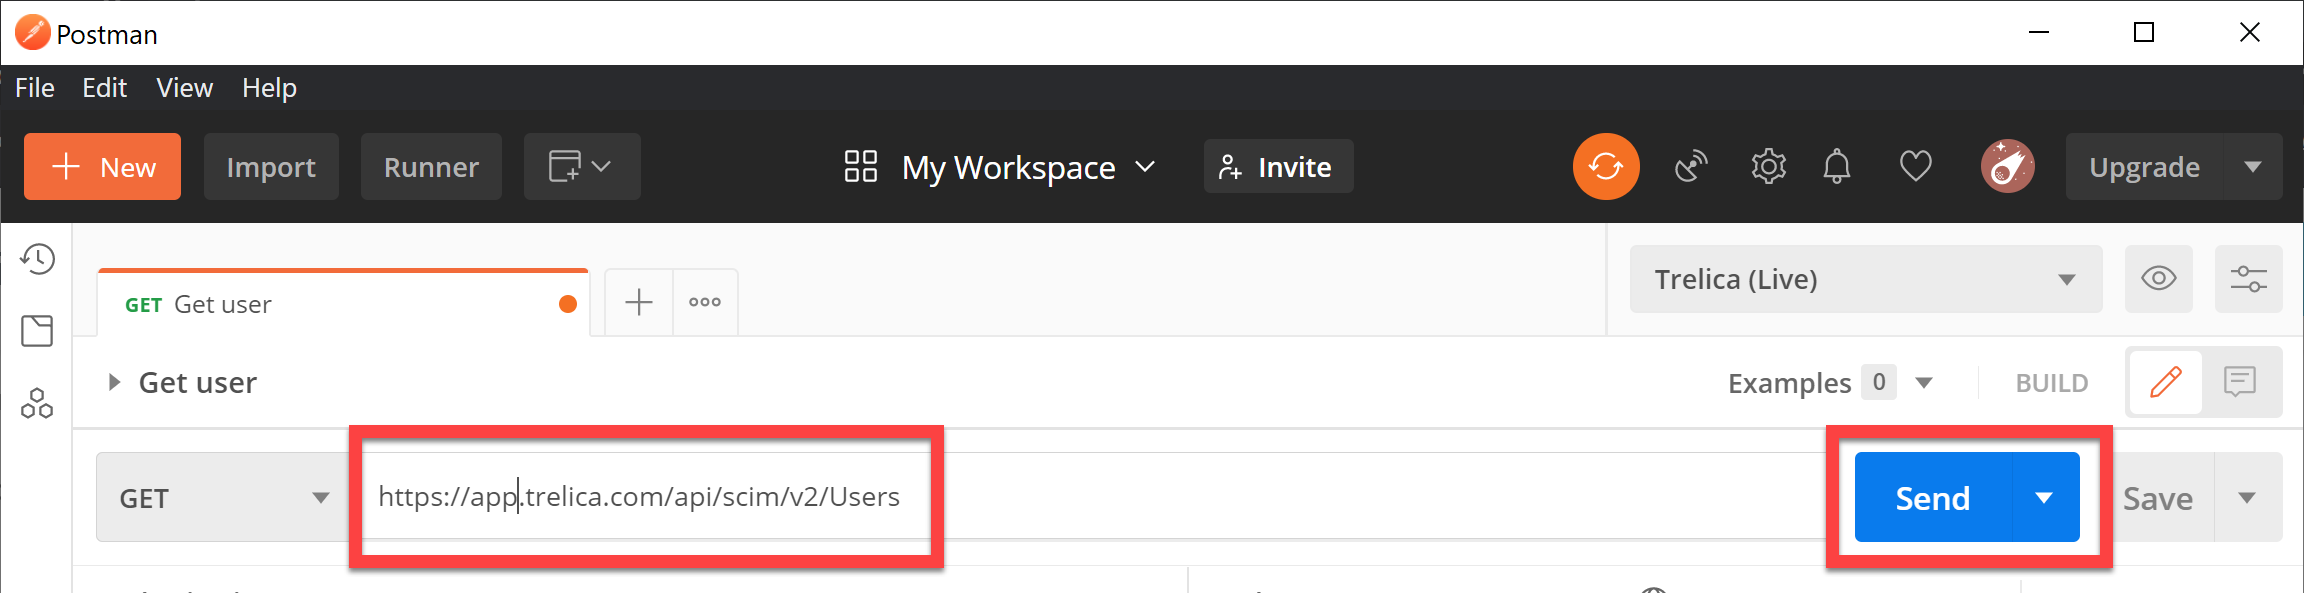
Make the API call
Go back to the request, and enter the API end-point we want to access:
https://app.trelica.com/api/scim/v2/Users
or
https://eu.trelica.com/api/scim/v2/Users
Then click Send:
You'll then see the response come back:
By default your access token will expire after an hour, and you'll then need to reauthenticate (in the Authorization tab on the left, where you configured the token request).
If you're writing an application that needs to access data for a longer period of time, then providing you requested the offline_access scope, you will have been issued a refresh token to use to obtain a new access token.
By accessing or using 1Password Developer Tools, you agree to the API and SDK Terms of Service.
Comments
0 comments
Please sign in to leave a comment.