Note: 1Password SaaS Manager was previously named Trelica. Some commands and integrations still use or refer to Trelica. Follow directions as written to avoid errors.
1Password SaaS Manager connects to Snowflake in two ways, each requiring slightly different authentication:
- Snowflake REST SQL, authenticated by either RSA Key pair or OAuth (deprecated).
- The Snowflake SCIM interface, authenticated using a token (required for provisioning and deprovisioning).
Snowflake URLs
The first piece of information you need relates to the URL for your Snowflake instance.
- Go to Admin > Accounts.
- Hover over the info button on the account you want to connect to
- Copy the Current URL to the clipboard
- The Locator is also shown on this page (which you will also need to connect).

Alternatively if you are an organization admin you can view this information as SQL:
use role ORGADMIN;
show organization accounts;
The relevant fields are:
- account_url
- account_locator
Create a role and user
To connect to Snowflake from SaaS Manager, you will need a user to authenticate with. This step will create a new user, assigned to a new SaaS Manager role in Snowflake.
To create the role, run:
create or replace role TRELICA;
grant manage grants on account to TRELICA;
Then create a new user account with a login name of TRELICA_USER. if you are using OAuth for authentication then substitute <password> for a strong password, else enter null.
create user if not exists TRELICA_USER
    password = '<password>'
    login_name = 'TRELICA_USER'
    display_name = 'SaaS Manager Integration User'
    must_change_password = false
    default_role = TRELICA;

grant role TRELICA to user TRELICA_USER;
RSA Key pair authentication
Step 1: Generate RSA Key Pair
Generate an RSA key pair for secure authentication. Run these commands on your local machine:
macOS
# Generate private key
openssl genrsa 2048 | openssl pkcs8 -topk8 -inform PEM -out snowflake_private_key.p8 -nocrypt

# Generate public key
openssl rsa -in snowflake_private_key.p8 -pubout -out snowflake_public_key.pub

# Display the public key (you'll need this for the next step)
cat snowflake_public_key.pub
Windows (PowerShell 7)
PS > .\Generate-SnowflakeKeyPair.ps1
PowerShell version 7.5.2 detected - proceeding with PKCS#8 key generation...
Successfully generated PKCS#8 private key
Keys saved:
  Private key: snowflake_private_key.pem (PKCS#8 format)
Public key: snowflake_public_key.pemsnowflake_private_key.p8 or snowflake_private_key.pem) securely. You'll need to provide this to SaaS Manager for authentication.Step 2: Configure Key Pair Authentication
Set the public key on the SaaS Manager API user in Snowflake:
-- Set the RSA public key (remove header/footer lines)
ALTER USER TRELICA_USER SET
  RSA_PUBLIC_KEY = 'MIIBIjANBgkq...', -- Your public key here
  PASSWORD = null,
TYPE = SERVICE;-----BEGIN PUBLIC KEY----- and -----END PUBLIC KEY----- lines.OAuth configuration (deprecated)
As a user in the accountadmin role, create a new Worksheet in Snowflake (or using the SnowSQL CLI client) and run the following scripts.
Create the integration client
Create an OAuth client for SaaS Manager to connect to:
create or replace security integration OAUTH_TRELICA
    type = oauth
    enabled = true
    oauth_client = custom
    oauth_client_type = 'CONFIDENTIAL'
    oauth_redirect_uri = 'https://app.trelica.com/IntegrationsApi/Integrations/Snowflake/AuthCallback'
    oauth_issue_refresh_tokens = true
    oauth_refresh_token_validity = 7776000;

grant all on integration OAUTH_TRELICA to TRELICA;
If your SaaS Manager organization is hosted in the EU, then please use https://eu.trelica.com as the prefix for the oauth_redirect_uri, and not https://app.trelica.com.
By default you will need to reconnect to Snowflake every 90 days (60s x 60m x 24h x 90d = 7776000).
You can request Snowflake Support to change the refresh token timeout for your Snowflake environment. For example, to request a timeout of 2 years, request the maximum OAUTH_REFRESH_TOKEN_VALIDITY for a SECURITY INTEGRATION to be increased to 63072000 seconds.
You can alter the refresh token validity using the command:
alter security integration OAUTH_TRELICA set oauth_refresh_token_validity = 63072000;Then show the details of the token to get the client id and secret. The result is shown as JSON - you will need to copy out the OAUTH_CLIENT_SECRET and OAUTH_CLIENT_ID fields.
select system$show_oauth_client_secrets('OAUTH_TRELICA');
Do not use the OAUTH_CLIENT_SECRET_2 field
Generating a SCIM token
This is only required if you want to enable provisioning and deprovisioning.
You can only deprovision a user previously provisioned using the SCIM interface.
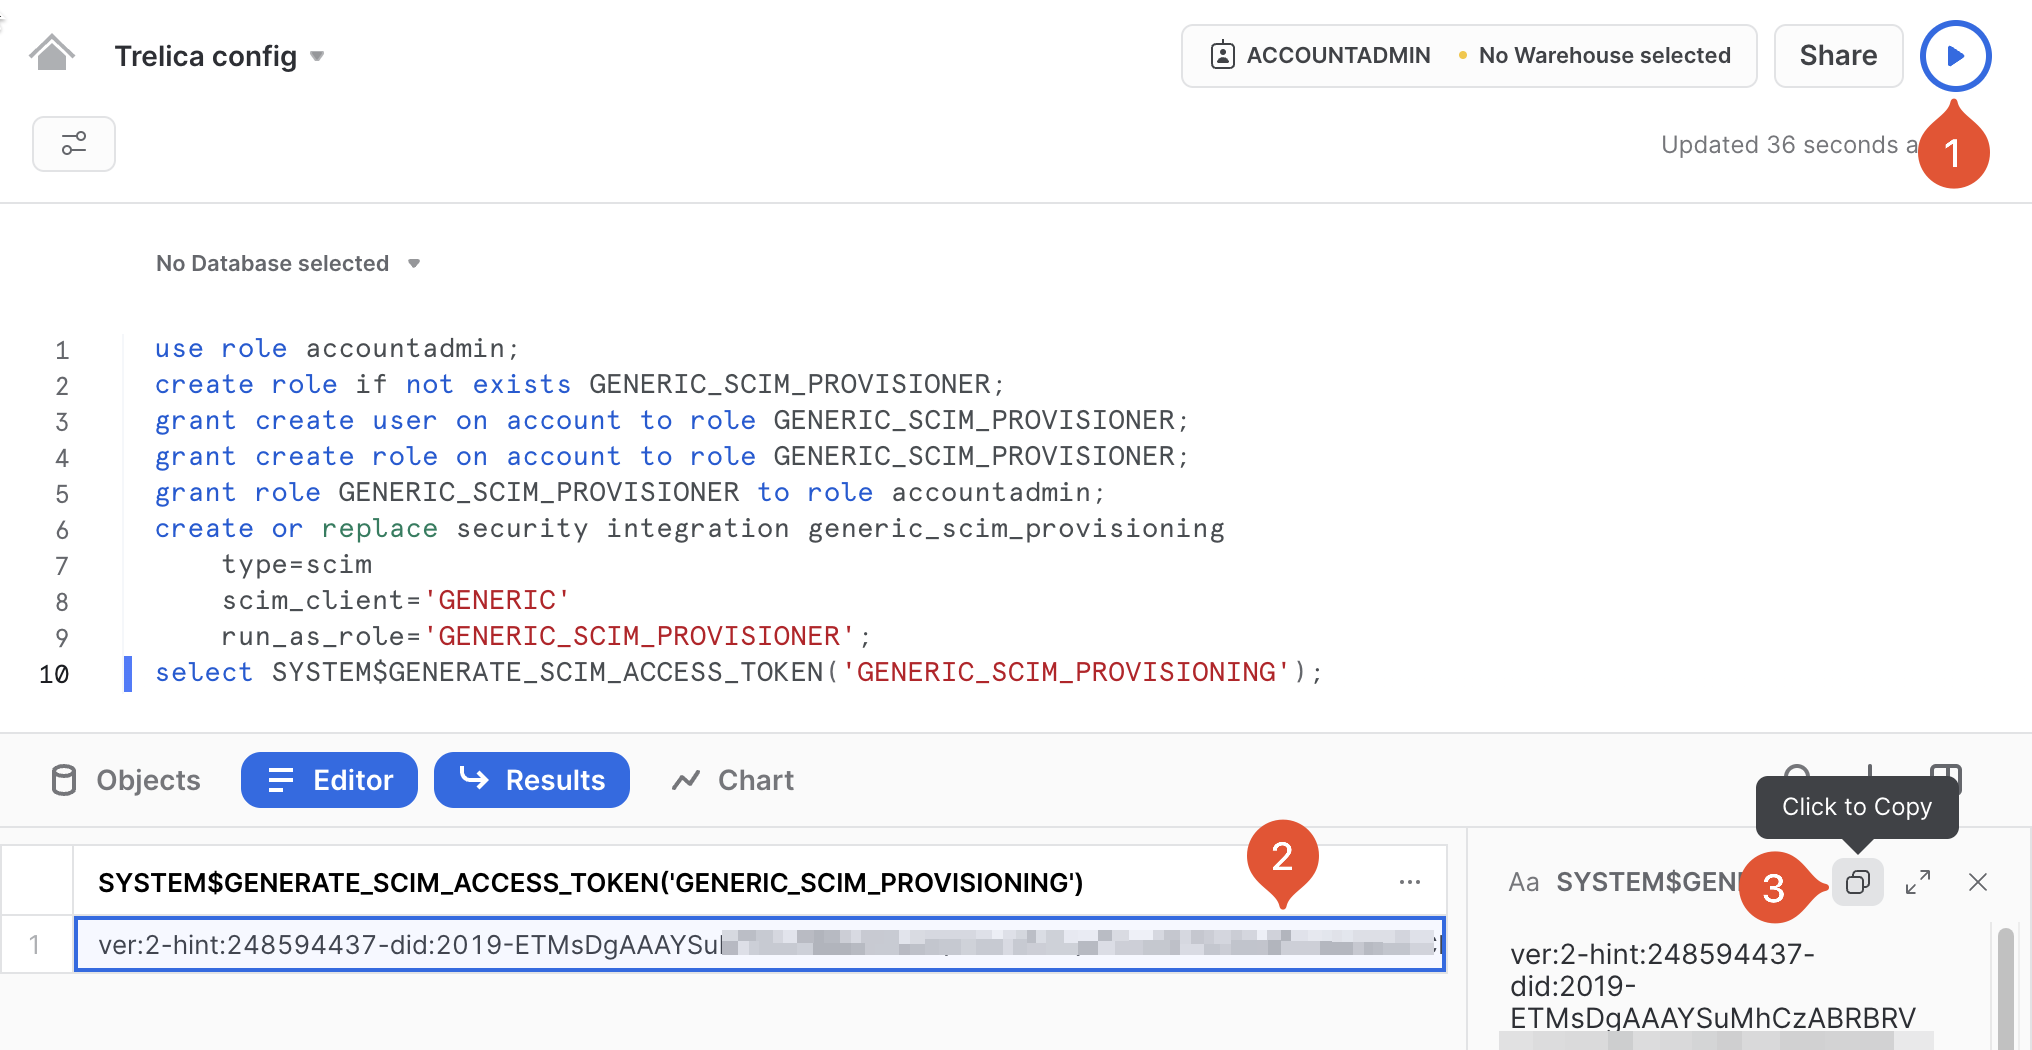
As a user in the accountadmin role, create a new Worksheet in Snowflake, and run the following script to create a Snowflake integration and associated role, and then generate a SCIM access token:
use role accountadmin;
create role if not exists GENERIC_SCIM_PROVISIONER;
grant create user on account to role GENERIC_SCIM_PROVISIONER;
grant create role on account to role GENERIC_SCIM_PROVISIONER;
grant role GENERIC_SCIM_PROVISIONER to role accountadmin;
create or replace security integration generic_scim_provisioning
    type=scim
    scim_client='GENERIC'
    run_as_role='GENERIC_SCIM_PROVISIONER';
select SYSTEM$GENERATE_SCIM_ACCESS_TOKEN('GENERIC_SCIM_PROVISIONING');
Note that you can easily copy the token that gets emitted:
Renewing a SCIM token
The SCIM tokens last 6 months. The following script will create a fresh token:
use role accountadmin;
select system$generate_scim_access_token('GENERIC_SCIM_PROVISIONING');
Connecting to Snowflake from 1Password SaaS Manager
You now have all the information you need to connect.
Enter your:
- Snowflake Account URL
- SCIM API key (if Provisioning or Deprovisioning are enabled)
- Private key (if using RSA Key pairs) or Client ID and Secret (if using OAuth)
- Account Locator
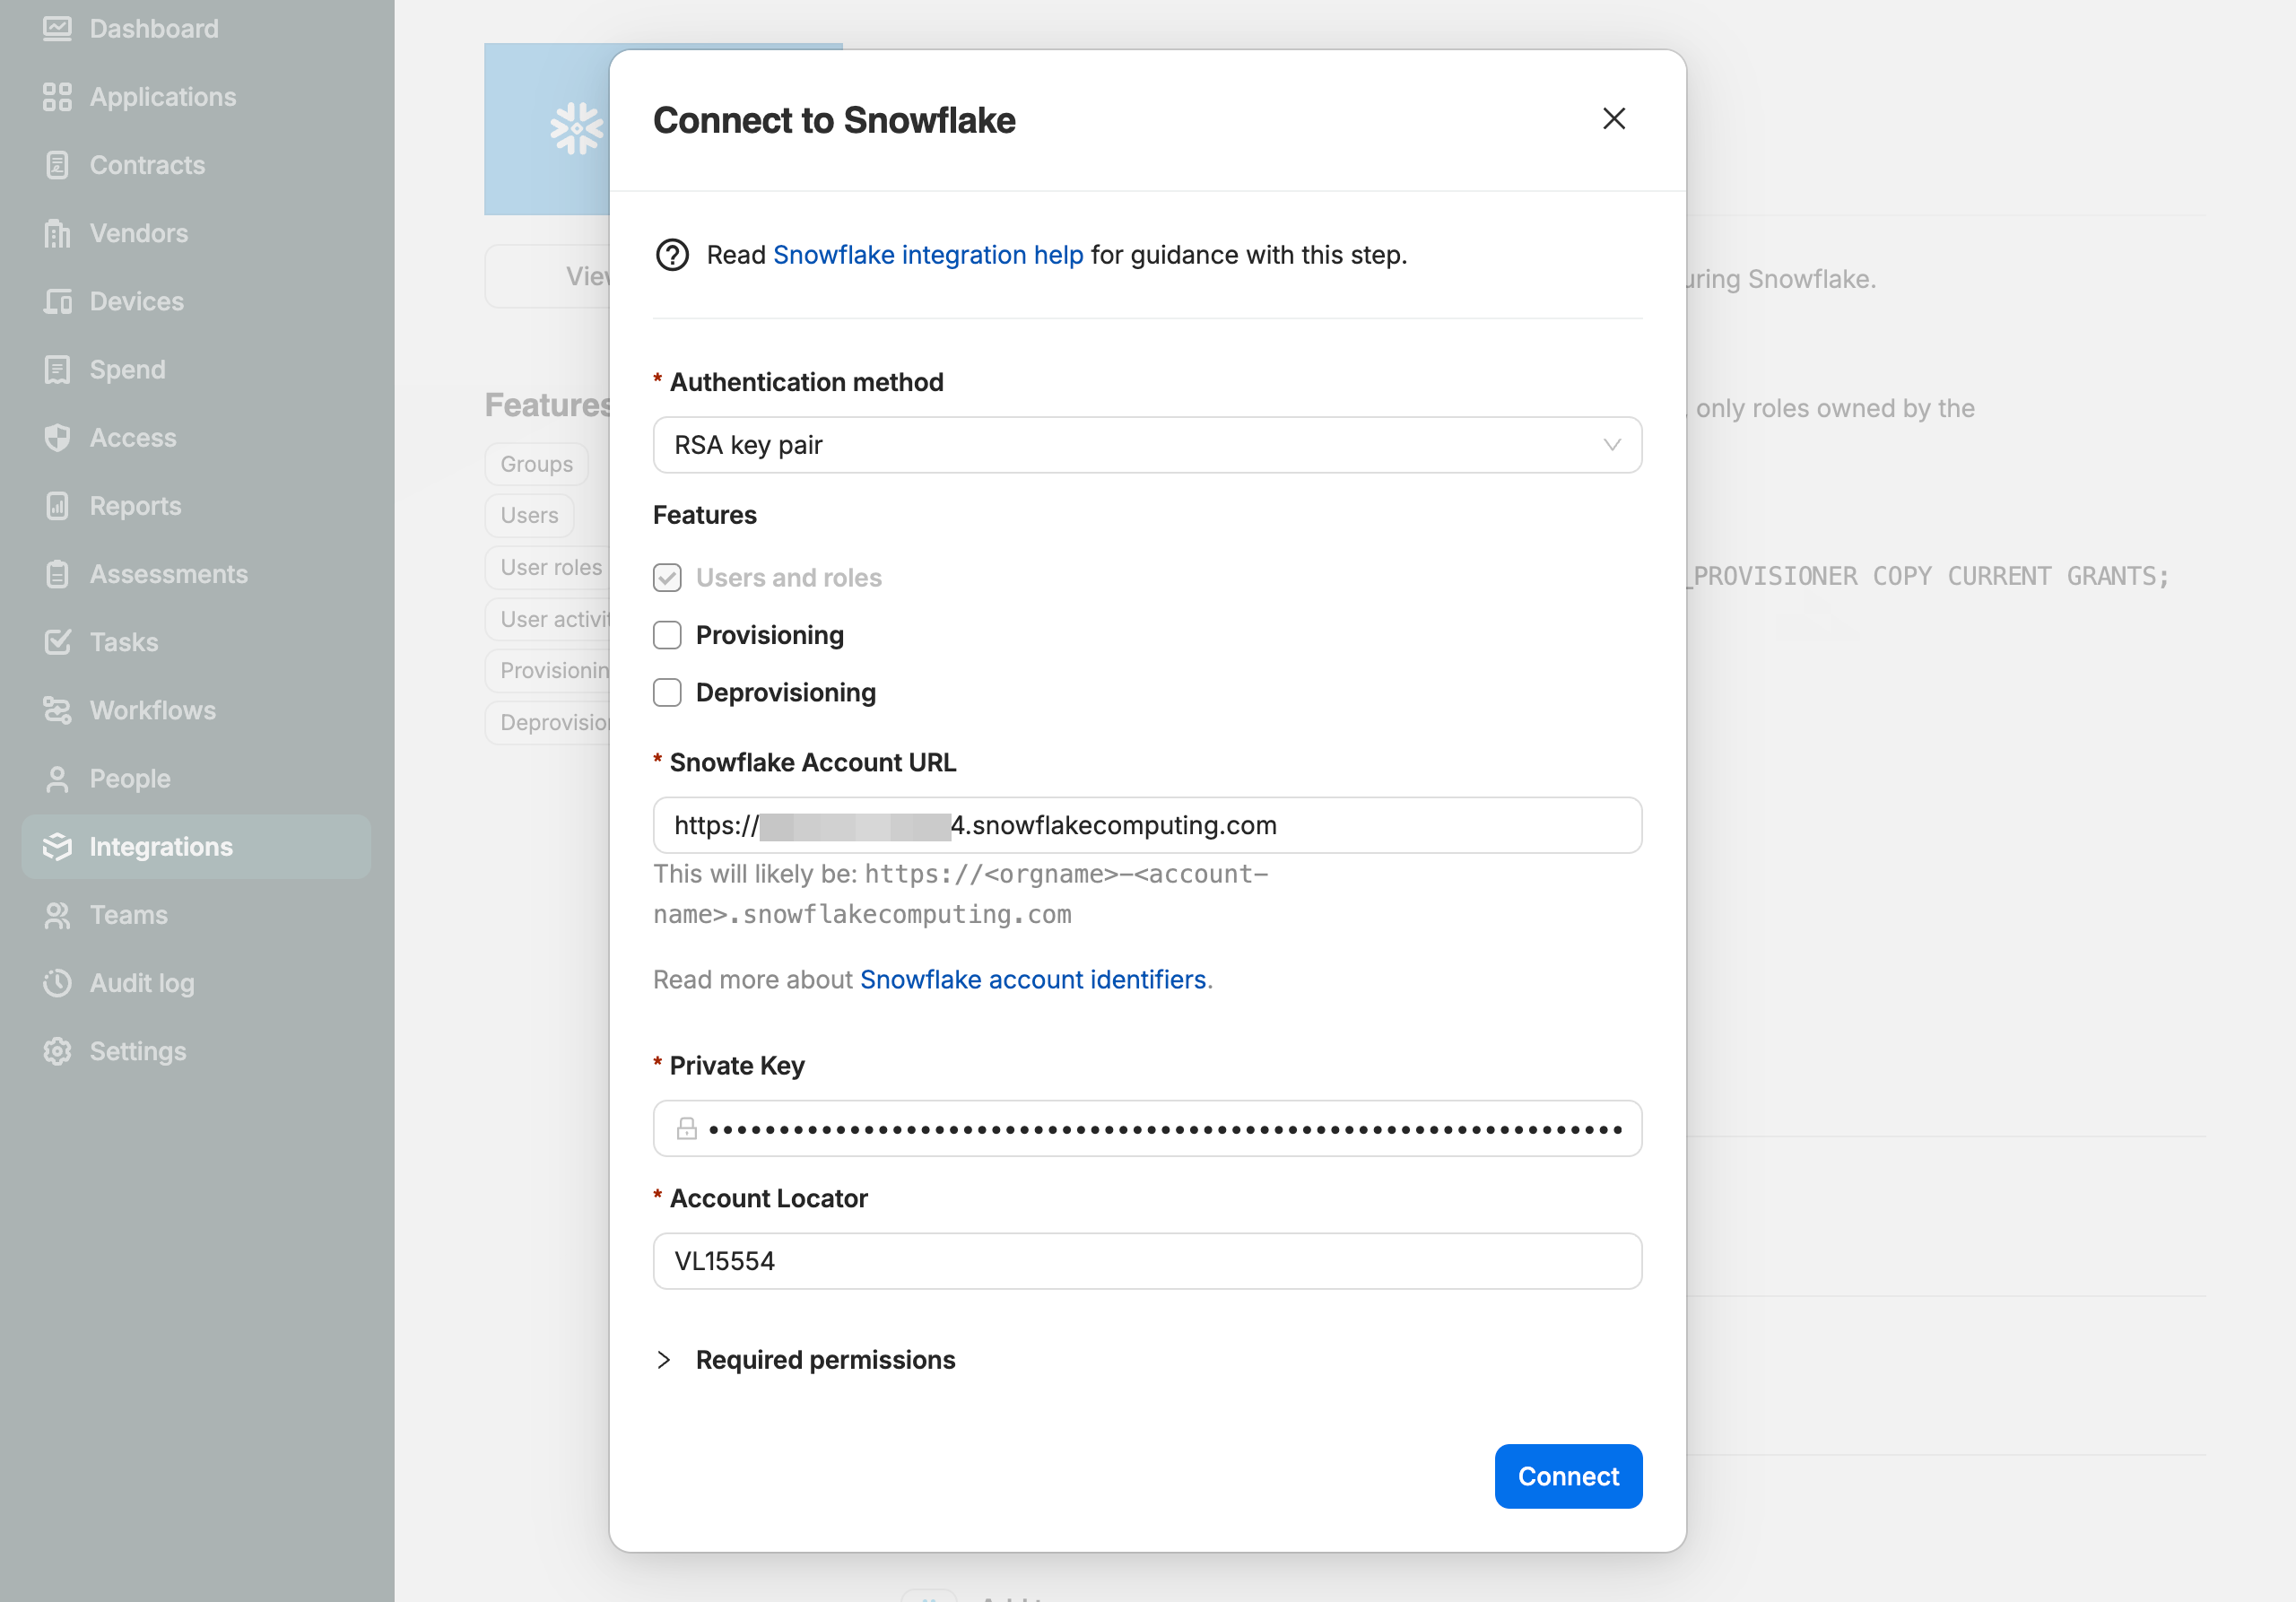
Select Connect.
Consent process if using OAuth
If you are using OAuth you will then be asked to login to Snowflake. Use the TRELICA_USER username and associated password that you created above.
Then consent to the access scopes requested and select Allow.
Migrating from OAuth to RSA Key pair authentication
If you already configured OAuth and want to switch to use RSA Key pair authentication, follow the steps above. Once complete you can remove the OAuth integration and associated role.
Remove OAuth Integration and SaaS Manager role
Drop the OAuth security integration and role that was created:
DROP SECURITY INTEGRATION IF EXISTS OAUTH_TRELICA;
DROP ROLE IF EXISTS TRELICA;
Verification
To verify the OAuth integration has been removed:
SHOW INTEGRATIONS LIKE 'OAUTH_TRELICA';This should return no results if the integration was successfully dropped.
To verify the user is configured correctly:
DESCRIBE USER TRELICA_USER;Look for the RSA_PUBLIC_KEY_FP field to confirm the public key fingerprint is set and TYPE should be SERVICE.
Comments
0 comments
Please sign in to leave a comment.