How does 1Password SaaS Manager work with ServiceNow?
1Password SaaS Manager helps IT teams keep on top of what SaaS software has been bought, how much money is being spent on it, how well it's being used and whether everything is compliant from a security and privacy point of view.
SaaS Manager can connect directly to different SaaS tools (like ServiceNow) to extract up-to-date information about which of your users are using ServiceNow, and how regularly they are logging in. This will help you improve engagement, deprovision unused seats, and prepare for your license renewal.
You must be an administrator of your ServiceNow instance in order to connect with SaaS Manager.
As an administrator, you may have received an invitation from someone in your IT team asking you to connect ServiceNow to SaaS Manager.
Setting up the OAuth2 client in ServiceNow
Each ServiceNow instance is separate and this means that you have to set-up an OAuth2 client in ServiceNow in order for SaaS Manager to connect.
Log in to ServiceNow and search in the navigator for "application registry":

Choose Application Registry and then click the New button:

Choose Create an OAuth API endpoint for external clients:

Enter the following values in the form that appears (click the padlock symbols to make the URL fields editable):
| Field | Value |
|---|---|
| Name | 1Password SaaS Manager Connection |
| Redirect URL | https://app.trelica.com/IntegrationsApi/Integrations/ServiceNow/AuthCallback |
| Logo URL |
If your data is hosted in our EU cloud then please substitute https://eu.trelica.com for https://app.trelica.com in the redirect URL.
Then click the Submit button.
The OAuth2 client is now configured in ServiceNow, but we will open the client details again to see the Client ID and the Client Secret.
Find 1Password SaaS Manager Connection in the list that now appears, and click through on the link.
Click the padlock icon by the Client Secret to reveal it.

Keep this window open, or take note of the Client ID and the Client Secret as you will shortly need both of these for connecting SaaS Manager to ServiceNow.
Connecting to ServiceNow from 1Password SaaS Manager
If you received an email asking you to set up the integration, then just click on the link, otherwise login to SaaS Manager and go to Admin > Integrations to get started.
In the Search... box, just type in ServiceNow.
Then click on the ServiceNow logo to get started.
Click Connect.
You will now have to enter some details to connect. First of all enter your ServiceNow Url (probably something like https://yourcompany.service-now.com).
The OAuth2 Client ID is the Client ID from ServiceNow.
For the OAuth Client Secret, paste in the secret that ServiceNow created for you and that you should have open in another browser window, or copied to your clipboard.
If you have enabled the Tasks feature, you will see some additional Yes/No form fields. These represent which types of ServiceNow ticket you wish to enable support for. For example, if you choose "Yes" for Incidents, you will be able to create ServiceNow incidents from a SaaS Manager workflow.
Click Connect.
You will then be asked to log in to ServiceNow (if you aren't already logged in) and shown a message explaining that SaaS Manager wants to connect to your organization's ServiceNow site.
Click Allow and you will be taken back to SaaS Manager.
After a short pause, SaaS Manager will start to synchronize with ServiceNow and you'll see a green tick when everything is done.
Syncing 1Password SaaS Manager tasks with ServiceNow tickets
Task syncing works via webhooks so that when some data in a relevant ServiceNow table changes, SaaS Manager is immediately updated accordingly.
A webhook is set up by creating a "Business Rule" in ServiceNow. A Business Rule must be created for each ServiceNow table you wish to sync with SaaS Manager. For example, if you wish to create ServiceNow Incidents and Service Requests in SaaS Manager and have them sync'd with the corresponding SaaS Manager tasks, you will need to create two Business Rules, one for Incidents and the other for Service Requests.
Creating a Business Rule in ServiceNow
In your ServiceNow instance, go to System Definition > Business Rules and select New.
Enter a descriptive name, e.g. "1Password SaaS Manager Incident-Task syncing".
Select the Table you wish to sync, e.g. "Incident".
Check Advanced.
In the When to run tab in the bottom portion of the page, do the following:
- Select "after" in the When dropdown.
- Check the Update box.
- Add a filter condition, choosing "State" as the field, "is" as the operator and the value for state you wish to trigger an update in SaaS Manager for. You can add additional state conditions by selecting "OR".

In the Advanced tab, enter the following code snippet into the "Script" field and replace the {Your webhook URL} template with your SaaS Manager webhook URL.
(function executeRule(current, previous /*null when async*/) {
	try {
		var r = new sn_ws.RESTMessageV2();
		r.setEndpoint("{Your webhook URL}");
		r.setHttpMethod("post");

		var obj = {
			"state": current.getValue("state"),
			"number": current.getValue("number"),
			"due_date": current.getValue("due_date"),
			"sys_class_name": current.getValue("sys_class_name")
		};

		var body = JSON.stringify(obj);
		gs.info("Webhook body: " + body);
		r.setRequestBody(body);
		r.setRequestHeader("Content-Type", "application/json");
		var response = r.execute();
		var httpStatus = response.getStatusCode();
	} catch (ex) {
		var message = ex.message;
		gs.error("Error message: " + message);
	}

	gs.info("Webhook target HTTP status response: " + httpStatus);
})(current, previous);
Finding your webhook URL
Your webhook URL is specific to your ServiceNow integration. When connecting SaaS Manager to ServiceNow, a message containing the webhook URL will be displayed. This will remain on the integration page so you can retrieve your webhook URL whenever you need to. You can copy this URL and replace the {Your webhook URL} placeholder with it.
Now click Submit.
If you delete your ServiceNow integration in SaaS Manager, you will need to update the Business Rule script with the new webhook URL when reconnecting the integration. This does not apply to disconnecting/reconnecting.
Supporting multiple ServiceNow tables
Below is a table containing the types of ServiceNow tickets that can be sync'd with SaaS Manager tasks and their corresponding table names:
| ServiceNow ticket type | ServiceNow table name |
| Incident | incident |
| Service Request | sc_request |
| Service Request Item | sc_req_item |
| Change Request | change_request |
| Problem | problem |
| Device Task | asset_task |
| Service Catalog | sc_task |
The steps to set up task syncing is the same for all types of ServiceNow ticket. Simply choose the desired table from the table above in the "Table" dropdown control when creating the business rule in ServiceNow. The script/filters will not need to change.
Because business rules cannot apply to multiple tables, you will need to create a separate business rule for each table you wish to sync.
Triggering 1Password SaaS Manager workflows via ServiceNow webhooks
Create a workflow with the API webhook trigger type.
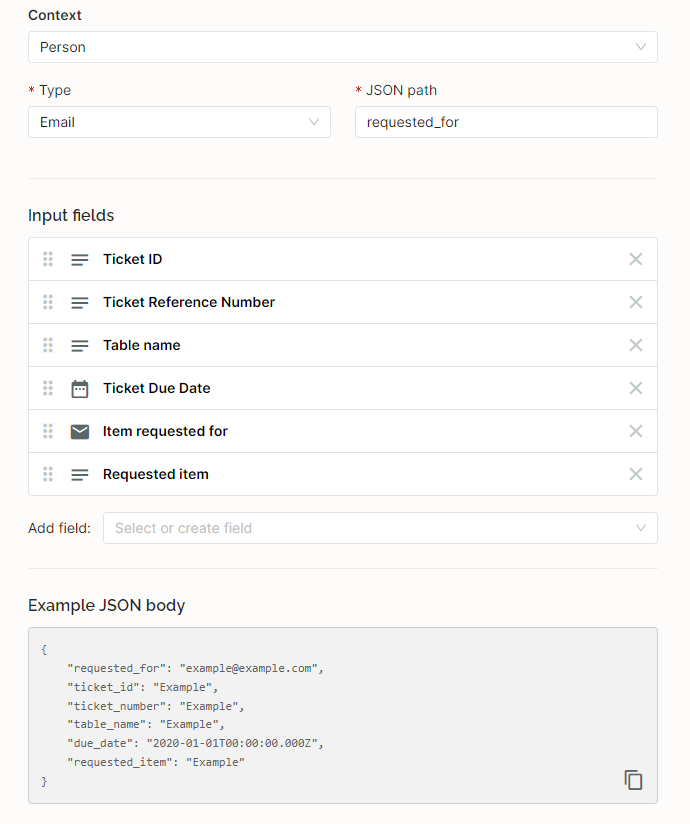
To use values provided in a ServiceNow ticket you will need to create input fields in your SaaS Manager workflow to map those values to. To map a ServiceNow ticket field to a SaaS Manager input field you must provide the JSON path for the mapped field in the Advanced section of the input field modal in SaaS Manager. The JSON path values will be defined in the ServiceNow business rule that initiates the workflow.
The input fields you will want to create if triggering a workflow from a ticket in ServiceNow will likely vary depending on the ticket type and the SaaS Manager workflow use case you have in mind. The examples in this section are based around a workflow being initiated from a Service Request Item.
In your ServiceNow instance, go to System Definition > Business Rules and select New.
Similar to the task syncing Business Rule outlined earlier in this article, enter the relevant information into the When to Run tab, for example the rule below will run when a new Service Request Item is created:

In the Advanced tab, paste the following code snippet into the Script field, and replace the {Your workflow webhook URL} template with the URL shown in the "Web request" section of the SaaS Manager workflow.
(function executeRule(current, previous /*null when async*/) {
	try {
		var r = new sn_ws.RESTMessageV2();
		r.setEndpoint("{Your webhook URL}");
		r.setHttpMethod("post");

		var usr = new GlideRecord('sys_user');
		usr.get('sys_id', current.getValue("requested_for"));
		var requested_for_email = usr.getValue('email');

		var obj = {
			"ticket_id": current.getValue("sys_id"),
			"ticket_number": current.getValue("number"),
			"table_name": current.getValue("sys_class_name"),
			"ticket_state": current.getDisplayValue("state"),
			"due_date": current.getValue("due_date"),
			"requested_item": current.getDisplayValue("cat_item"),
			"requested_for": requested_for_email
		};

		var body = JSON.stringify(obj);
		gs.info("Webhook body: " + body);
		r.setRequestBody(body);
		r.setRequestHeader("Content-Type", "application/json");

		var response = r.execute();
		var httpStatus = response.getStatusCode();
	} catch (ex) {
		var message = ex.message;
		gs.error("Error message: " + message);
	}

	gs.info("Webhook target HTTP status response: " + httpStatus);

})(current, previous);
Adding a work note to a ServiceNow ticket via a 1Password SaaS Manager workflow
You can also add notes to synced tickets adding the ServiceNow Add work note step to the workflow .
Populate the ServiceNow Ticket ID field with the Ticket ID input field you defined earlier and the ServiceNow Table Name field with the Table Name input field. Finally enter you note in the Text field and click Enable.
Now if you update the State of a ServiceNow incident to "Closed", the workflow will be triggered and will add a work note to this incident with the text you specified previously.
Note that if you try to trigger a SaaS Manager workflow via a business rule applied to a non-supported ticket type, the workflow will fail.
Transitioning a ticket to a new state via a 1Password SaaS Manager workflow
ServiceNow tickets can be moved to a new state by adding the Transition ticket step to the workflow. Enter the name of the new state into the State name field and optionally enter text into the Work note and/or Resolution note fields. Selecting a Resolution code is also optional.


When the workflow is triggered, this step will move the incident to the Closed state, add a work note and a resolution note to the incident and set the incident's resolution code to the specified value.
Note that the possible states of a ticket will depend on the configuration of your ServiceNow instance. Closed may not be a valid state.
Comments
0 comments
Please sign in to leave a comment.