- Log in to ChatGPT as a workspace administrator.
- Select your profile icon at the bottom-left in ChatGPT.
- In the menu, select Workspace settings > Identity & Provisioning.
- Scroll down to User Provisioning.
- Under Directory Sync (SCIM), select Create Directory Connection.
- Select Custom SCIM.
- Follow the wizard to generate the URL and token.
If you've already generated a SCIM token for use in another identity provider (IdP) such as Okta or Entra ID, we recommend reusing the token for 1Password SaaS Manager. If you refresh the token then you'll need to update your identity provider with the new token.
SaaS Manager will only read data by default, so it will not interfere if you already have an identity provider in charge of provisioning and deprovisioning.
If you don't have an identity provider managing users, then select the Provisioning and Deprovisioning checkboxes when you connect from SaaS Manager.
Enabling Audit Logs Feature
The ChatGPT Enterprise audit logs require a "COMPLIANCE API KEY". This key is different than the one used for SCIM configuration.
- Log in to the ChatGPT Admin API portal.
- In the left-hand navigation, select the workspace you want to target, then select the appropriate Project.
- Navigate to API keys.
- Create a Service Account:
- Select Service Account.
- Enter a descriptive name for the service account.
- Select your project from the dropdown, then select Create secret key to create the service account and generate your secret key.
- Copy the secret key and store it in your 1Password vault.
- After you create the new API key, OpenAI requires a manual step to configure the key so it's necessary to follow the rest of the instructions in the OpenAI Instructions for Authentication.
- After the API key has been configured correctly it should appear with the "Restricted" Permissions and be ready for use.
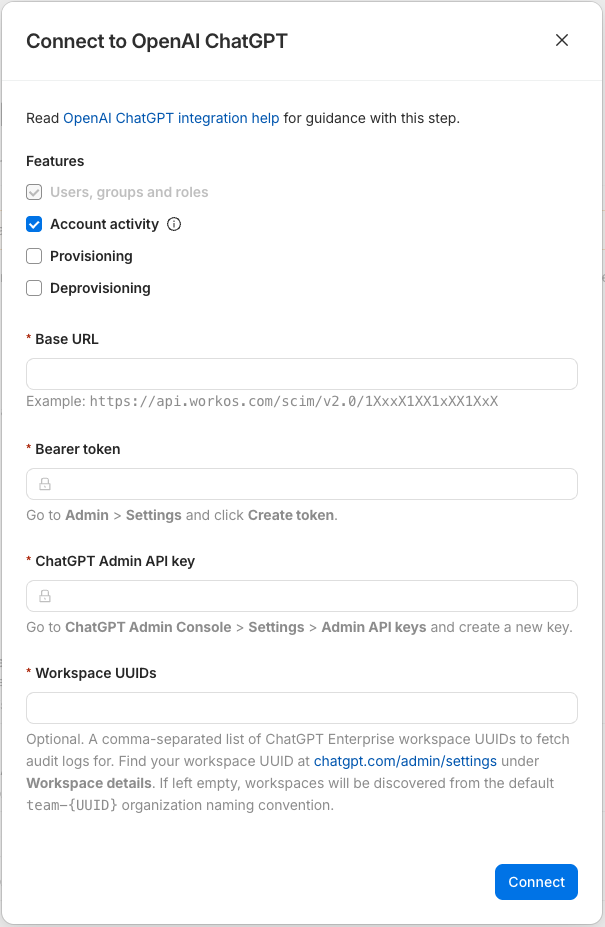
If you have workspaces that have been renamed, you may receive errors when trying to connect. If this happens, you'll need to navigate to your ChatGPT Admin Settings page, navigate to the General tab, and then copy the Workspace ID under Workspace details. Return to SaaS Manager and paste the copied ID into the Workspace UUIDs field on the connection pop-up. You can add multiple UUIDs separated by commas to the field.
Comments
0 comments
Please sign in to leave a comment.