The REST API supported by Microsoft for managing Exchange Online (EXO) is limited in what it can do.
Full functionality is available using the Exchange Online PowerShell module.
To run these actions you will need to host and run a script yourself on a scheduled basis, for example every hour. The script integrates with a 1Password SaaS Manager workflow to check for jobs that need processing.
This article describes how to:
- Configure a connection to Exchange Online.
- Create a sample SaaS Manager workflow and API client.
- Modify and use a supplied PowerShell script to execute Exchange Online actions.
- Run the script to check the SaaS Manager workflow API endpoints for jobs to execute.
Background to authenticating with Exchange Online
Previously Microsoft supported Basic Authentication for the EXO PowerShell module but this has been deprecated. Authentication is now certificate-based which requires configuration through Entra.
The process is described in full in this Microsoft article on App-only authentication for unattended scripts in Exchange Online PowerShell and Security & Compliance PowerShell.
We've provided a simplified description here which also has specific instructions if you are configuring from macOS or Linux.
The full Microsoft article is has additional information if you want to control Entra permissions in a more granular way.
Creating an app in Entra ID
- Go to App registrations and select New registration:

- Enter a name, for example SaaS Manager EXO, and make sure that Accounts in this organizational directory only is selected.
- Select Register.
- On your newly created application select API permissions > Add a permission.
- Select the APIs my organization uses tab and search for Office 365 Exchange Online.
- Select the entry in the list.
- Select Application permissions.
- Search the permissions for Exchange and select the box next to Exchange.ManageAsApp.

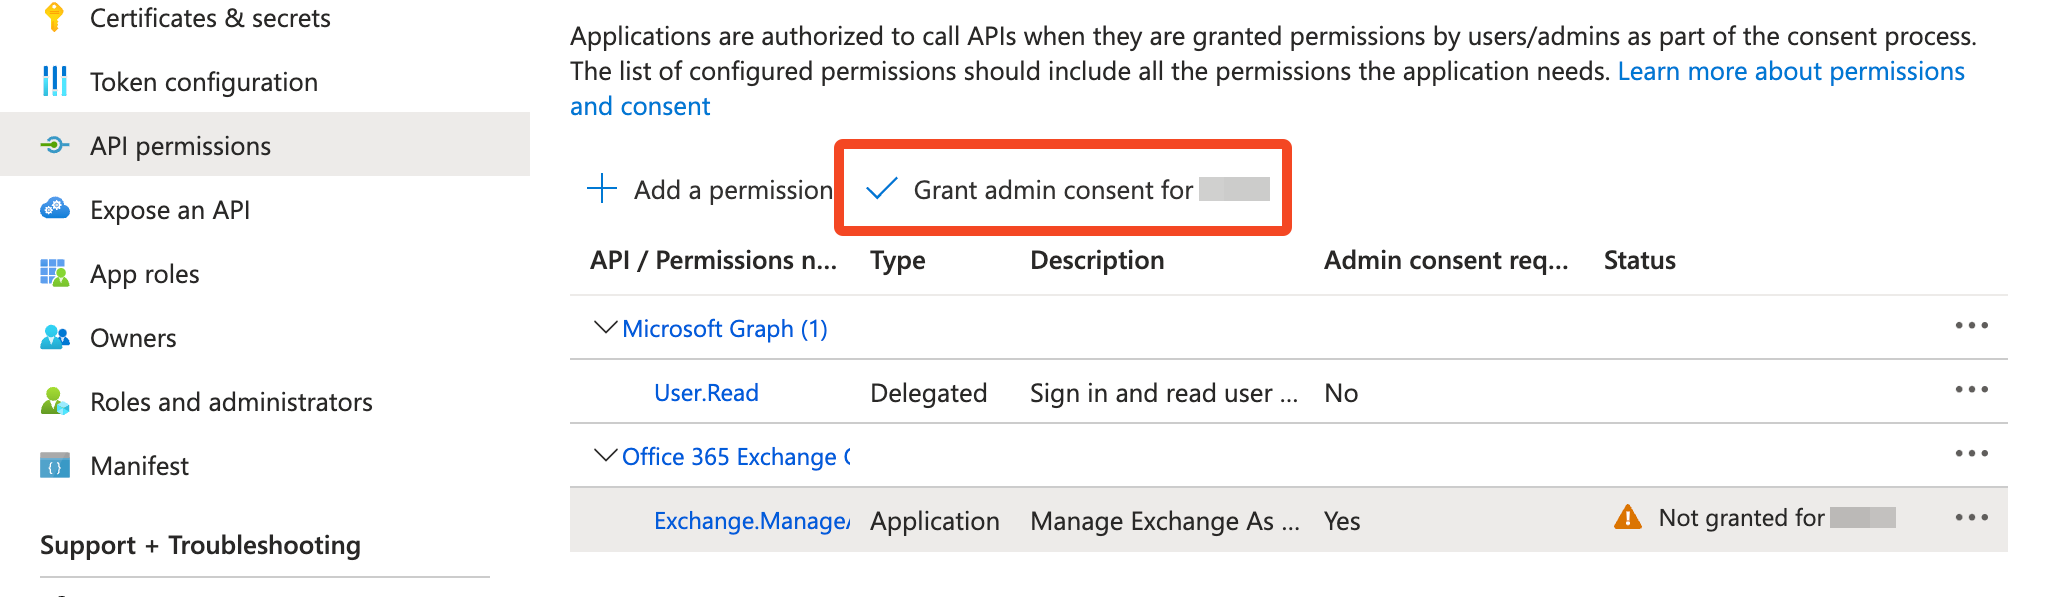
- Select Add permissions at the bottom of the screen. You will be taken back to the main API permissions screen.
- Select the tick icon to Grant admin consent:
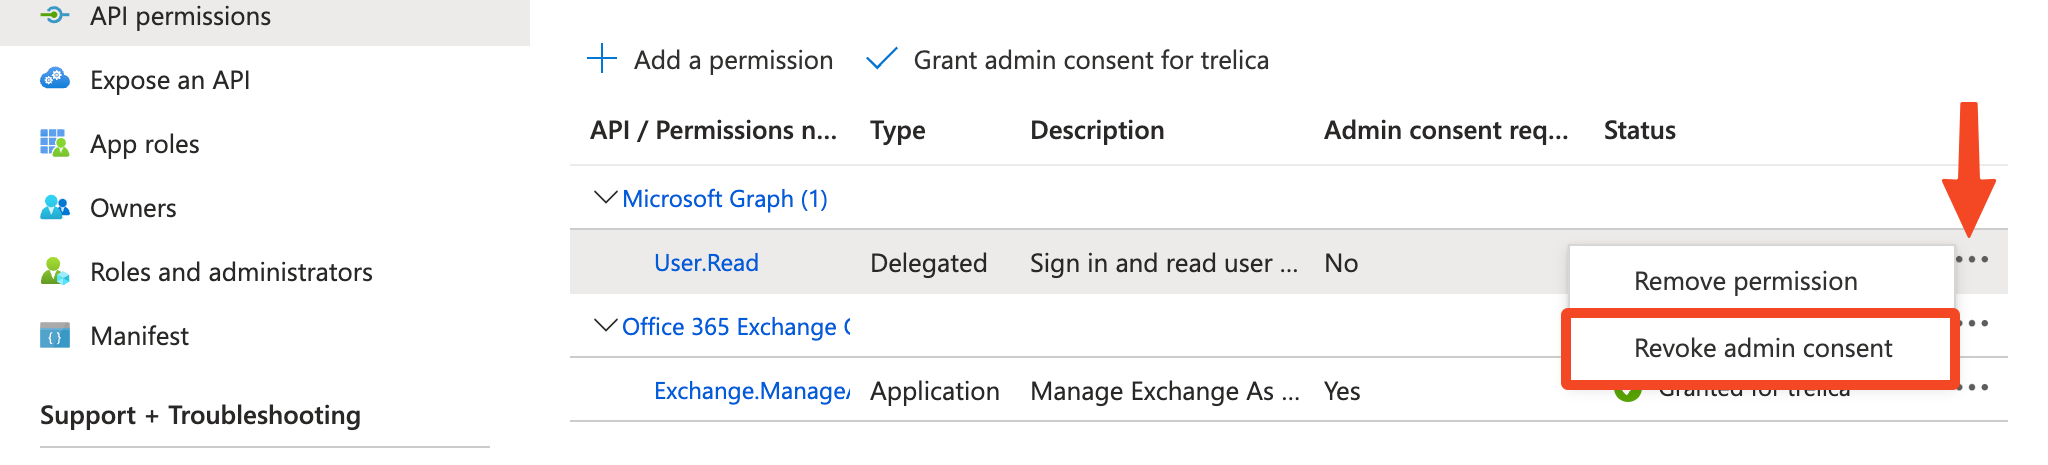
- Both permissions will now show that admin consent has been granted. Revoke admin consent for the User.Read permission:
Creating a self-signed certificate
You now need to create a self-signed certificate on your local machine, and then assign this to the Entra application you just configured.
You should configure a strong password for your private key when prompted.
Windows
Go to PowerShell, and use the Microsoft PKI module to configure a certificate. For more information see the official Microsoft article.
- Use "Run as Administrator" to open a Powershell session.
- This contains a link to a Powershell file called
Create-SelfSignedCertificate.ps1. You'll need to download this to the folder you're running from and you may need to temporarily modify your execution policy (Set-ExecutionPolicy Unrestricted) to run a non-digitally signed Powershell script. - Alter
-DnsName "xxxxxx.onmicrosoft.com"in the first step, and the CommonName and dates in the final step. - After you export to .pfx you will be presented with a 'login' style dialog. This is to allow you to securely enter a password credential. The username is irrelevant and the password is whatever you wish to choose.
# Create certificate
$mycert = New-SelfSignedCertificate -DnsName "xxxxxx.onmicrosoft.com" `
    -CertStoreLocation "cert:\CurrentUser\My" `
    -NotAfter (Get-Date).AddYears(1) -KeySpec KeyExchange

# Export certificate to .pfx file
$mycert | Export-PfxCertificate -FilePath mycert.pfx `
    -Password (Get-Credential).password

# Export certificate to .cer file
$mycert | Export-Certificate -FilePath mycert.cer

# Use the Create-SelfSignedCertificate script to generate SHA1 certificates.
Create-SelfSignedCertificate.ps1 -CommonName "MyCompanyName" `
-StartDate 2024-04-01 -EndDate 2025-04-01<MyCompanyName>.cer and <MyCompanyName>.pfx depending on the company name you enter.macOS or Linux
The PKI module doesn't work on PowerShell Core which is used on macOS or Linux. Instead you can use openssl to generate the certificates.
"/CN=xxxxxx.onmicrosoft.com" in the first command and change YourOrg in the final command for your organization name.# Generate a private key and a self-signed certificate
openssl req -x509 -nodes -newkey rsa:2048 -keyout private.key \
-out certificate.crt -days 365 -subj "/CN=xxxxxx.onmicrosoft.com"
# Generate a PKCS#12 file containing the private key and certificate
openssl pkcs12 -export -out mycert.pfx -inkey private.key -in certificate.crt
# Export the certificate to a DER-encoded file
openssl x509 -outform der -in certificate.crt -out mycert.cer
# Generate a private key and a self-signed certificate in one step
openssl req -x509 -nodes -newkey rsa:2048 -keyout private.key \
-out certificate.crt -days 365 -subj "/CN=YourOrg" \
-addext "subjectAltName = DNS:YourOrg"Linking the certificate to the Entra app
- Go back to your application and select Certificates & secrets.
- Select the Certificates tab and select Upload certificate.
- Upload the mycert.cer file and select Add:
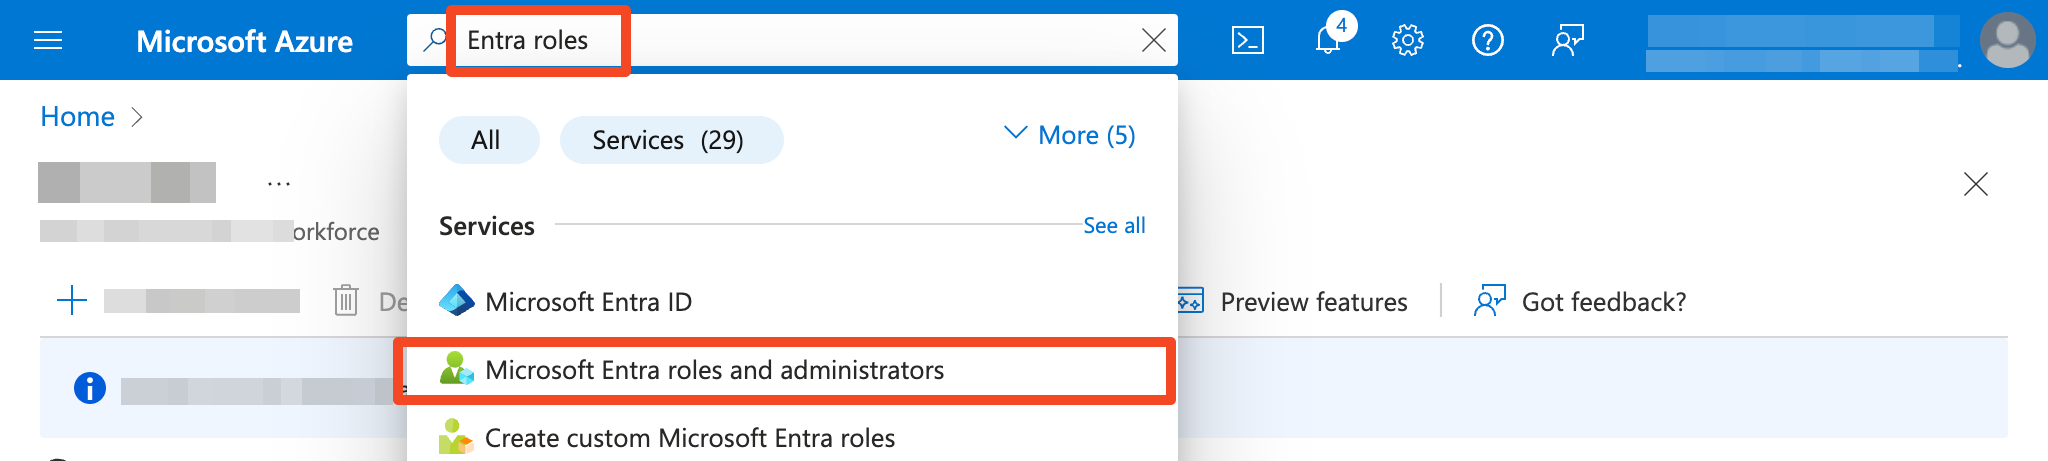
Assigning the Entra app to a role
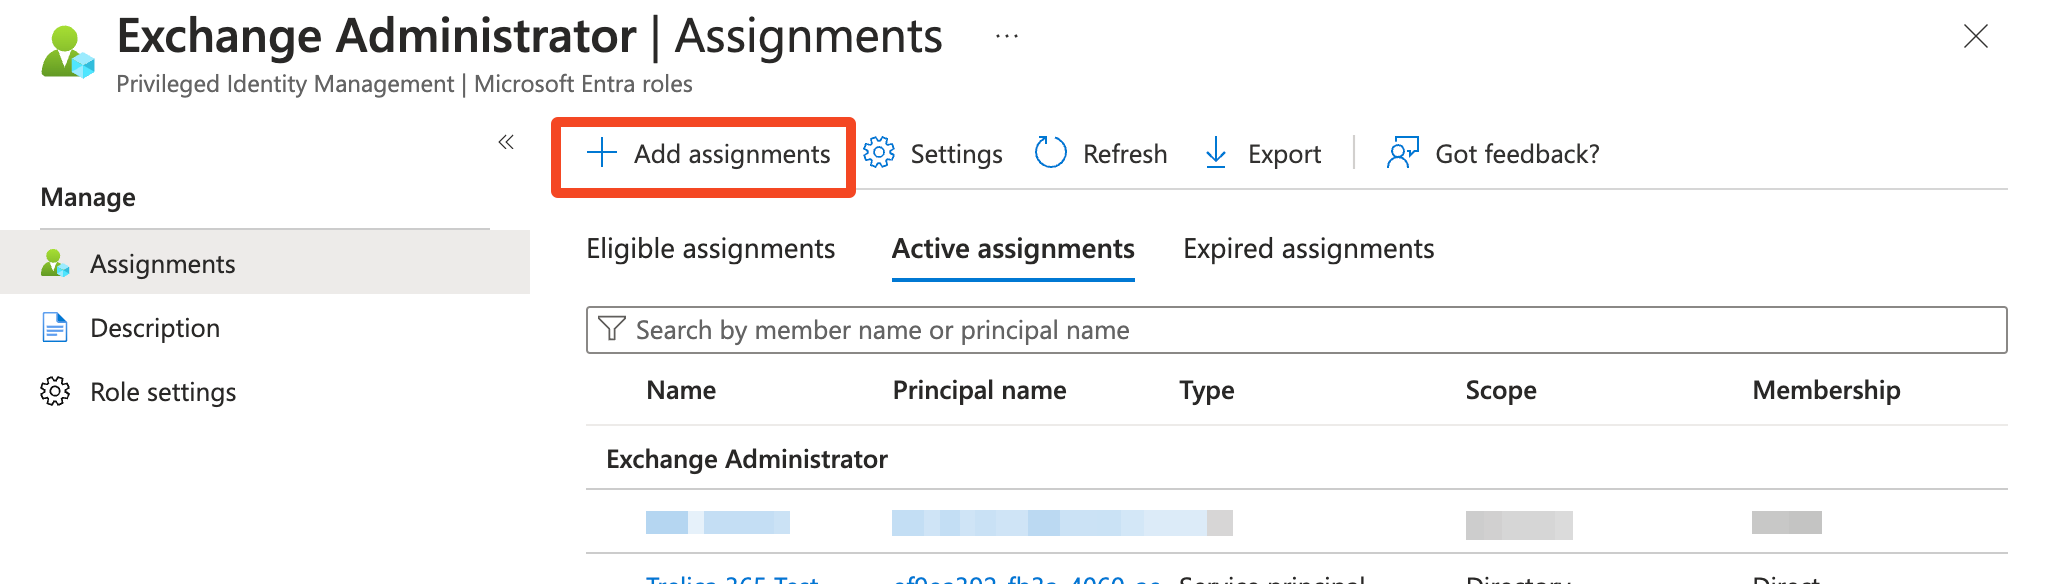
- Find the Microsoft Entra roles and administrators service in Azure
- Search for the Exchange Administrator role and select it.
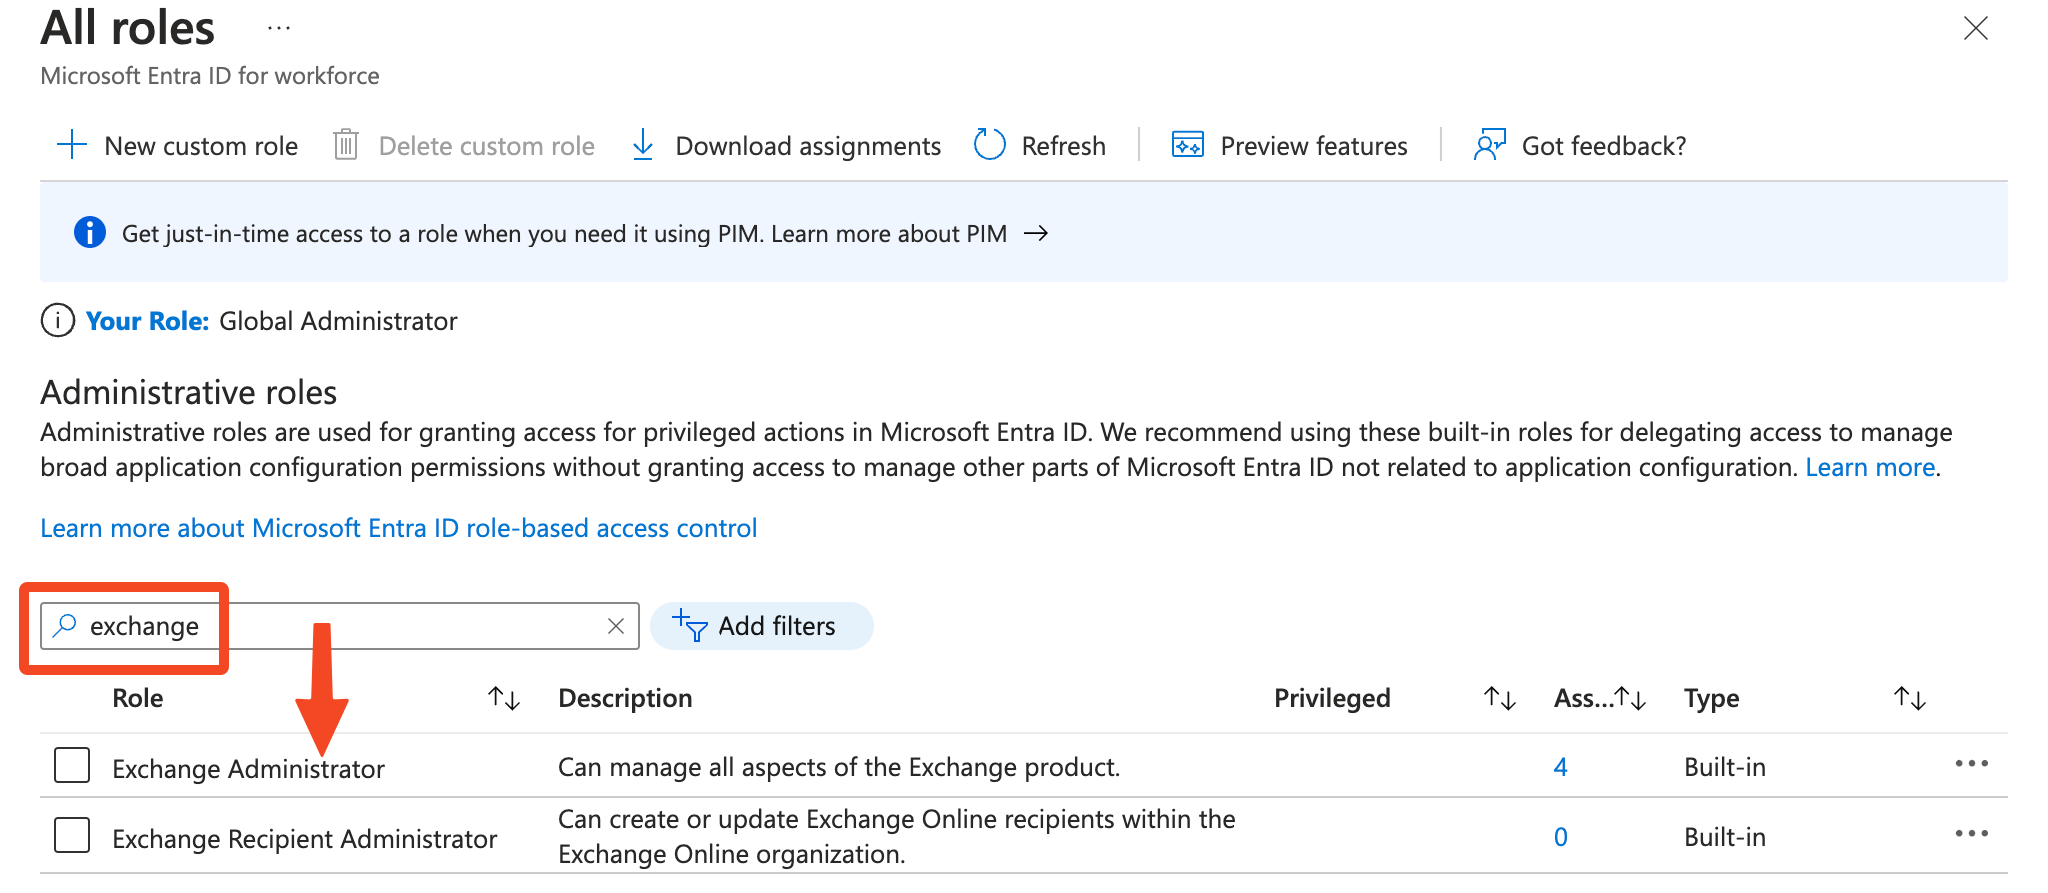
- Select Add assignments:
- Select No member selected to add members:
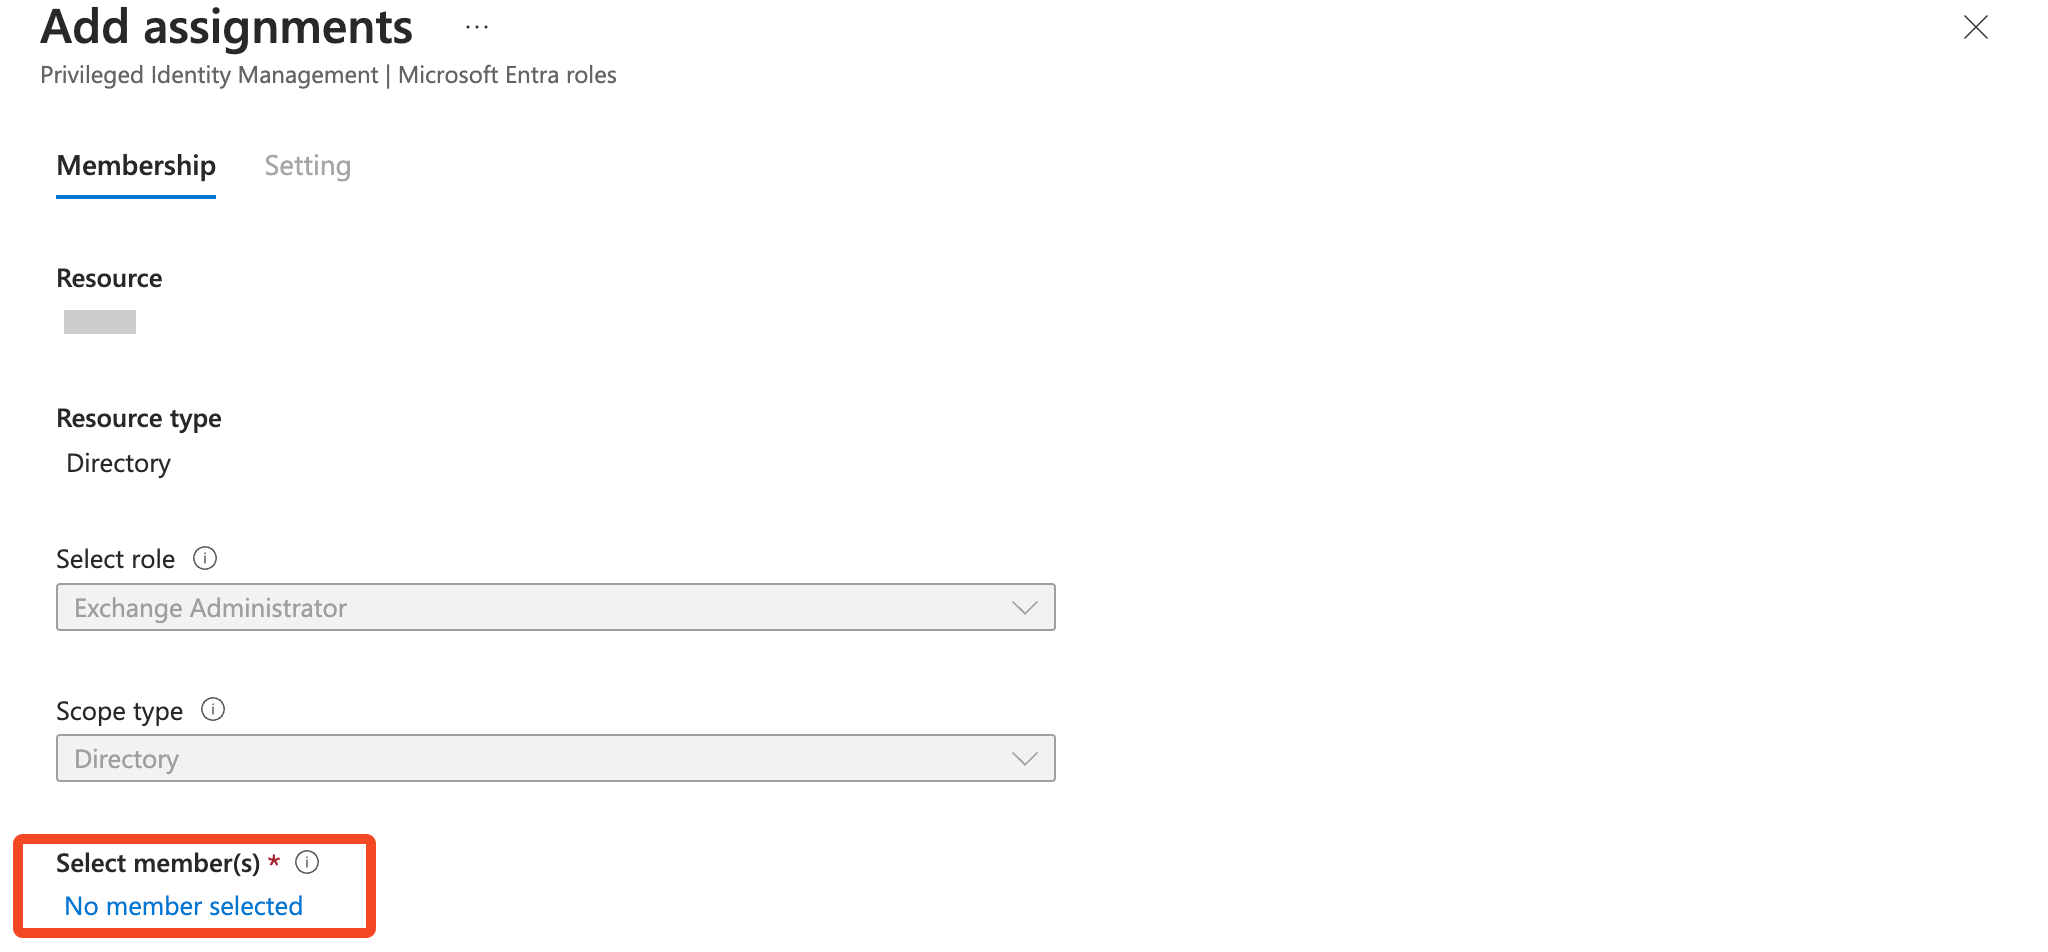
- Search for the application you created earlier (
SaaS Manager EXO), check the box next to it, and select Select at the bottom of the page. - Select Next and enter a justification for the role change. For example, "Configuring SaaS Manager."
- Select Assign.
Finding the Application ID
Find the application you registered at the start and copy the Application (client) ID.
Testing the connection
-
Go to PowerShell and install the EXO module:
Install-Module ExchangeOnlineManagement -
In the command below, swap out the
AppIDand theOrganizationdomain:
(in Windows you may need to enter the full path to the PFX file)Connect-ExchangeOnline -CertificateFilePath "./mycert.pfx" ` -CertificatePassword (Get-Credential).password ` -AppID "xxxxxxxx-xxxx-xxxx-xxxx-xxxxxxxxxxxx" ` -Organization "xxxxx.onmicrosoft.com" -
Run a command to list some mail boxes to confirm everything is working:
Get-EXOMailbox -ResultSize 5 | ft Name,UserPrincipalName
Sample output from macOS: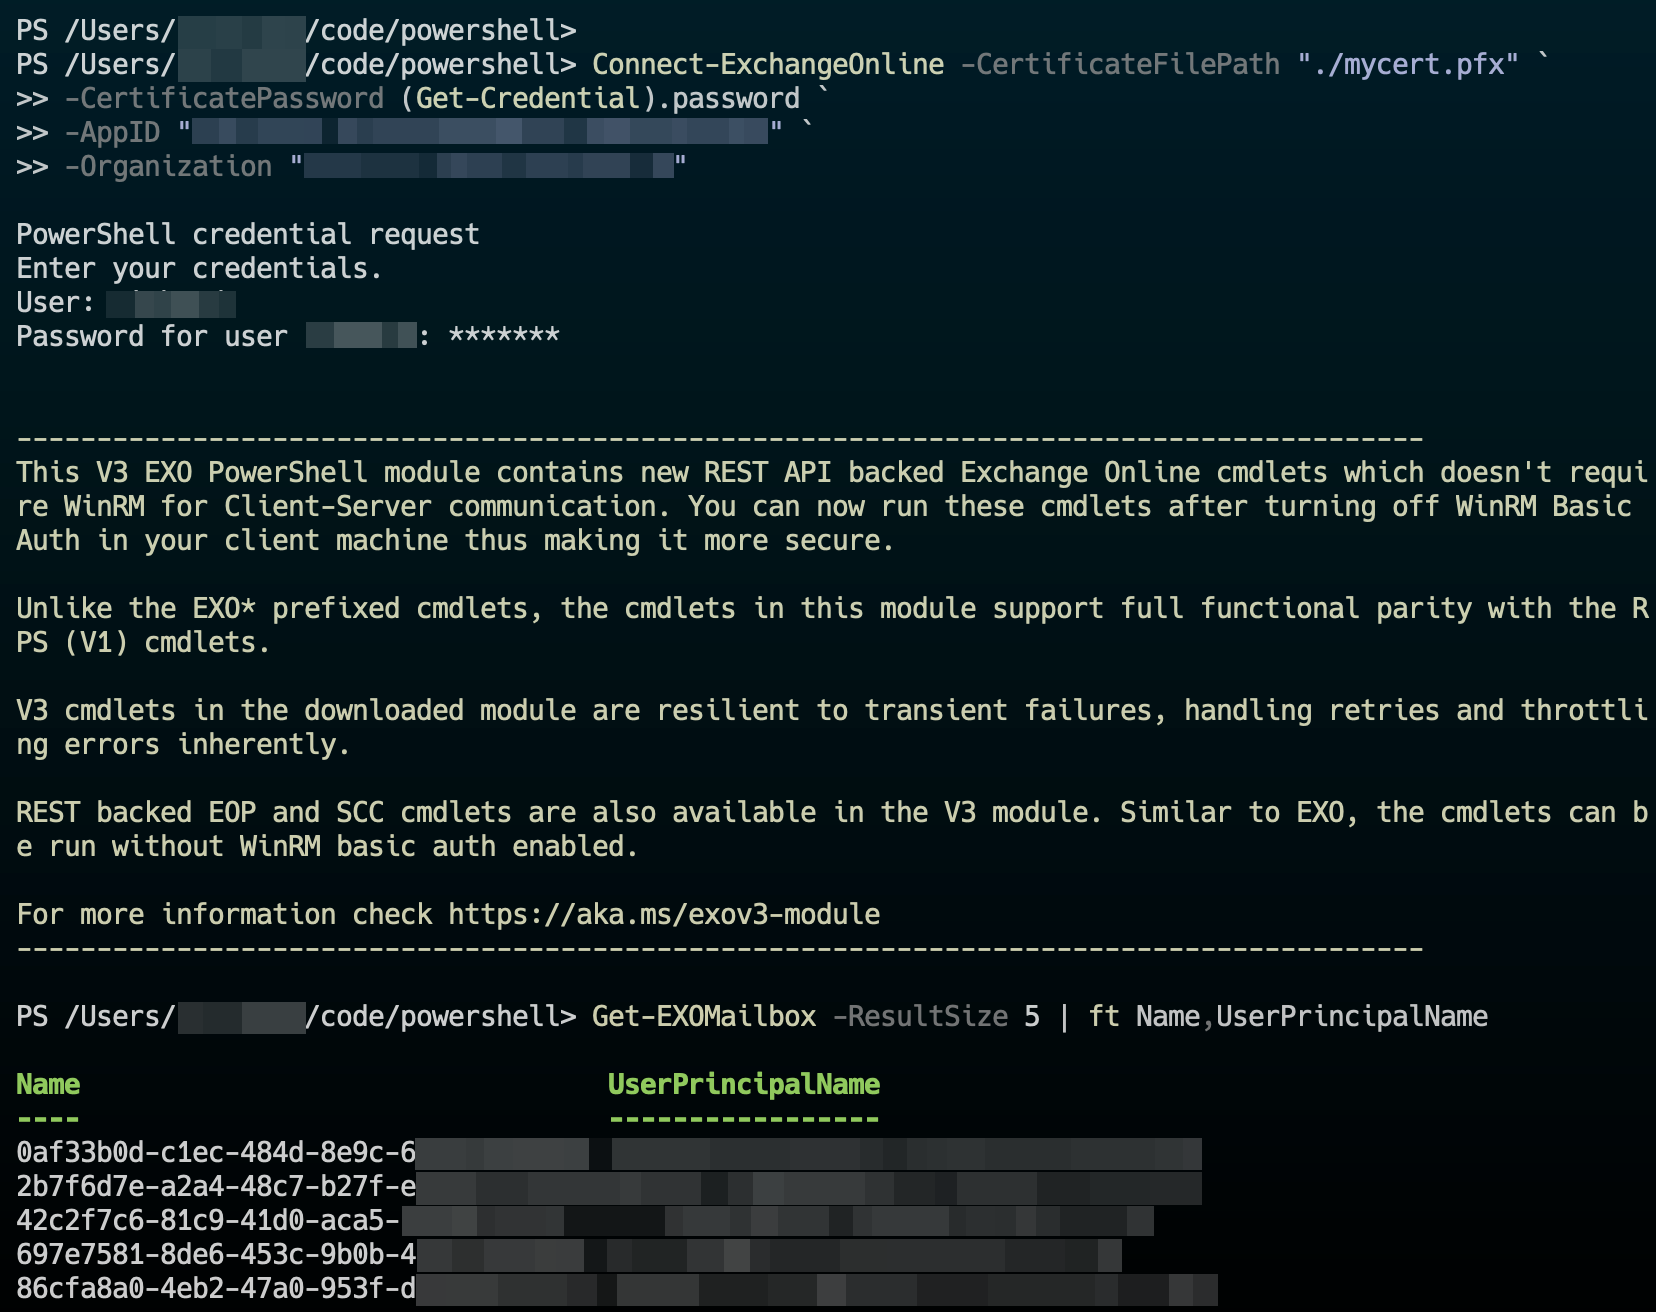
Building a workflow
- Create a Person leaves workflow called
Terminate Usersin SaaS Manager and add a Signal step. - Set the Description to
Wait for PowerShelland add a Primary button namedContinue. - Save the workflow
- Go to the "More" (...) menu, and select Run now. Select a user you want to test against.
- View the workflow run - it should be waiting on the Signal step.
We will now run a PowerShell script that will look for workflow runs waiting on the Signal step and run some specific Exchange Online actions.
For the script to access the workflow via the SaaS Manager API you need to configure a SaaS Manager API client.
- Go to Settings > API Access and select New.
- Enter a name, e.g.
PowerShell EXO Scriptand select Client credentials and the Workflows.Read, Workflows.Runs.Read and Workflows.Runs.Execute scopes). If you need an appropriate icon there is one at the bottom of this article. - Copy the Client ID and Client Secret to the clipboard and select Save.
Running from PowerShell
If you've not used the SaaS Manager API from PowerShell before we recommend reading more about this first.
To set (or reset) SaaS Manager API client credentials you can use:
Initialize-SaaS ManagerCredentials -Reset -BaseUrl https://app.trelica.comWindows
If you're running Windows you can install the certificate in the user certificate store for the current user.
You can then connect by passing the certificate thumbprint.
Connect-ExchangeOnline -CertificateFilePath "./mycert.pfx" `
    -CertificateThumbPrint "012THISISADEMOTHUMBPRINT" `
    -AppID "xxxxxxxx-xxxx-xxxx-xxxx-xxxxxxxxxxxx" `
    -Organization "xxxxx.onmicrosoft.com"
macOS or Linux
Under macOS or Linux we recommend at least storing the password secret in Microsoft's Secret Management module.
Install-Module Microsoft.PowerShell.SecretManagement, Microsoft.PowerShell.SecretStore

Set-Secret -Name EXOCertificatePassword -Secret XXXXXXX

Connect-ExchangeOnline -CertificateFilePath "./mycert.pfx" `
    -CertificatePassword (Get-Secret -Name EXOCertificatePassword) `
    -AppID "xxxxxxxx-xxxx-xxxx-xxxx-xxxxxxxxxxxx" `
    -Organization "xxxxx.onmicrosoft.com"
Sample script
There's a script that you can modify to meet your needs in the SaaS Manager Powershell Git repository.
https://github.com/trelica/powershell
You should change various variables near the top and potentially change the connection to EXO at the bottom.
It has a DRY_RUN mode which will let you test the basic flow:
# Set to $true to do a dry run, not connecting to EXO or posting results to SaaS Manager
$DRY_RUN = $false

# Set to $true to write out JSON received from SaaS Manager
$DEBUG = $false

# Core settings
$CERT_PATH = "/Users/xxxxxx/code/scripts/mycert.pfx"
$ORG = "xxxxxx.onmicrosoft.com"
$APPID = "xxxxxxxx-xxxx-xxxx-xxxx-xxxxxxxxxxxx"
$DEPROVISIONING_WORKFLOW_LIST = @("Terminate Users")
$STEP_NAME = "Signal"
$ACTION_NAME = "Continue"
If you run the script you can see the following output:
Initialize-SaaSManagerCredentials | Get-SaaSManagerContext | ./EXOWorkflowSync.ps1 `
    -CertificatePassword (Get-Secret -Name EXOCertificatePassword)
Credentials path: /Users/xxxxxx/SaaSManager
Connecting to xxxxx.onmicrosoft.com...

DEPROVISIONING WORKFLOWS
========================
Requesting runs for Workflow 'Terminate Users' (ID 660ab540333bc526179a2cc7) and Action Step ID 660ab54e8f758630e9261bc7...
> Processing run ID 660ab6de333bc526179a2e18: 'Edward Gibbon' at 2024-26-01 16:26 +02:00
----------------------------------------------------------------------------------------
POSTing 'Continue' action for run ID 660ab6de333bc526179a2e18: 'Edward Gibbon'...


DONE
We can now check the status in the Exchange admin center:
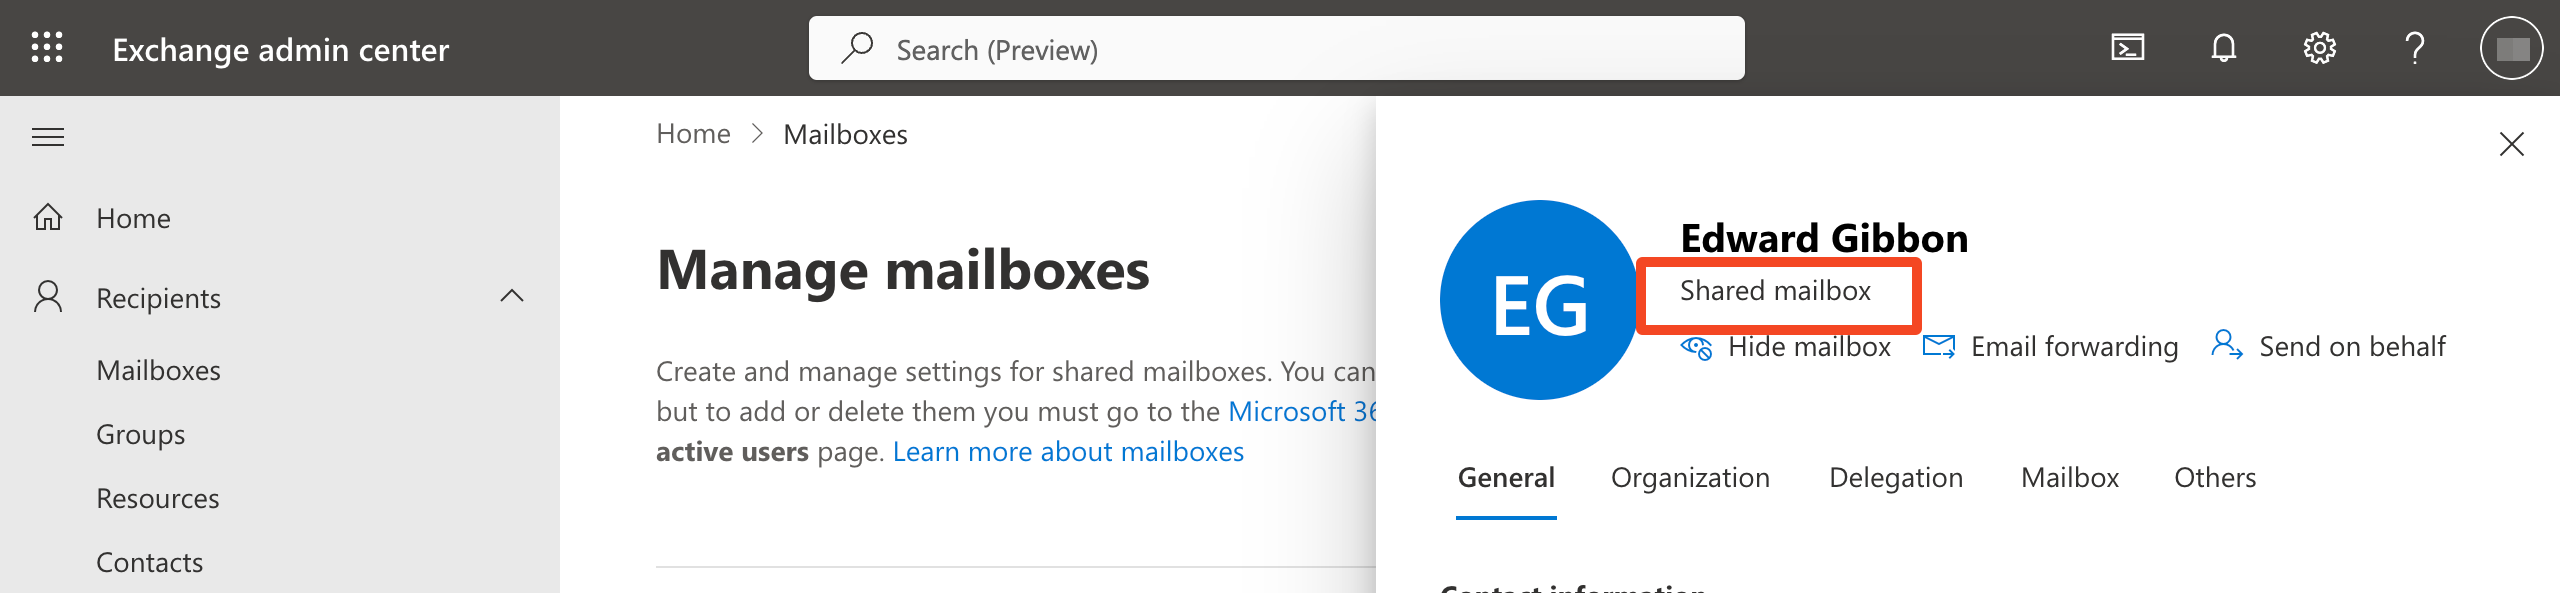
In SaaS Manager, you can confirm that the workflow run has completed.
Comments
0 comments
Please sign in to leave a comment.