1Password SaaS Manager supports various ADManager Plus actions from SaaS Manager workflows. To use these you have to connect ADManager Plus to SaaS Manager. As part of this process you will be asked for an "Authtoken". This guide explains how to provide this parameter.
You may however already have ADManager Plus automations configured, so an alternative way to drive workflows is through a SaaS Manager Application Integration in ADManager Plus which is also described here.
Connecting ADManager Plus to SaaS Manager
You will need either the helpdesk technician or built-in admin role delegation to generate an Authtoken.
There are two ways to generate an authtoken:
- Via the My Account menu (requires the helpdesk technician role)
- Via the Delegation menu (requires the built-in admin role)
The following information should be entered into the authtoken form:
- The technician for whom you'd like to generate an authtoken
- The name of the authtoken
- The scopes of the authtoken:
Create user actionRead user actionUpdate user actionRead group actionUpdate group action
- The expiry time of the authtoken
My Account
- In ADManager Plus, navigate to My Account > Active Authtokens
- Click the Generate Authtoken button

Delegation
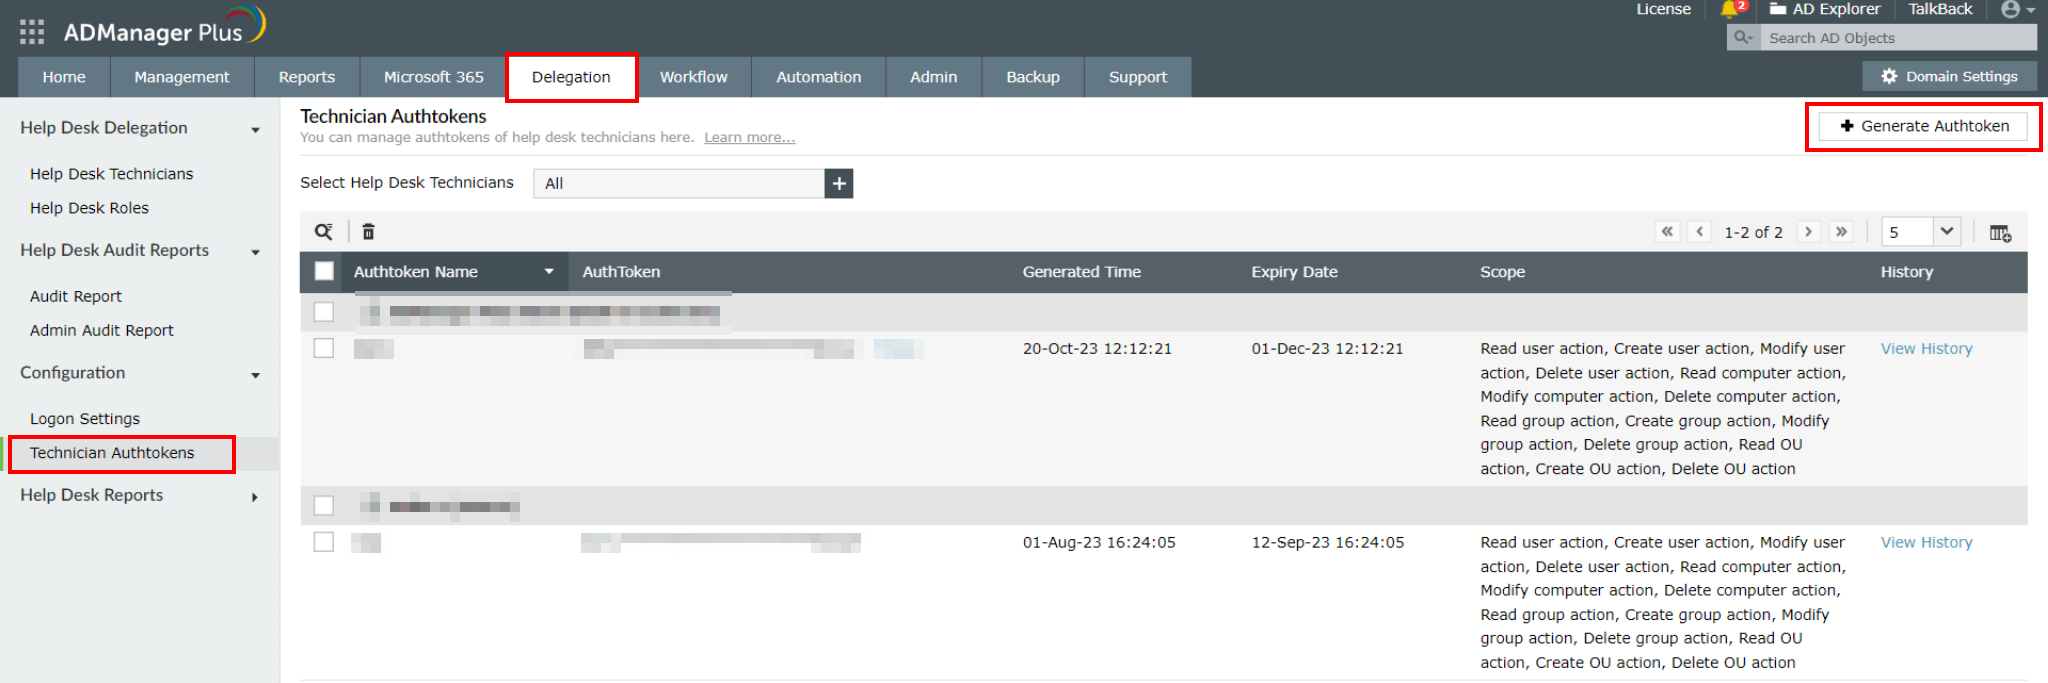
- In ADManager Plus, navigate to Delegation > Technician Authtokens.
- Click the Generate Authtoken button.
Connecting SaaS Manager to ADManager Plus
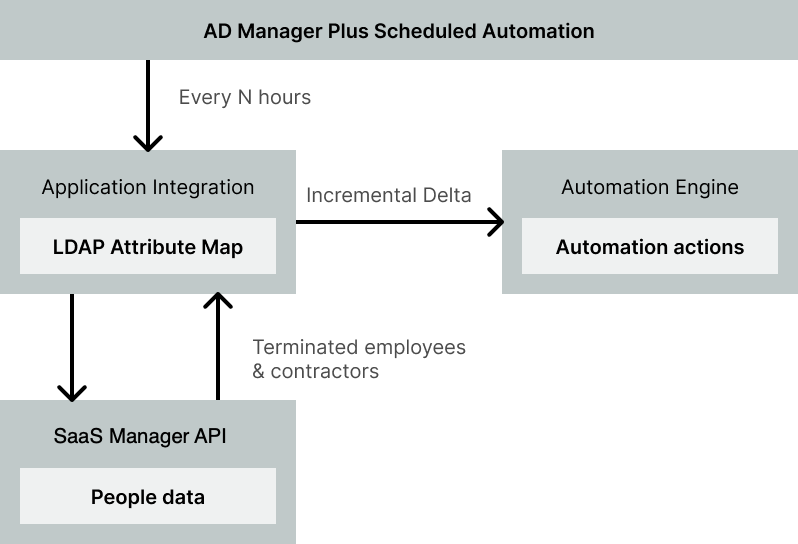
You may however already have ADManager Plus automations configured, so an alternative way to drive workflows is creating a SaaS Manager Application Integration in ADManager Plus.
This can be driven by the results of an API call to SaaS Manager which works particularly well for triggering offboarding automations in ADManager Plus.
Create an API application in SaaS Manager
- From your SaaS Manager dashboard, navigate to to Settings > API Access and click New
- Upload a logo (one is provided at the bottom of this page - ad logo.svg), and enter
ADManager Plusas the App name. - Check the Read people scope.
- Copy the Client ID and Client Secret values - you will need these shortly so put them in a text file or on your clipboard.
- Click Save. The Client ID and Secret will only be valid once you have clicked Save.
Create a new Application Integration in ADManager Plus
- Go to the Automation tab and choose Configuration > Application Integrations.
- Click Custom Application
- Enter a name and upload a logo. You can download a SaaS Manager logo here.
- Click Save.
Configure the Application Integration
Authorization
-
Enter the following values.
Authorization Type OAuth 2.0 Header Prefix (leave empty) Grant Type Client Credentials Access Token URL https://trelica.app/connect/tokenClient ID From the SaaS Manager API client Client Secret From the SaaS Manager API client Scope (leave empty) Client Authentication Send Client Credentials In Request Body - Click Configure.
- Click Add API Endpoint.
Configuring the endpoint
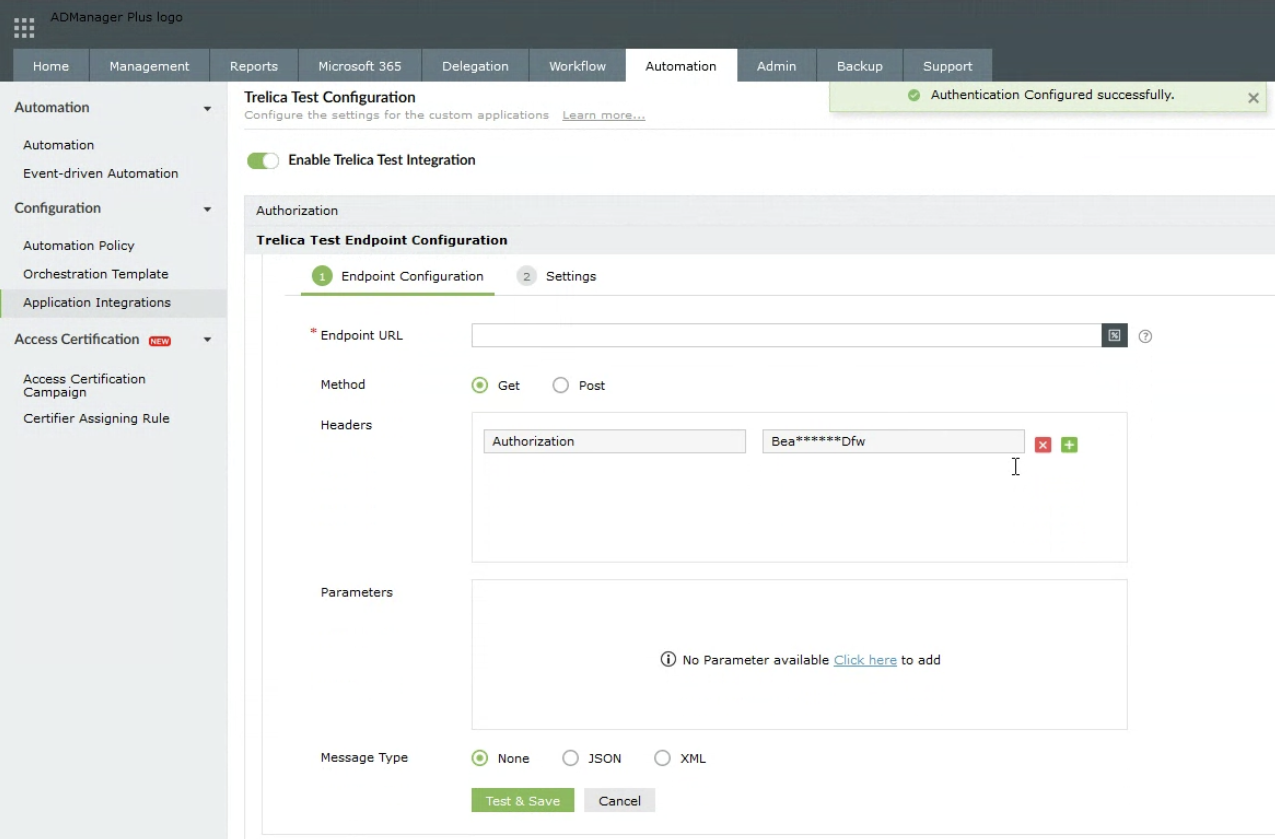
The Endpoint URL requires a full URL and the query string must be URL Encoded. The API URL you want to call is https://trelica.app/api/people/v1?filter=<filter-value>
The filter can be configured to meet your needs but we suggest
status eq "Terminated" and leavingDate gt "2024-02-01" and (personType eq "Contractor" or personType eq "Employee")
We recommend fetching people terminated after a recent date because otherwise the first run will potentially fetch a lot of already terminated users from long ago.
You can use a site like https://www.urlencoder.org/ to encode your filter. You only need to encode the filter value, not the whole URL. An example of a correctly encoded URL would be
https://trelica.app/api/people/v1?filter=status%20eq%20%22Terminated%22%20and%20leavingDate%20gt%20%222024-02-01%22%20and%20(personType%20eq%20%22Contractor%22%20or%20personType%20eq%20%22Employee%22)
The Method should be Get.
No additional Headers (beyond the Authorization header which ADManager Plus adds for you) or Parameters are required. The Message Type can be left as None.
Click Test & Save when you are ready.
You should be shown a tree hierarchy of the data structure returned. Click Proceed.
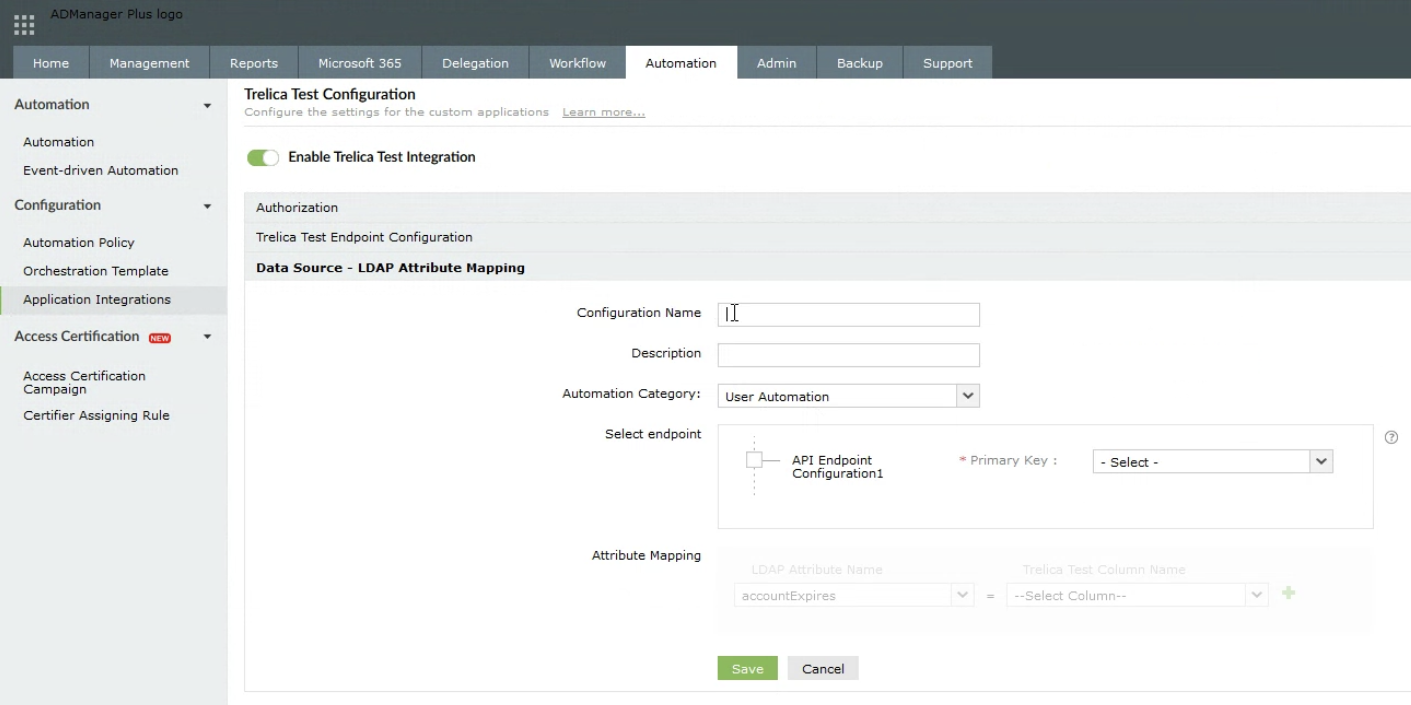
LDAP Attribute Mapping
Enter a Configuration Name (e.g. SaaS Manager Attributes).
The Primary Key will be response.id
Create a mapping from userPrincipalName to response.email .
Click Save.
Configure a Scheduled Automation
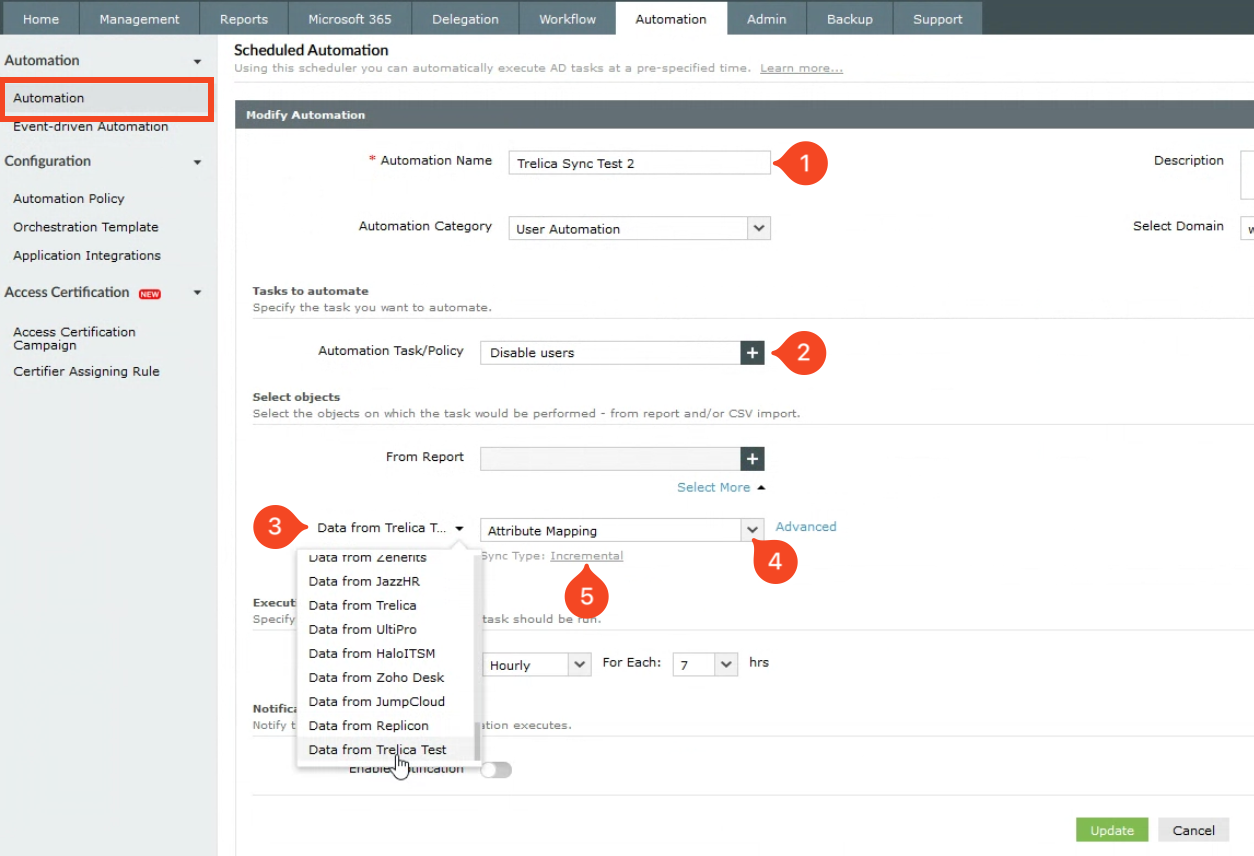
Go to the Automation menu and click Create New Automation at the top right of the list.
- Give the Automation a name, and ensure that the User Automation category is selected.
- Select an Automation Task you want to run for each SaaS Manager user that is returned by the API call.
- Under Select objects, pick the data source - this will be the Application Integration you configured earlier.
- Pick the Attribute mapping you configured for the Application Integration.
- Choose the Incremental sync type in order to just run the automation for new rows returned by the API query.
- Click Update.
Testing
Go to the Schedule Automation list.
Ensure that the automation is enabled (it will have a green tick next to the name) and then click Run Now.

Once the automation has run you can see the results by clicking the small icon to the right of the Run Now button.
- ad logo.svg3 KB
Comments
0 comments
Please sign in to leave a comment.