Connect to Freshservice from 1Password SaaS Manager
In 1Password SaaS Manager, go to Integrations > Freshservice and select Connect.
Find your API key
- Log in to Freshservice.
- Select your profile avatar in the top right corner of your screen.
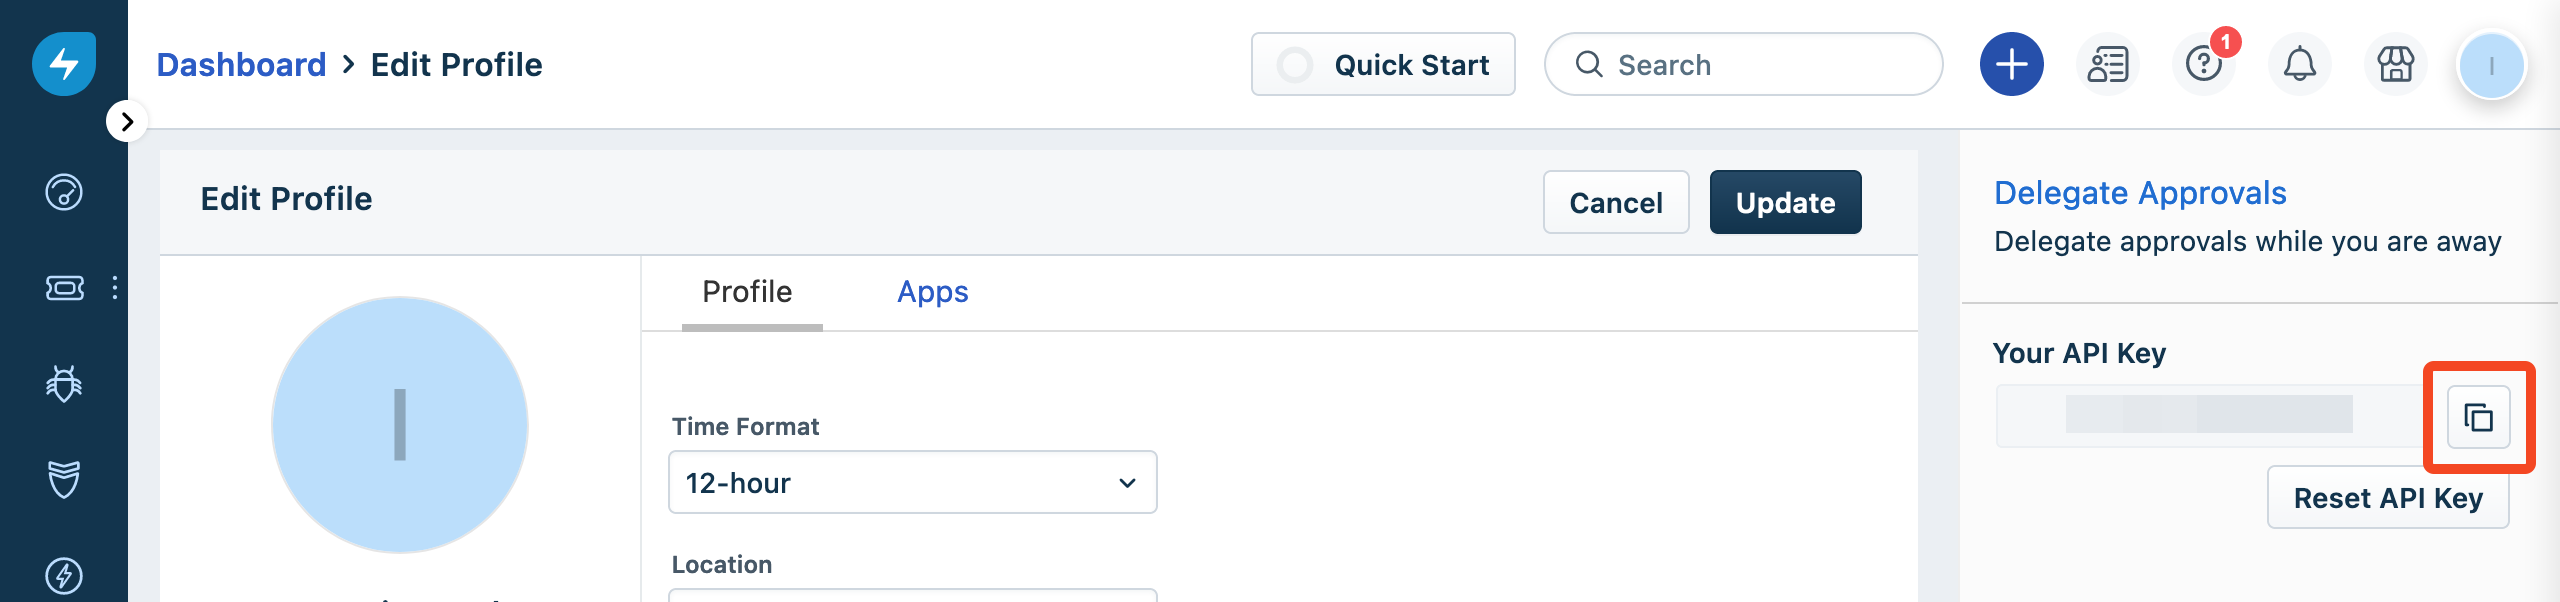
- Select Profile settings:

- Copy your API Key to the clipboard:
Actions on Freshservice agents
Permanently remove access
The Delete action in SaaS Manager is the same as Forget Agent in Freshservice.
All incidents and notes (public and private) created by this agent will be deleted.
All Service Requests which were requested for this user will also be deleted.
The 'Forgot Agent' action will be recorded under the Activities tab.
The previous actions performed by the forgotten agent (including their name) will remain in the audit log.
Reduce costs
If an agent is not active in Freshservice, either:
- Change the user license type from Full-Time to Occasional. This will switch billing to use day passes, rather than as a full-time agent.
Change the user license type back to Occasional if the agent becomes more active to avoid purchasing additional day passes.
OR - Deactivate the user. The user will no longer have access to Freshservice:
- You will not be able to assign entities (such as tickets, problems, devices and projects) to them.
All tickets assigned to the agent with Open, In Progress or Pending statuses will automatically become unassigned.
All tickets assigned to the agent with Resolved and Closed statuses will remain as it is.
The agent will automatically be removed from all account level configurations except workflow automator, in which users will have to manually remove the agent from the associated workflow.
Keep SaaS Manager tasks and Freshservice tickets in sync
When you connect to Freshservice from SaaS Manager you can enable the Create Tickets option.
To keep a SaaS Manager task's status in sync with a Freshservice ticket, you will need to create a workflow using Freshservice's Workflow Automator that will update SaaS Manager when the ticket's status changes.
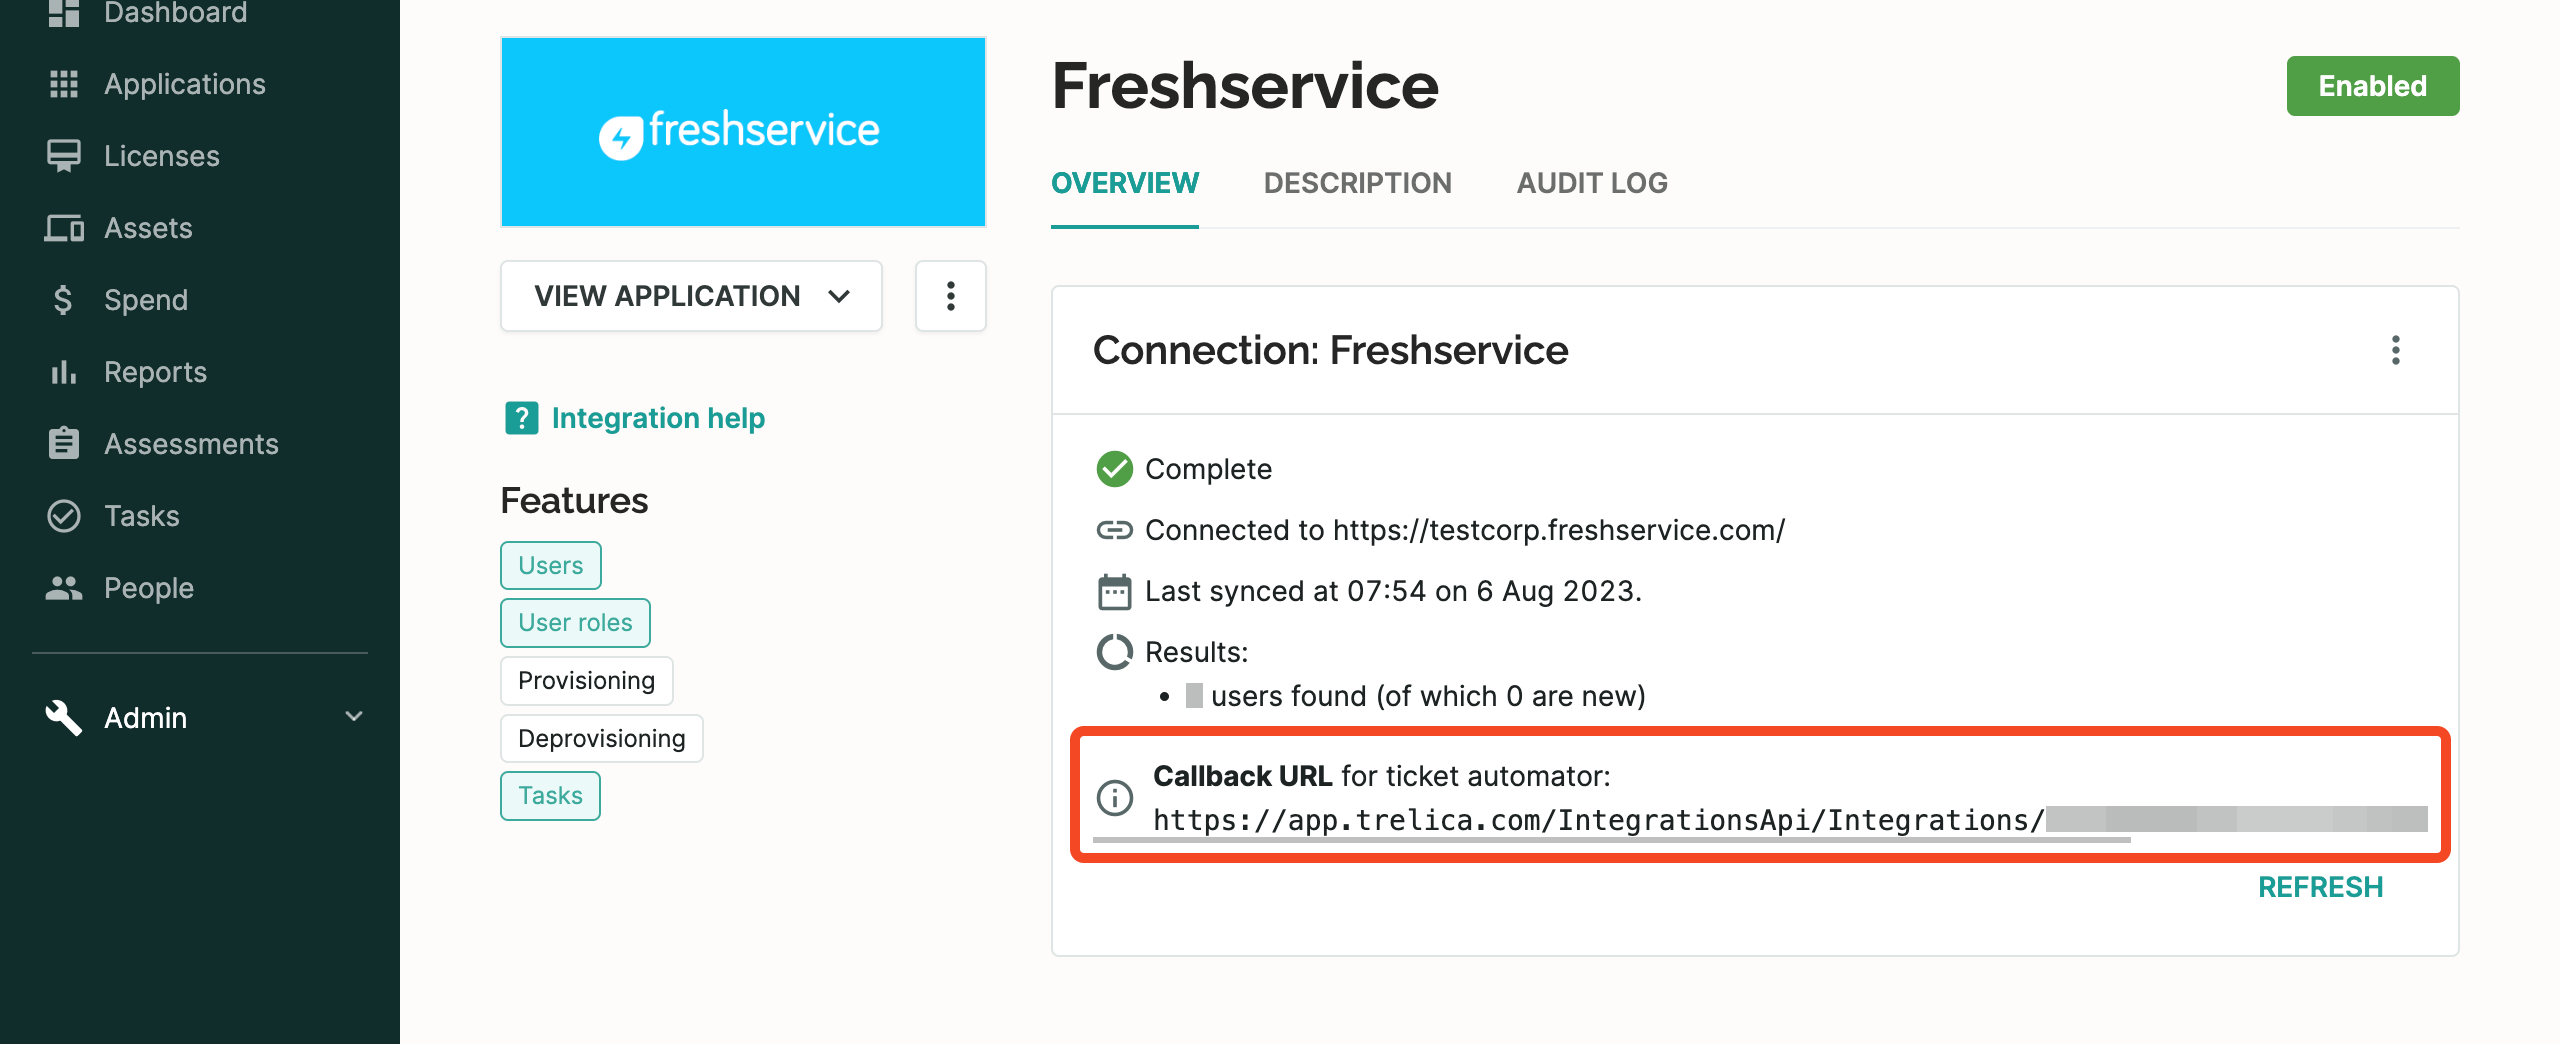
Before starting, go to the Freshservice integration in SaaS Manager, and find the Callback URL for the Freshservice ticket automator. You will need this when setting up the Freshservice workflow.
Create a Freshservice workflow
- Navigate to the Admin page in Freshservice.
- On the Admin page, select the Workflow Automator link within the Automation & Productivity section. You can search for
workflow automator.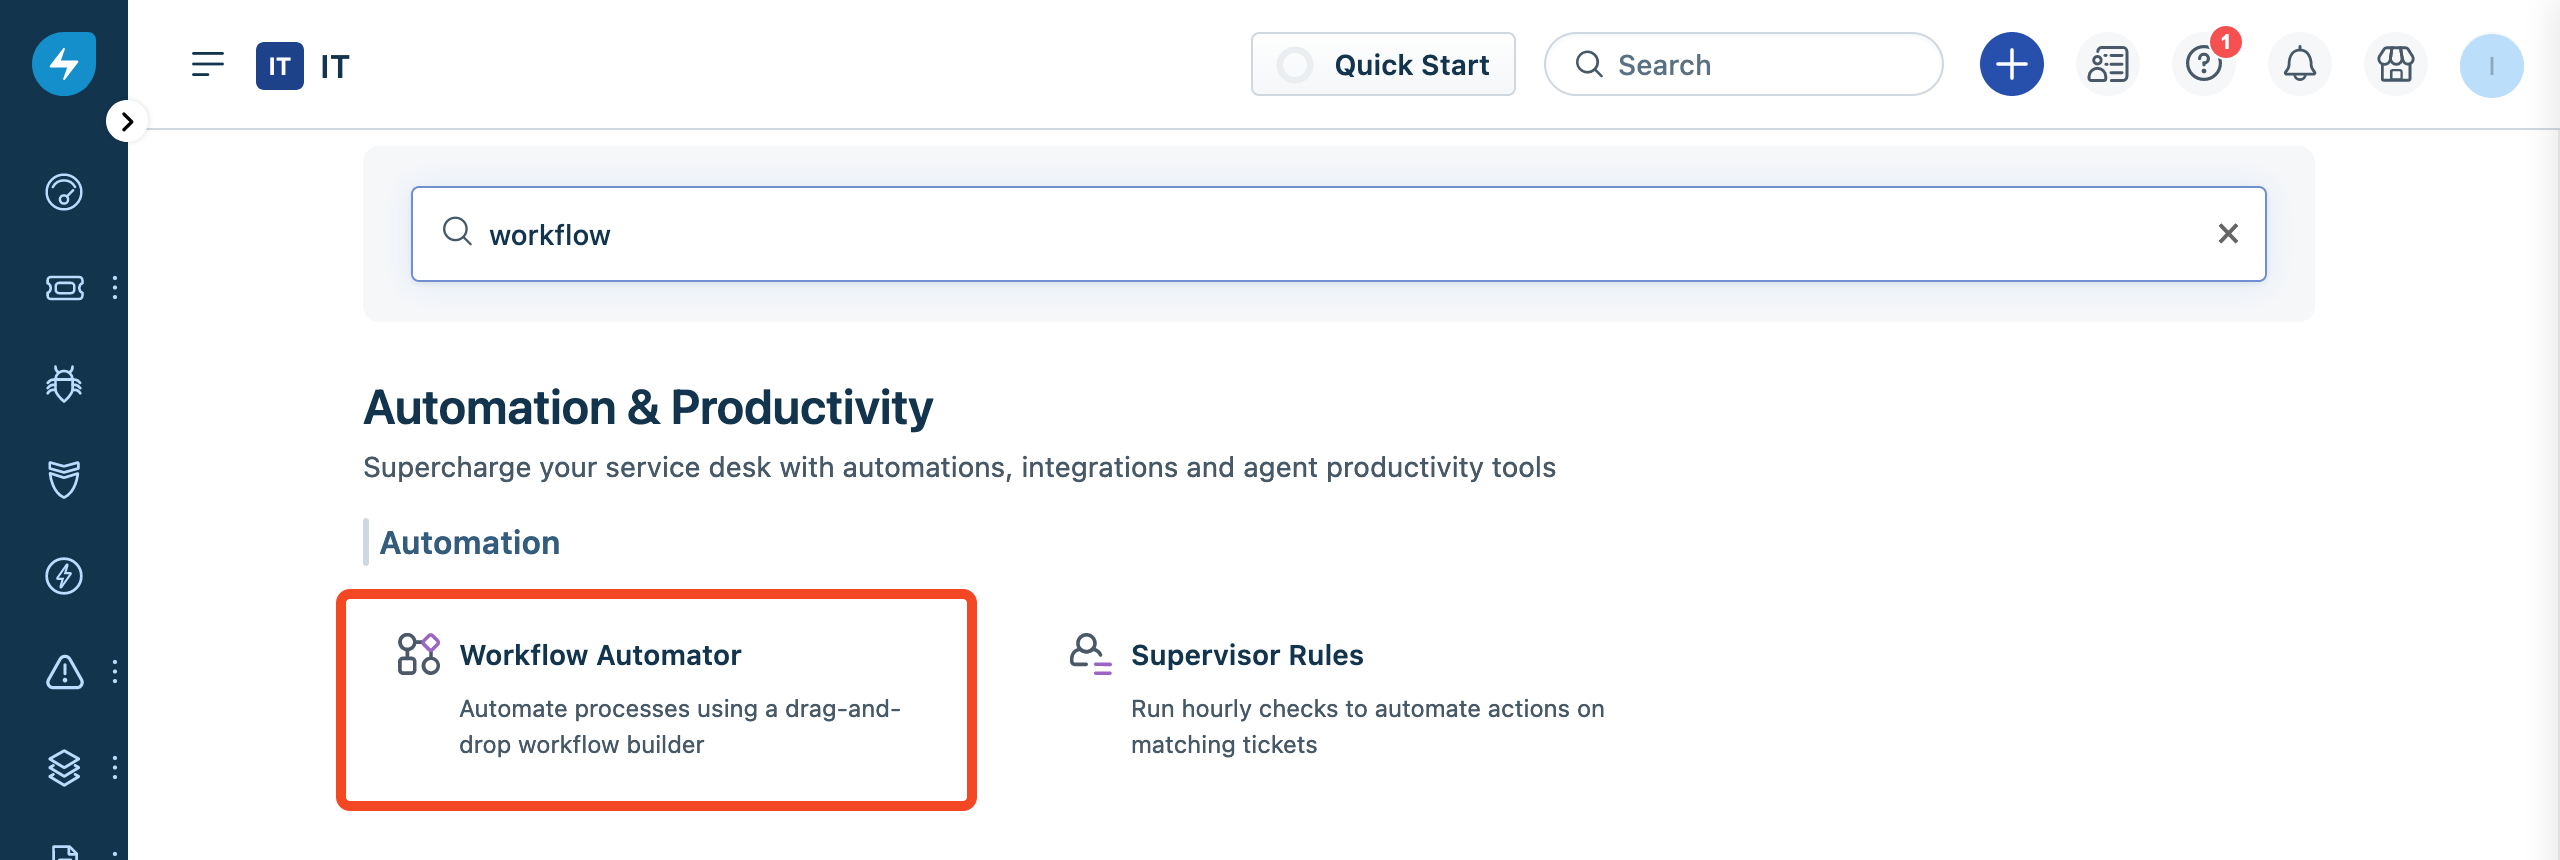
- On the Workflow Automator page, select New Workflow, followed by selecting the Event Based Workflow type.

-
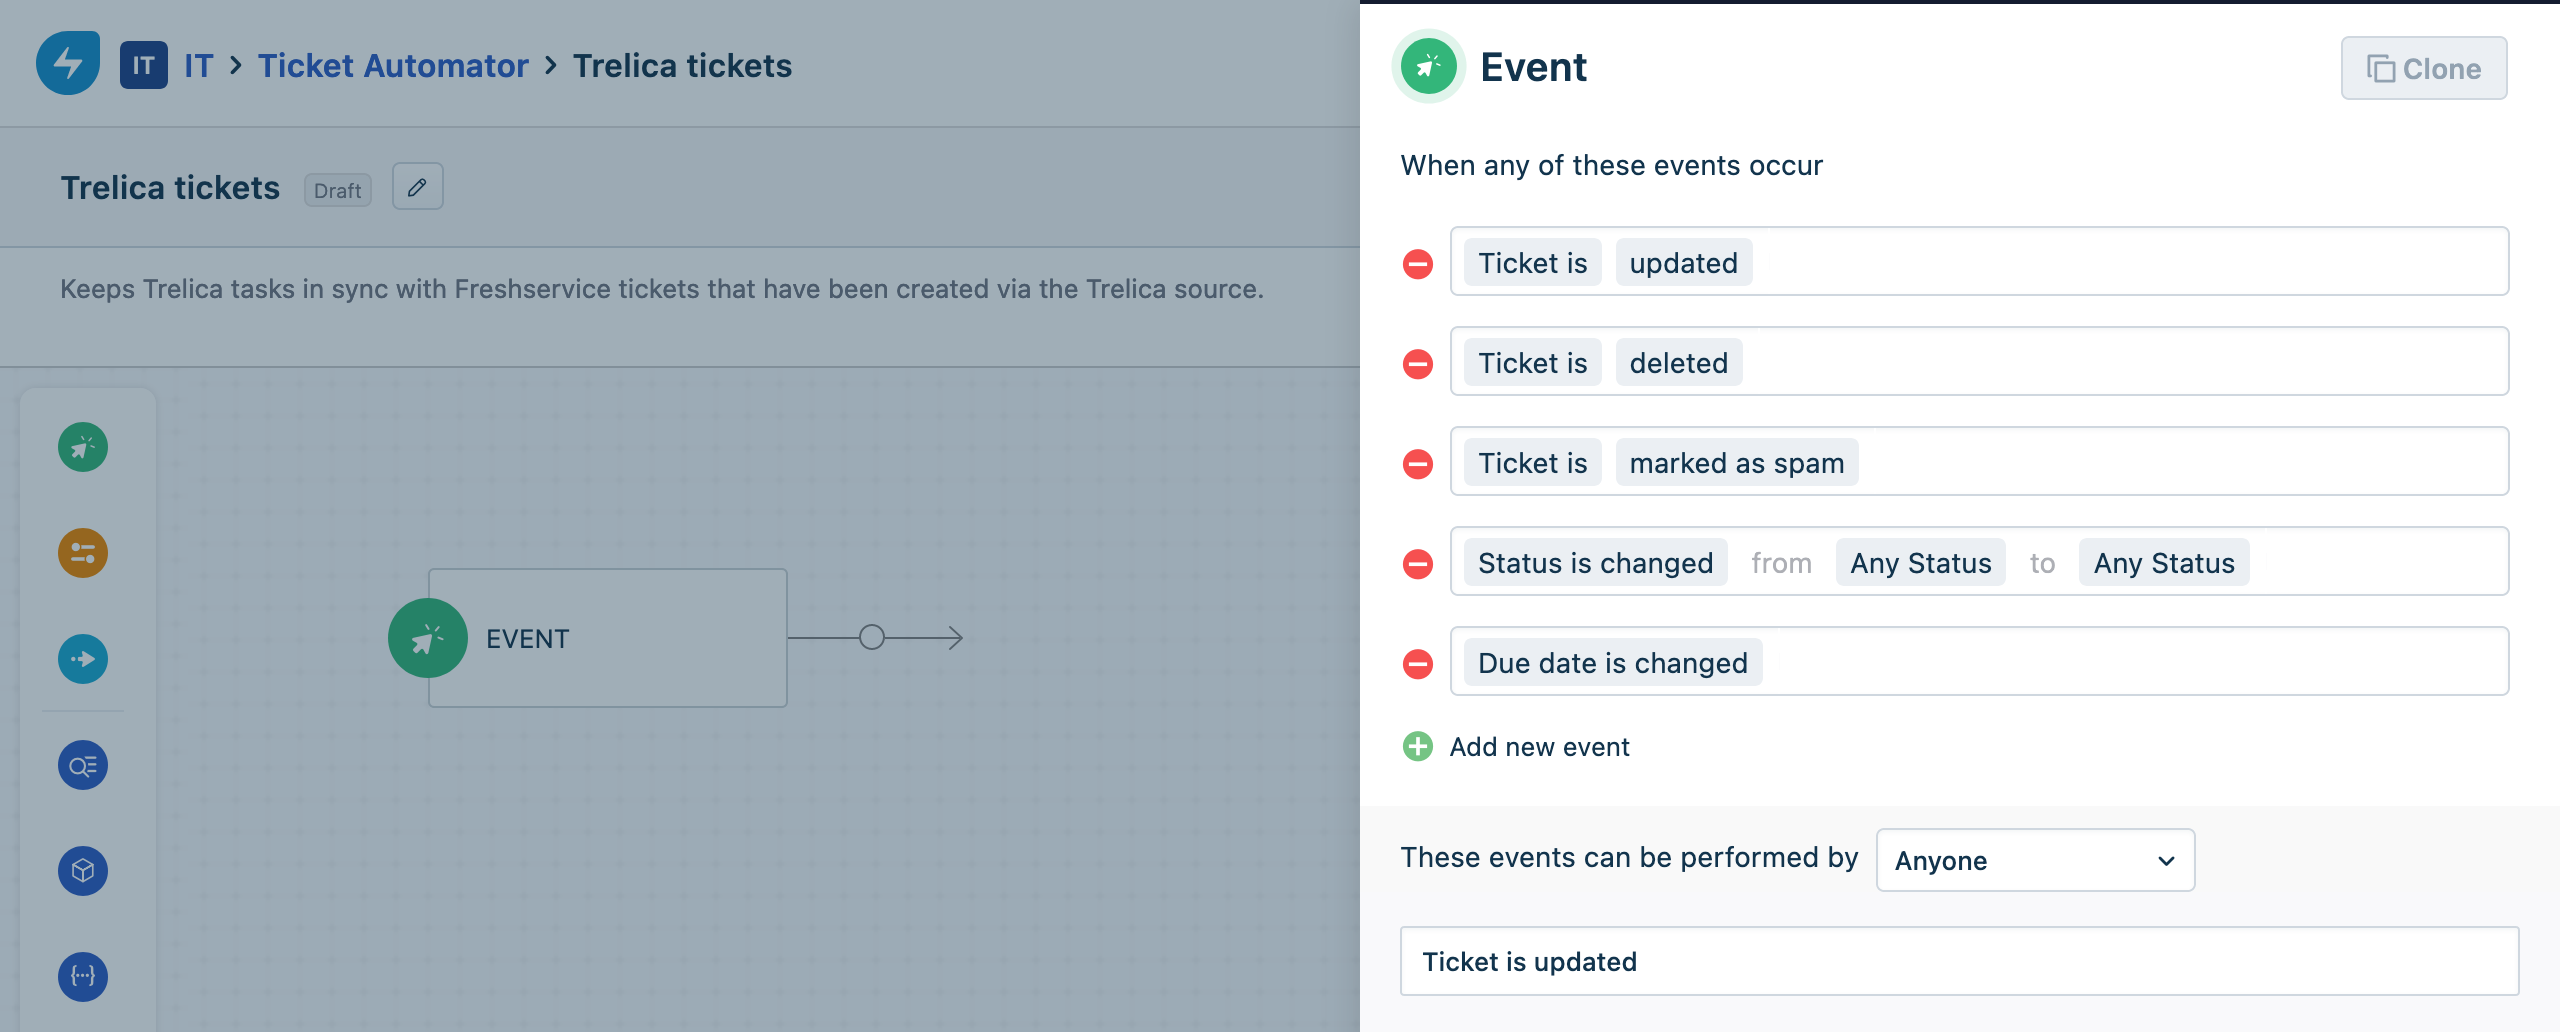
Name the workflow
SaaS Manager ticketsand select Tickets as the Module.We recommend an optional description like
Keeps SaaS Manager tasks in sync with Freshservice tickets that have been created via the SaaS Manager source.. -
Add the following events as triggers for the workflow:
-
Ticket isupdated -
Ticket isdeleted -
Ticket ismarked as spam -
Status is changedfromAny StatustoAny Status Due date is changed
-
- Drag and drop a Condition after the Event (this will be named "Ticket is updated" if you've left the name as the default) in the workflow and select
Ticket Fields.SourceisSaaS Manager.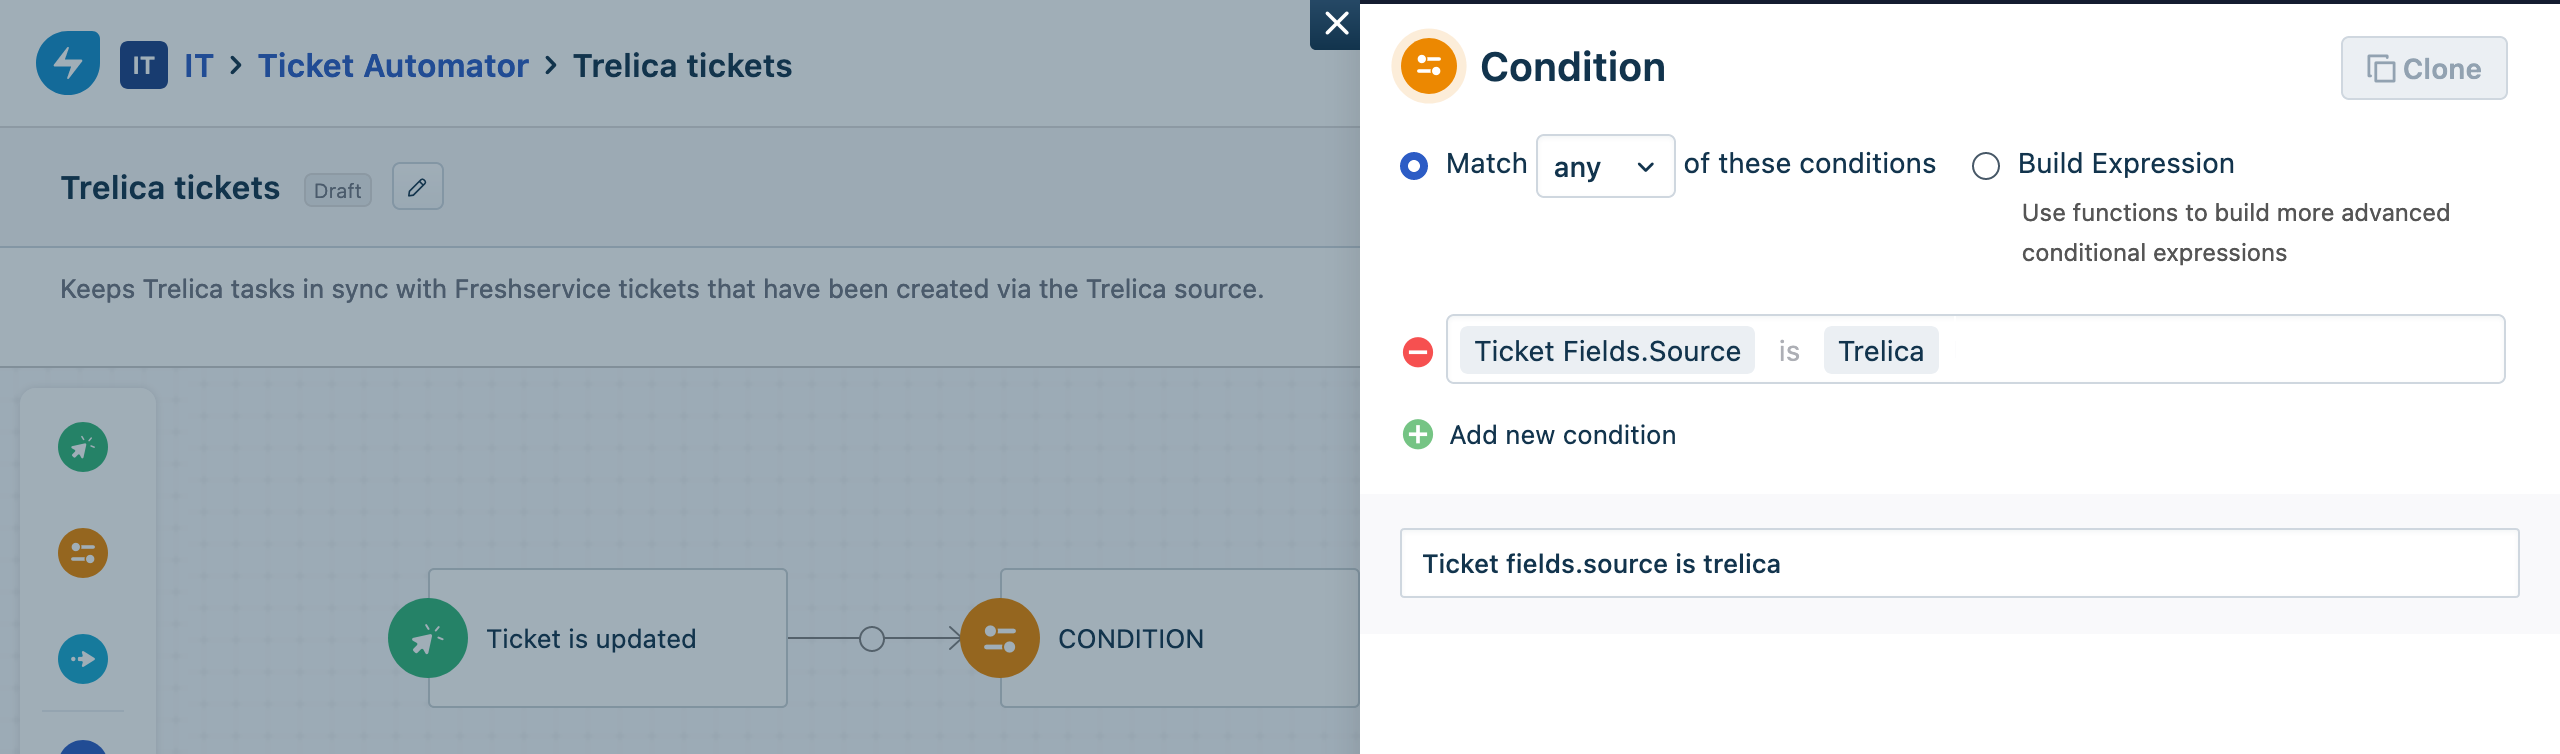
- Drag and drop an Action after the Condition and select Trigger Webhook.
- Select POST for the Request Type,
- Enter the Callback URL which you took from SaaS Manager. It will be something like:
https://app.trelica.com/IntegrationsApi/Integrations/123a4567891bc234d5ef6a78/Hooks/TicketUpdated.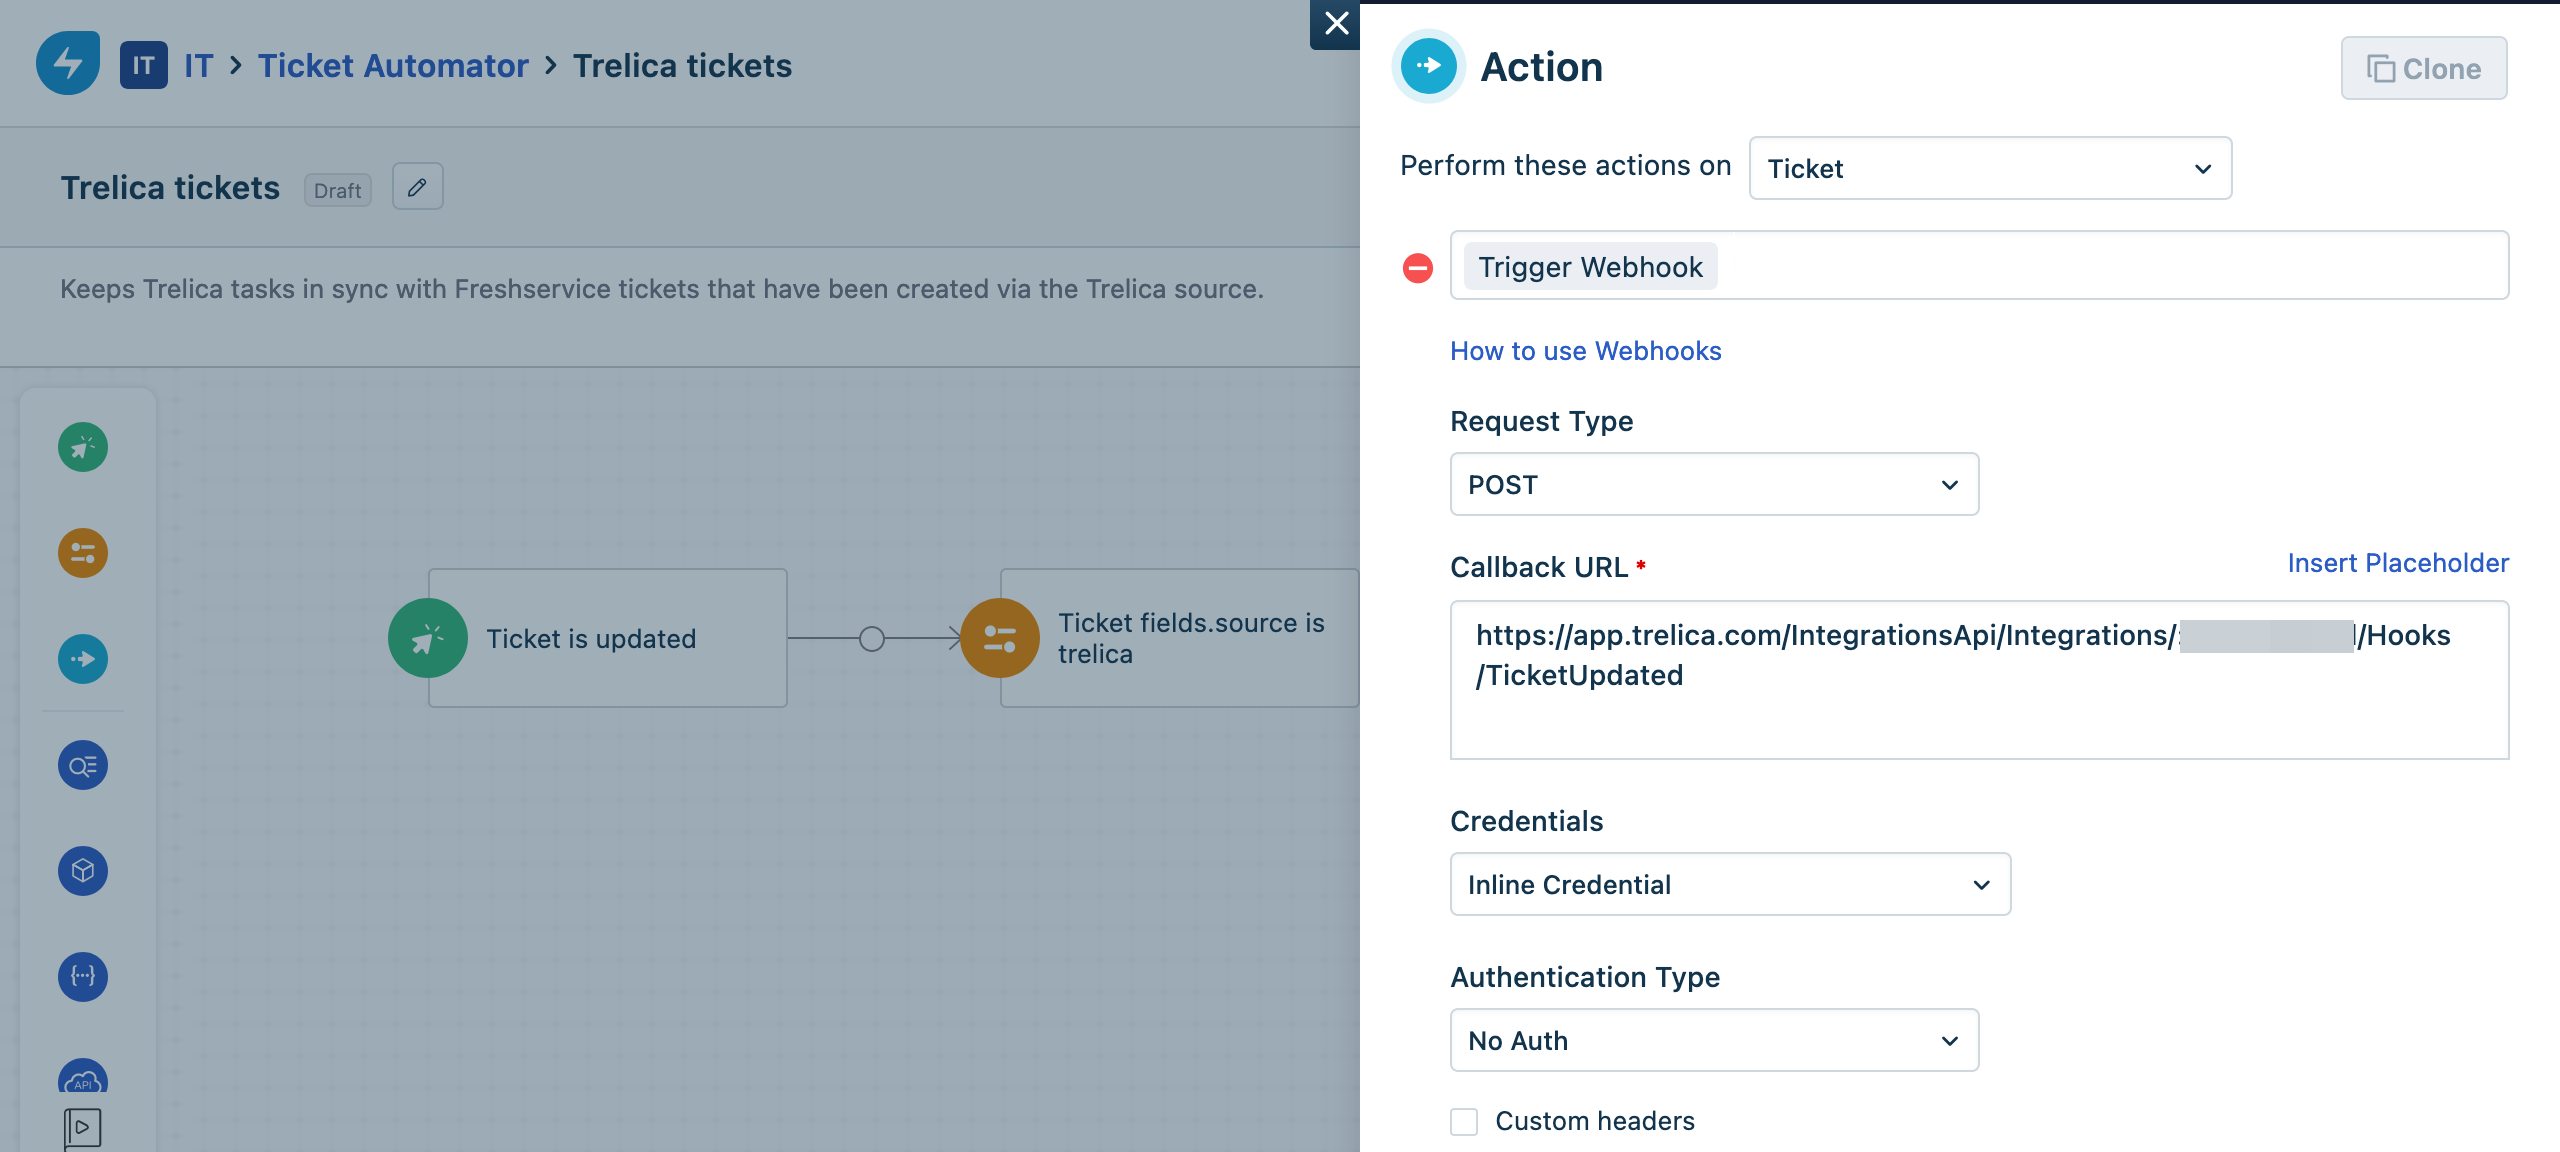
- Select Credentials > Inline Credentials, and No Auth for the Authentication Type.
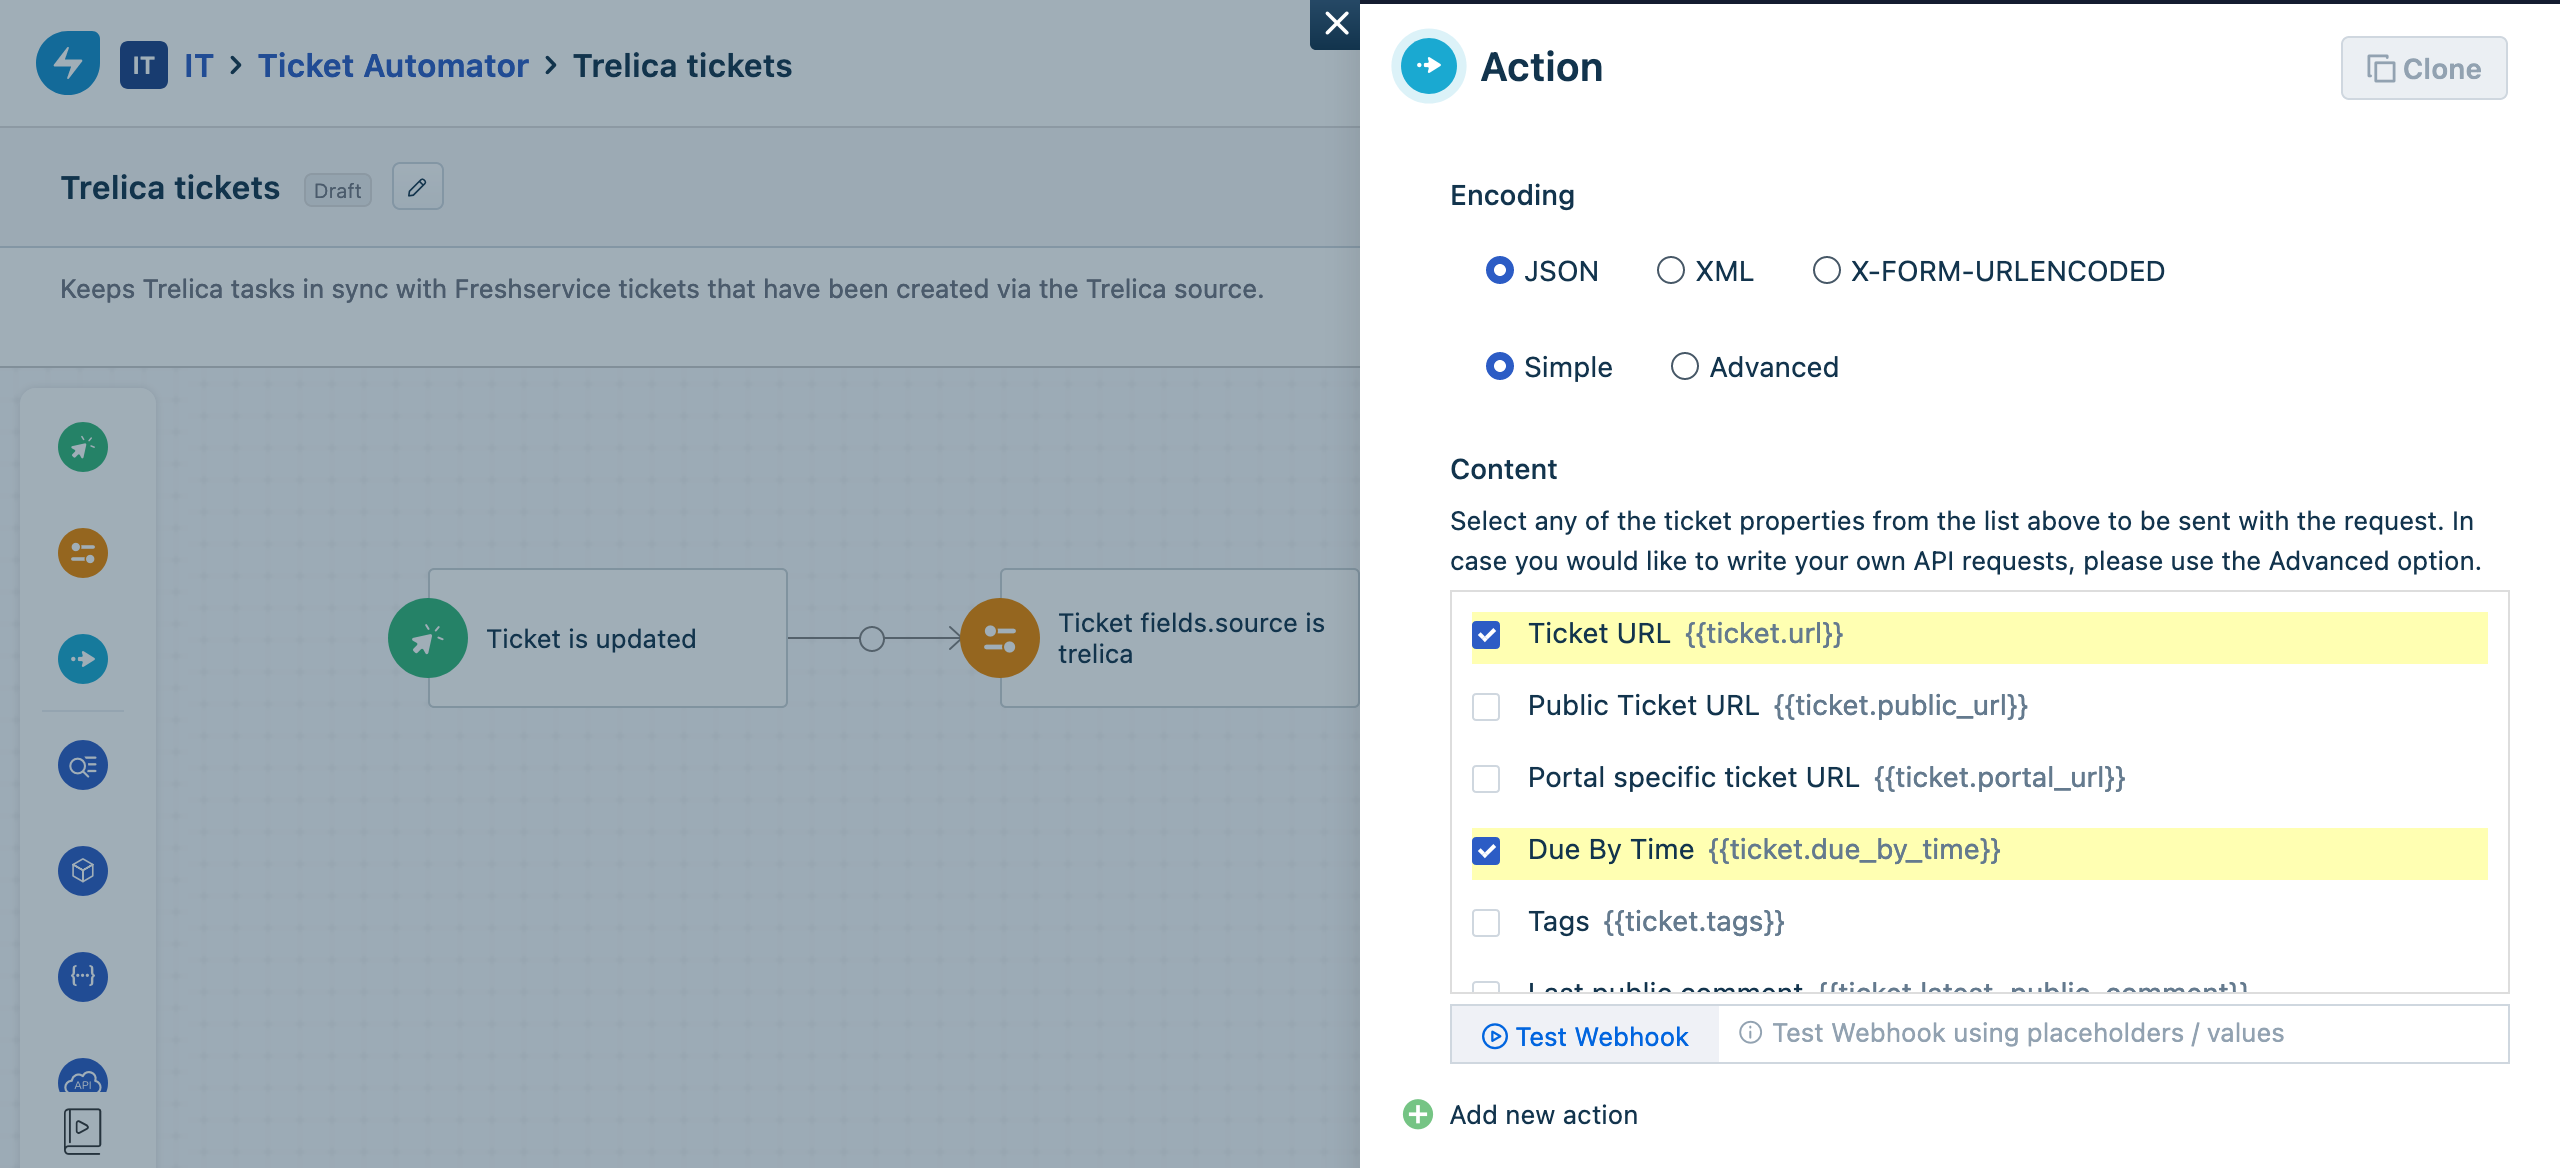
- Set Encoding to JSON and Simple
-
Select the following properties for Content:
- Ticket URL
- Due By Time
- Ticket ID (numeric)
- Status
- Source
- Set the label to
Update SaaS Managerand select Done. -
Once you have configured the event and action, select Activate on the workflow to ensure it's enabled.
Note that you'll want to Deactivate or Delete the workflow you've created if you disconnect the SaaS Manager integration.
Initiate a workflow from a Freshservice ticket
Much of the configuration for initiating a workflow from a Freshservice ticket is the same as that for keeping tickets in sync, but there are some important differences. Your exact configuration will depend on the ticket type and workflow process you are trying to implement. The following guide is based on using a Service Request ticket to initiate an offboarding workflow for an employee.
In SaaS Manager
Create a workflow with trigger type API Webhook. Note the URL on the trigger step - this will be used as the callback URL when configuring your workflow automation in Freshservice.
In Freshservice
- Create an Event Based workflow automation, as described in the steps above for sync'ing Freshservice tickets.
- For an offboarding workflow select the Event trigger as
Service Request is Created. - Add a Field Condition that that will apply an appropriate filter to limit the workflow to service request tickets that are used for offboarding (for example, using the ticket title).
- Drag and drop an Action after the Condition and select Trigger Webhook.
- Select POST for the Request Type,
- Enter the Callback URL from the SaaS Manager workflow API Webhook trigger step.
- Select Credentials > Inline Credentials, and No Auth for the Authentication Type.
- If you want to apply additional security to your webhook messaging configure Custom Headers. Learn more about sending a secret in a webhook header.
- Set Encoding to JSON and Advanced
-
In the input field you can now define the JSON message structure that will be sent. Use dynamic placeholders to help you add the correct fields. It might look something like this:
{
  "fields": {
    "email": "{{ticket.offboarding_request.actor_1.cf_employee_email}}",
    "leaveDate": "{{ticket.offboarding_request.actor_1.cf_last_working_date_date_iso}}",
    "lineManager": "{{ticket.offboarding_request.actor_1.cf_line_manager_email}}",
    "ticketId": "{{ticket.id_numeric}}"
  }
}
Note, including
ticket.id_numericis useful if you want to update the originating Freshservice ticket as part of your SaaS Manager workflow. - Select Done.
- Remember to Activate the workflow when you are ready.
In SaaS Manager
- In your workflow (assuming the new workflow is linked to a person) set the Context as
Person. - Select Type as
Email. - Enter the JSON (per the same webhook JSON above) as
field.email. - Add input fields for each attribute in the inbound JSON message that you want to use as a value in the workflow. e.g., name
Leave dateand IDleave_date, with the JSON pathfield.leave_date
Once created, input fields will be available for selection as variables on various other SaaS Manager workflow steps. - Configure the rest of your SaaS Manager workflow, and when you are ready Enable it (unless the workflow is enabled it will not receive webhook requests from Freshservice).
Useful Freshservice articles
- Freshservice API authentication
- Understanding Full-Time vs. Occasional agents
- What happens when you deactivate an agent?
- What happens when you forget an agent?
- Triggering a webhook via the Workflow Automator
FAQ
How do I limit SaaS Manager access to Freshservice?
API access is restricted to the permissions of the Freshservice user.
Go to Global Settings > Roles > Edit Role
Under the Tickets section select:
Agent can:
| ✓ | View tickets | ||||
| ✓ | Send reply to a ticket | ||||
| ✓ | Forward a conversation | ||||
| ✓ |
Edit notes
|
||||
| ✓ | Delete a conversation | ||||
| ✓ | Merge / split a ticket | ||||
| ✓ |
Edit ticket properties
|
||||
| ✓ |
Create and Edit Tasks in Tickets
|
||||
| ✓ | Delete a ticket |
Admin can:
| ◉ | Perform Operational Admin actions | ||||||
| ✓ |
View Agents and Agent groups
|
||||||
| ✓ |
View Requesters
|
Creating a Freshservice task error with 'Validation failed: {field_id} - It should be of type {data_type}'
This means there is a field that is mandatory for Agents when creating a ticket that is not available in the SaaS Manager UI. Tickets created via the Freshservice API are treated as though they are being raised by an Agent in the Freshservice UI. To work around this restriction you can add a Business Rule to make the field(s) in question non-mandatory for the user that has connected the Freshservice integration in SaaS Manager.
To create a Business Rule navigate to Admin > Business Rules for Forms in Freshservice.
- Select Create New Rule
- You must check Enforce System Wide in the Advanced Settings for the rule to apply to API requests
- The example below makes the field "Group" non-mandatory for tickets raised by a specific user:

Remember to enable the rule on saving (rules are not enabled automatically if you just select Save).
Comments
0 comments
Please sign in to leave a comment.